Archived
Understanding API-Based Platforms: A Guide For Product Managers

Understanding API-Based Platforms: A Guide For Product Managers
Understanding API-Based Platforms: A Guide For Product Managers
Michał Sędzielewski
2019-01-29T13:00:57+01:00
2019-01-29T11:53:08+00:00
To build a digital product today is to integrate the myriad of various back-office systems with customer touchpoints and devices. The cost of engaging a software team to connect them in a single working solution might sky-rocket.
This is why modern product managers, when choosing vendors, often put integration capabilities in the first place which may come down to choosing systems exposing API. What’s the API and how to test it without engaging your tech team? Read on.
Embrace The Data: Why We Need APIs At All
Customer data change how the business operates. If properly collected and shifted around, they can help companies shoot up customer acquisition and retention rates, leading eventually to a burst in income.
But data crunching is a tedious job. That’s why business tapped into computer science. In the 1990s, the databases which automated the most time-consuming data tasks became massively popular across marketing departments. This led to a massive shift in how marketing strategies were conceived — that shift was called the data-driven approach.
Databases had a major con, though. To make them something of value, a company needed to hire software engineers. They were the heroes who knew how to turn huge piles of data into working insights. They were also the guards protecting data integrity and thus making sure the system was future-proof.
But software engineers cost a lot, and their communication interface required effort.
When the number of data collection channels spanned over several departments and even external companies, databases and their operators became a bottleneck. Businesses needed to find an automated way of accessing data stores.
This is how the idea of API-first systems originated.
Getting workflow just right ain’t an easy task. So are proper estimates. Or alignment among different departments. That’s why we’ve set up “this-is-how-I-work”-sessions — with smart cookies sharing what works well for them. A part of the Smashing Membership, of course.
Explore Smashing Membership ↬
What The API Actually Is Without The Tech Lingo
API-first systems, today commonly shortened as API (Application Programmable Interface), are the applications which ensure that other systems can access their data in a unified and secure way.
Without a computer science grade, Application Programmable Interface doesn’t really ring a bell. Let’s have a look at a more tangible explanation.
One of the best analogies I’ve found in the web so far has been written by Taija:
“If you go to a restaurant as a customer, you are not allowed to enter the kitchen. You need to know what is available. For that, you have the menu. After looking at the menu, you make an order to a waiter, who passes it to the kitchen and who will then deliver what you have asked for. The waiter can only deliver what the kitchen can provide.
Best API analogy I’ve seen: take a restaurant. The menu is the API, your order is the API call, the food from the kitchen is the response.
— Aarthi 發財 ! (@AarthiD) 19. Dezember 2013
How does that relate to an API? The waiter is the API. You are someone who is asking for service. In other words, you are an API customer or consumer. The menu is the documentation which explains what you can ask for from the API. The kitchen is, for example, a server; a database that holds only a certain type of data — whatever the buyer has bought for the restaurant as ingredients and what the chef has decided they will offer and what the cooks know how to prepare.”
So again:
- Kitchen
The database, no customers allowed to protect data integrity. - Waiter
The API, a middleman that knows how to serve data from the database without disrupting its functioning. - Customer
An external system that wants to get their data - Menu
The data format reference the external systems have to use to perform their operation. - Order
An actual single API call.
With the current state of technology, it still takes a software developer to “make an order.” But it’s way faster (read: cheaper) because the menu, like McDonald’s, is more or less standardized across the world.
So now, we’re going to wear a software developer’s shoes and try to call an exemplary API. Don’t worry; we’re not going to go beyond school computer science classes.
How Your Weather App Gets The Data: API Basics
We’re going to find out how your weather app knows the current temperature. In this way, we’ll get the basics of how to communicate with systems over the internet.
What we need:
- A weather database
- A browser
- A dash of willpower
That’s it! Today’s technology makes it easy to test the API without the need for big developer tools.
Of course, that’s different when you want to create a full-blown integration. When push comes to shove, you need to know more advanced tools and programming languages, but for testing/proof of concepts, this setup is enough.
So, let’s try to get the current temperature index for your city — or, in the parlance of coders — let’s invoke the first API call. After all, it boils down to sending some text to a server and receiving a message in exchange.
The Anatomy Of An API Request
In this article, we’ll be using the https://openweathermap.org API. Visit the site and try checking weather conditions in several locations. Hopefully, you’re feeling better than me in Katowice today:
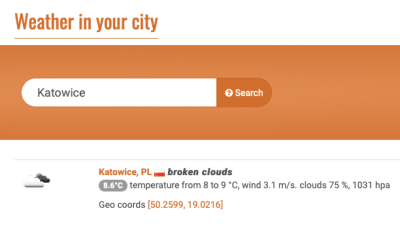
Open Weather Map API widget (Large preview)
As you might have guessed, the website is calling the API to get the data. Developers implemented it in a way that every time you press search, behind the scenes the application knocks the API’s door and says “give me temperature.”
Let’s put on a hacker hat and see the API calls this website is calling with your browser. You can use Developer Tools in your Browser to see what’s happening behind the scenes:
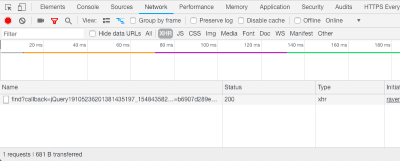
Requests monitor in Chrome Developer Tools (Large preview)
If you copy the link, you can see it includes the location name and a couple of other parameters.
https://openweathermap.org/data/2.5/find?callback=jQuery19103887954878001505_1542285819413&q=Katowice&type=like&sort=population&cnt=30&appid=b6907d289e10d714a6e88b30761fae22&_=1542285819418
jQuery19103887954878001505_1542285819413({"message":"accurate","cod":"200","count":1,"list":[{"id":3096472,"name":"Katowice","coord":{"lat":50.2599,"lon":19.0216},"main":{"temp":281.69,"pressure":1031,"humidity":61,"temp_min":281.15,"temp_max":282.15},"dt":1542285000,"wind":{"speed":3.6,"deg":50},"sys":{"country":"PL"},"rain":null,"snow":null,"clouds":{"all":90},"weather":[{"id":804,"main":"Clouds","description":"overcast clouds","icon":"04d"}]}]})
{
   "message":"accurate",
   "cod":"200",
   "count":1,
   "list":[
      {
         "id":3096472,
         "name":"Katowice",
         "coord":{
            "lat":50.2599,
            "lon":19.0216
         },
         "main":{
            "temp":281.69,
            "pressure":1031,
            "humidity":61,
            "temp_min":281.15,
            "temp_max":282.15
         },
         "dt":1542285000,
         "wind":{
            "speed":3.6,
            "deg":50
         },
         "sys":{
            "country":"PL"
         },
         "rain":null,
         "snow":null,
         "clouds":{
            "all":90
         },
A word of explanation of what we’ve just done here.
The web application behind the Open Weather Map website takes the data from the API and displays it on the website.
Every time you type the city name and press search, the website connects to a server with a specific link which includes the name of the city as a parameter.
The same sentence in the tech jargon: the application behind the website sends a request to an API endpoint providing the name of the city as an argument.
Then, the API replies (sends an API response) with a text message formatted as JSON.
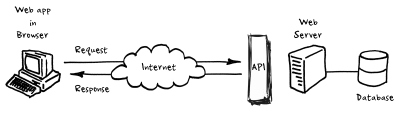
Webapp Database diagram (Large preview)
To create an API request you need to put together its address. Yeah, the address is a good analogy. To ship something you need to provide the courier with:
- City,
- Street and number,
- Sometimes some extra information on how to get to your office.
And, to connect to the API, by analogy, you need:
https://openweathermap.org/(link)
The city or root-endpoint — a starting point, an internet address of a server you want to connect to, in our case.data/2.5/find(link)
The street number or the path — determines the resource you want to get from an API.?callback=jQuery19103887954878001505_1542285819413&q=Katowice&type=like&sort=population&cnt=30&appid=b6907d289e10d714a6e88b30761fae22&_=1542285819418(link)
The extra info or the query parameters — let the API server know what we want to get in particular and what structure and order the data should have.
This is how APIs are designed. The root-endpoint usually stays the same for a single vendor, then you need to figure out what path and query parameters are available and what information the API development team put behind them.
Now let’s put the hacker hat a bit tighter. In our case, not all query parameters are necessary to get the weather data. Try removing different parameters after the question mark (?) and check how the Weather API replies.
For example, you can start by removing callback from the request link:
https://openweathermap.org/data/2.5/find?callback=jQuery19103887954878001505_1542285819413&q=Katowice&type=like&sort=population&cnt=30&appid=b6907d289e10d714a6e88b30761fae22&_=1542285819418
The result:
https://openweathermap.org/data/2.5/find?q=Katowice&type=like&sort=population&cnt=30&appid=b6907d289e10d714a6e88b30761fae22&_=1542285819418
If you play around with the other ones, you can see that some of them are optional too. Actually only q and appid are mandatory:
https://openweathermap.org/data/2.5/find?q=Katowice&appid=b6907d289e10d714a6e88b30761fae22
How do you know what’s mandatory and what’s optional? How do you know where to get the root-endpoint and path in the first place?
API Documentation: A Must-Read Before You Start
You always need to check the API documentation first to learn how to construct your request the right way.
In our case, the documentation https://openweathermap.org/current shows the available endpoints. It also explains all response data fields — so you can find what information the API will reply even before you even send a request.
A good API documentation offers quick start tutorials on how to create simple requests and moves on to more advanced stuff. Fortunately, the Open Weather API has one and we’re going to use it now.
Creating An API Call From Scratch
Let’s sum up our findings. We’ve already sent a request to the API. We’ve figured out the correct link by sniffing what OpenWeatherMap does behind the scenes. This approach is called reverse-engineering and it’s often hard or not possible at all.
Moreover, most of the times, API providers ban users from over-using this option. That’s why we should learn how to “call” the API by the rules (meaning — documentation).
One way to do this is to code it. But as we’re not coders (yet!), we’re going to use tools that make this easier. So much easier that even software developers have it under their toolbelt.
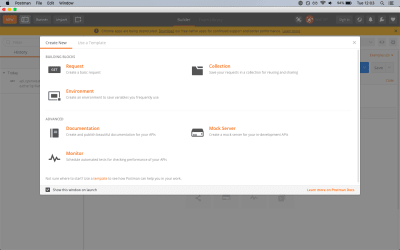
As promised, we won’t leave the browser. But we need to install an extension (Chrome only) — Postman. This simple plugin turns your browser into an API connector.
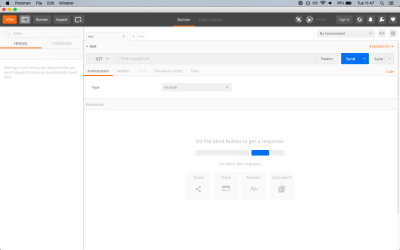
Postman main view (Large preview)
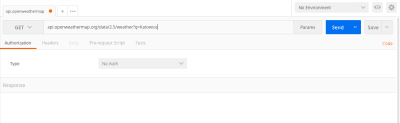
OK, now that we have a tool, let’s take a look into the documentation to see how we can get current weather conditions for a specific city name https://openweathermap.org/current#name.
The docs say we should use the following endpoint: api.openweathermap.org/data/2.5/weather?q={city name}
When we break it down we get the following elements:
- Root-endpoint:
api.openweathermap.org - Path:
data/2.5/weather - Query parameter:
q={city name}(this notion means that we should replace the braces with a specific city name)
Let’s put it into Postman. The process boils down to three easy steps:
Postman new request view (Large preview)
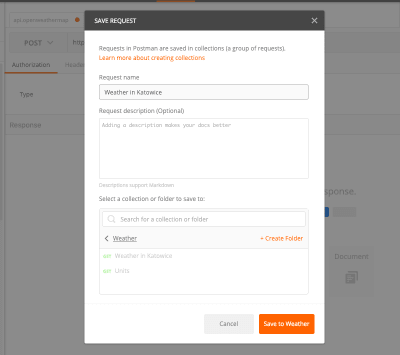
Postman request name view (Large preview)
Sending the first request with Postman (Large preview)
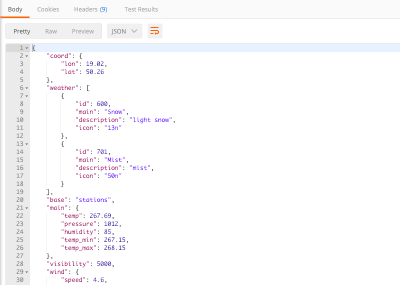
Congrats! You’ve just successfully called your fir… wait a second! Let’s pay attention to the API response:

Invalid response example (Large preview)
It’s not a JSON filled with weather information we’ve seen before. What do the 401 and Invalid API key mean at all? Is our documentation wrong?
Authentication
You wouldn’t let anybody access your cocktail cabinet without your permission, would you? By the same token, API providers also want to control the users of their product to protect it from malicious activity. What’s malicious activity? For example, sending many API requests at the same time, which will “overheat” the server and cause downtime for other users.
How can you control the access? The same way as you guard your drinks! By using keys — API keys.
If you visit the How to start guide from Weather API documentation, you’ll notice how you can get your key. Sign up now and check your inbox.
So now the question is how to use the key? It’s easy, according to the docs, just copy and paste the key at the end of your endpoint URL (without braces).
api.openweathermap.org/data/2.5/weather?q=Katowice&appid={your API key}
And click send again. Here you go, we can now see the API response! 🙌
Successful response from Open Weather Map API (Large preview)
But there’s much more you can get from the API using Postman. Ready to become a true API hacker?
API parameters: Getting Tailored Responses
Usually, API endpoints have some utility features you can use to adjust the API response, e.g. if you need a better data format or you want to get the data in a particular order. These options are often hidden behind some parameters you can find in the documentation.
Query parameters are just a structured text you add at the endpoint address with the following pattern:
?) after the path,=) symbol,&) and others follow with points 2-4 (in this way you can add as many parameters as you want).Take our first request as an example:
https://openweathermap.org/data/2.5/find?q=Katowice&appid=b6907d289e10d714a6e88b30761fae22
Important note: The order of query params doesn’t matter.
?q=Katowice&appid=b6907d289e10d714a6e88b30761fae22
The above is the same as the following:
?appid=b6907d289e10d714a6e88b30761fae22&q=Katowice
As mentioned, query params are described in API docs. The following excerpt from the weather API documentation shows you how to get the temperature in different units (imperial or metric):
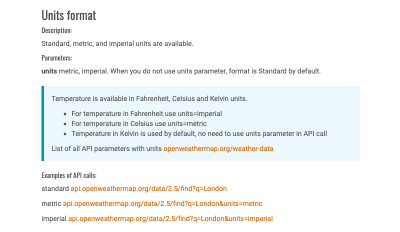
OpenWeatherMap API documentation excerpt (Large preview)
Try sending these two options with Postman to see the difference in results. Remember to add your API key at the end of the endpoint address.
Note: Always take some time to study the documentation and find parameters which can save you or your development team some serious time.
API Request Options: How To Send Data To The API
So far, we’ve been getting information from the API. What if we want to add or modify information in the database behind the API? Request methods are the answer.
Let’s take a look at Postman once again. You might have noticed an upper-case GET label next to the API endpoint address. This represents one of four request methods. GET means we want to get something from the API (thanks captain) and it’s a default option. What are the other options?
Method Name
What it does with the API
GET
The API looks for the data you’ve requested and sends it back to you.
POST
The API creates a new entry in the database and tells you whether the creation is successful.
PUT
The API updates an entry in the database and tells you whether the update is successful.
DELETE
The API deletes an entry in the database and tells you whether the deletion is successful.
Still confusing? Let’s move to examples.
API POST: How To Create A Record In The API
We can’t create or update anything with Weather API (because it’s meant to be read-only), so we need to find a different one for testing purposes.
Let’s come up with some more business-oriented example. We’re going to simulate the following scenario:
If it’s rainy, create a “cheer up” discount coupon for your customers.
We’re going to use Voucherify which provides an API for creating and tracking promotions for any e-commerce system.
Disclaimer: I’m a co-founder of Voucherify. I’m happy to answer your questions about designing and implementing digital promotions, and about our API of course. 🖐
We already know how to get them from the previous example, so let’s focus on creating a voucher:
Note: Instead of creating an account, you can use the test keys from the quick start guide — we’ll show you how in a minute.
/vouchers endpoint. 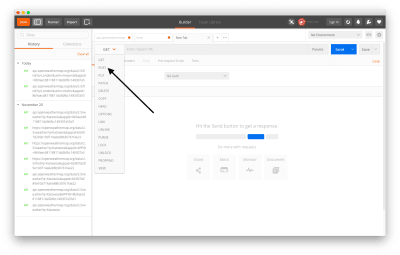
Postman – API methods selection (Large preview)
https://api.voucherify.io/v1/vouchers/ and click Send.
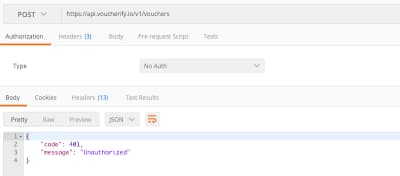
Missing credentials (Large preview)
Voucherify has a slightly different way of doing so. Instead of putting them as query params, you should put them to Headers. This is a common approach because it’s easier to implement and maintain keys this way rather than append them as query params.
Add the keys as in the picture and click Send. Notice that Voucherify requires two keys. Here the ones you can use for the purpose of this tutorial:
X-App-Id: 8a824b12-0530-4ef4-9479-d9e9b9930176
X-App-Token: 9e322bac-8297-49f7-94c8-07946724bcbc
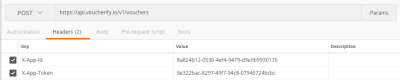
Providing API keys in Postman (Large preview)
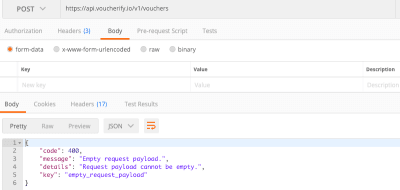
Voucherify API returns error code 400 (Large preview)
What the heck is a payload? As in the case of GET we want to retrieve some information, with POST we need to send something and the message we send is called the payload and it’s usually a JSON file.
Now Voucherify API is complaining that we didn’t provide one, which means that it cannot create a voucher because we didn’t tell what kind of voucher it should create. So what now? Back to the docs!
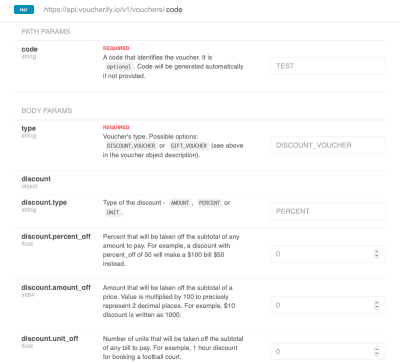
Voucherify API documentation excerpt (Large preview)
One parameter (type) is required and another optional. Let’s say it’s going to be a 20% off discount, available for the first 100 customers, expiring today. Now we need to find parameters responsible for this discount features and put them together into a format understable to Voucherify API. As you can see in the examples above, the JSON notation you should use looks like this:
{
    "type":"DISCOUNT_VOUCHER",
    "discount":{
        "percent_off":20.0,
        "type":"PERCENT"
    },
    "expiration_date":"2018-12-03T23:59:59Z",
    "redemption":{
        "quantity":100
    }
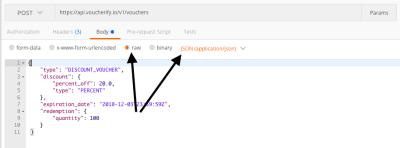
POST method in Postman (Large preview)
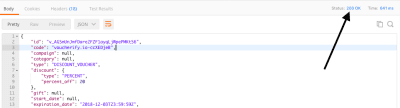
Voucherify returns 200 OK (Large preview)
But how do we know it is a successful request? First of all, we can see that Voucherify has sent us a message which, according to their docs, looks like a correct API response. Secondly, Postman displays the status 200 OK — which means our request is successful. Why 200 and what’s the status?
API Status Codes And Error Messages
Most of the APIs you’ll ever interact with will be HTTP-based. The HTTP is a protocol which standardizes communication between various client applications and servers on the Internet.
One of the key elements of HTTP is status codes. By understanding the status code you (or actually systems you implement) can immediately tell what’s happened to your request. Chances are you faced one of the most popular status codes when you typed the wrong link — 404

Voucherify 404 error code (Large preview)
But there are many more and end-users usually don’t see them. They range from 100+ to 500+. In general, the numbers follow the following rules:
- 200+ means the request has succeeded;
- 300+ means the request is redirected to another URL;
- 400+ means an error that originates from the client application has occurred;
- 500+ means an error that originates from the server has occurred.
If you could go through the steps once again, you would see that Voucherify replied with 401 Unauthorized when we didn’t provide API keys. Or 400 Bad Request when there was no payload which is required for Create Voucher request. Finally, we received 200 as a token of a successful API call.
If you’re curious about HTTP status codes meaning, there’s no better place than HTTP Cats (or this article maybe). 🙃

HTTP Cats 401 (Large preview)
Summary
The growing amount of data and the need for speed in building products pushed APIs to become the lingua franca of digital teams. To design systems based on API-first systems, make sure you understand the vendors’ offerings. This hands-on testing guide is a good starting point in doing so. It will help you explore the API capabilities even before you throw it to your teaching team, saving their energy — and yours as well.
Further Reading
- “An Introduction To E-Commerce APIs For Non-Developers,” Scott Brinker
- “Go Beyond Headless CMS — Meet Headless Commerce,” Michał Sędzielewski, Voucherify
- “How To Use API-First Platforms To Build Your Websites Faster,” Michał Sędzielewski, Medium
- “How To Use Your API-First Platform To Get Your Prototype Production-Ready,” Michał Sędzielewski, Medium
- “How To Use The Cloud To Build Applications Faster,” Michał Sędzielewski, Hacker Noon
![]()
(rb, ra, il)
From our sponsors: Understanding API-Based Platforms: A Guide For Product Managers


