Archived
Sharing Data Among Multiple Servers Through AWS S3

Sharing Data Among Multiple Servers Through AWS S3
Sharing Data Among Multiple Servers Through AWS S3
Leonardo Losoviz
2018-11-08T12:30:30+01:00
2018-11-08T12:30:20+00:00
When providing some functionality for processing a file uploaded by the user, the file must be available to the process throughout the execution. A simple upload and save operation presents no issues. However, if in addition the file must be manipulated before being saved, and the application is running on several servers behind a load balancer, then we need to make sure that the file is available to whichever server is running the process at each time.
For instance, a multi-step “Upload your user avatar” functionality may require the user to upload an avatar on step 1, crop it on step 2, and finally save it on step 3. After the file is uploaded to a server on step 1, the file must be available to whichever server handles the request for steps 2 and 3, which may or may not be the same one for step 1.
A naive approach would be to copy the uploaded file on step 1 to all other servers, so the file would be available on all of them. However, this approach is not just extremely complex but also unfeasible: for instance, if the site runs on hundreds of servers, from several regions, then it cannot be accomplished.
A possible solution is to enable “sticky sessions” on the load balancer, which will always assign the same server for a given session. Then, steps 1, 2 and 3 will be handled by the same server, and the file uploaded to this server on step 1 will still be there for steps 2 and 3. However, sticky sessions are not fully reliable: If in between steps 1 and 2 that server crashed, then the load balancer will have to assign a different server, disrupting the functionality and the user experience. Likewise, always assigning the same server for a session may, under special circumstances, lead to slower response times from an overburdened server.
A more proper solution is to keep a copy of the file on a repository accessible to all servers. Then, after the file is uploaded to the server on step 1, this server will upload it to the repository (or, alternatively, the file could be uploaded to the repository directly from the client, bypassing the server); the server handling step 2 will download the file from the repository, manipulate it, and upload it there again; and finally the server handling step 3 will download it from the repository and save it.
Getting workflow just right ain’t an easy task. So are proper estimates. Or alignment among different departments. That’s why we’ve set up “this-is-how-I-work”-sessions — with smart cookies sharing what works well for them. A part of the Smashing Membership, of course.
Explore Smashing Membership ↬
In this article, I will describe this latter solution, based on a WordPress application storing files on Amazon Web Services (AWS) Simple Storage Service (S3) (a cloud object storage solution to store and retrieve data), operating through the AWS SDK.
Note 1: For a simple functionality such as cropping avatars, another solution would be to completely bypass the server, and implement it directly in the cloud through Lambda functions. But since this article is about connecting an application running on the server with AWS S3, we don’t consider this solution.
Note 2: In order to use AWS S3 (or any other of the AWS services) we will need to have a user account. Amazon offers a free tier here for 1 year, which is good enough for experimenting with their services.
Note 3: There are 3rd party plugins for uploading files from WordPress to S3. One such plugin is WP Media Offload (the lite version is available here), which provides a great feature: it seamlessly transfers files uploaded to the Media Library to an S3 bucket, which allows to decouple the contents of the site (such as everything under /wp-content/uploads) from the application code. By decoupling contents and code, we are able to deploy our WordPress application using Git (otherwise we cannot since user-uploaded content is not hosted on the Git repository), and host the application on multiple servers (otherwise, each server would need to keep a copy of all user-uploaded content.)
Creating The Bucket
When creating the bucket, we need to pay consideration to the bucket name: Each bucket name must be globally unique on the AWS network, so even though we would like to call our bucket something simple like “avatars”, that name may already be taken, then we may choose something more distinctive like “avatars-name-of-my-company”.
We will also need to select the region where the bucket is based (the region is the physical location where the data center is located, with locations all over the world.)
The region must be the same one as where our application is deployed, so that accessing S3 during the process execution is fast. Otherwise, the user may have to wait extra seconds from uploading/downloading an image to/from a distant location.
Note: It makes sense to use S3 as the cloud object storage solution only if we also use Amazon’s service for virtual servers on the cloud, EC2, for running the application. If instead, we rely on some other company for hosting the application, such as Microsoft Azure or DigitalOcean, then we should also use their cloud object storage services. Otherwise, our site will suffer an overhead from data traveling among different companies’ networks.
In the screenshots below we will see how to create the bucket where to upload the user avatars for cropping. We first head to the S3 dashboard and click on “Create bucket”:
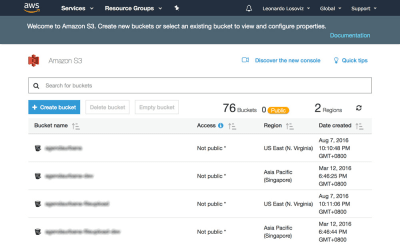
S3 dashboard, showing all our existing buckets. (Large preview)
Then we type in the bucket name (in this case, “avatars-smashing”) and choose the region (“EU (Frankfurt)”):
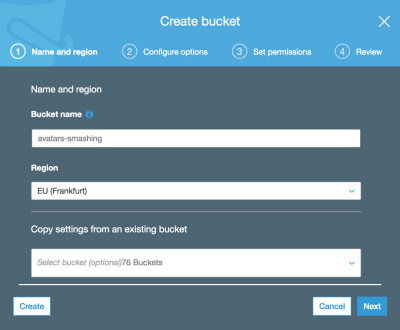
Creating a bucket through in S3. (Large preview)
Only the bucket name and region are mandatory. For the following steps we can keep the default options, so we click on “Next” until finally clicking on “Create bucket”, and with that, we will have the bucket created.
Setting Up The User Permissions
When connecting to AWS through the SDK, we will be required to enter our user credentials (a pair of access key ID and secret access key), to validate that we have access to the requested services and objects. User permissions can be very general (an “admin” role can do everything) or very granular, just granting permission to the specific operations needed and nothing else.
As a general rule, the more specific our granted permissions, the better, as to avoid security issues. When creating the new user, we will need to create a policy, which is a simple JSON document listing the permissions to be granted to the user. In our case, our user permissions will grant access to S3, for bucket “avatars-smashing”, for the operations of “Put” (for uploading an object), “Get” (for downloading an object), and “List” (for listing all the objects in the bucket), resulting in the following policy:
{
    "Version": "2012-10-17",
    "Statement": [
        {
            "Effect": "Allow",
            "Action": [
                "s3:Put*",
                "s3:Get*",
                "s3:List*"
            ],
            "Resource": [
                "arn:aws:s3:::avatars-smashing",
                "arn:aws:s3:::avatars-smashing/*"
            ]
        }
    ]
}
In the screenshots below, we can see how to add user permissions. We must go to the Identity and Access Management (IAM) dashboard:
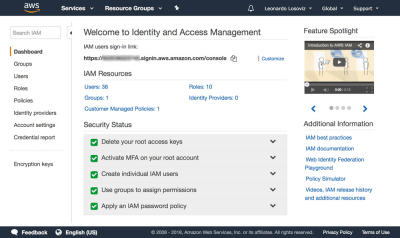
IAM dashboard, listing all the users we have created. (Large preview)
In the dashboard, we click on “Users” and immediately after on “Add User”. In the Add User page, we choose a user name (“crop-avatars”), and tick on “Programmatic access” as the Access type, which will provide the access key ID and secret access key for connecting through the SDK:

Adding a new user. (Large preview)
We then click on button “Next: Permissions”, click on “Attach existing policies directly”, and click on “Create policy”. This will open a new tab in the browser, with the Create policy page. We click on the JSON tab, and enter the JSON code for the policy defined above:
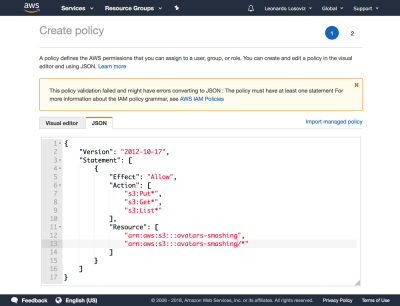
Creating a policy granting ‘Get’, ‘Post’ and ‘List’ operations on the ‘avatars-smashing’ bucket. (Large preview)
We then click on Review policy, give it a name (“CropAvatars”), and finally click on Create policy. Having the policy created, we switch back to the previous tab, select the CropAvatars policy (we may need to refresh the list of policies to see it), click on Next: Review, and finally on Create user. After this is done, we can finally download the access key ID and secret access key (please notice that these credentials are available for this unique moment; if we don’t copy or download them now, we’ll have to create a new pair):

After the user is created, we are offered a unique time to download the credentials. (Large preview)
Connecting To AWS Through The SDK
The SDK is available through a myriad of languages. For a WordPress application, we require the SDK for PHP which can be downloaded from here, and instructions on how to install it are here.
Once we have the bucket created, the user credentials ready, and the SDK installed, we can start uploading files to S3.
Uploading And Downloading Files
For convenience, we define the user credentials and the region as constants in the wp-config.php file:
define ('AWS_ACCESS_KEY_ID', '...'); // Your access key id
define ('AWS_SECRET_ACCESS_KEY', '...'); // Your secret access key
define ('AWS_REGION', 'eu-central-1'); // Region where the bucket is located. This is the region id for "EU (Frankfurt)"
In our case, we are implementing the crop avatar functionality, for which avatars will be stored on the “avatars-smashing” bucket. However, in our application we may have several other buckets for other functionalities, requiring to execute the same operations of uploading, downloading and listing files. Hence, we implement the common methods on an abstract class AWS_S3, and we obtain the inputs, such as the bucket name defined through function get_bucket, in the implementing child classes.
// Load the SDK and import the AWS objects
require 'vendor/autoload.php';
use AwsS3S3Client;
use AwsExceptionAwsException;

// Definition of an abstract class
abstract class AWS_S3 {

  protected function get_bucket() {

    // The bucket name will be implemented by the child class
    return '';
  }
}
The S3Client class exposes the API for interacting with S3. We instantiate it only when needed (through lazy-initialization), and save a reference to it under $this->s3Client as to keep using the same instance:
abstract class AWS_S3 {

  // Continued from above...

  protected $s3Client;

  protected function get_s3_client() {

    // Lazy initialization
    if (!$this->s3Client) {

      // Create an S3Client. Provide the credentials and region as defined through constants in wp-config.php
      $this->s3Client = new S3Client([
        'version' => '2006-03-01',
        'region' => AWS_REGION,
        'credentials' => [
          'key' => AWS_ACCESS_KEY_ID,
          'secret' => AWS_SECRET_ACCESS_KEY,
        ],
      ]);
    }

    return $this->s3Client;
  }
}
When we are dealing with $file in our application, this variable contains the absolute path to the file in disk (e.g. /var/app/current/wp-content/uploads/users/654/leo.jpg), but when uploading the file to S3 we should not store the object under the same path. In particular, we must remove the initial bit concerning the system information (/var/app/current) for security reasons, and optionally we can remove the /wp-content bit (since all files are stored under this folder, this is redundant information), keeping only the relative path to the file (/uploads/users/654/leo.jpg). Conveniently, this can be achieved by removing everything after WP_CONTENT_DIR from the absolute path. Functions get_file and get_file_relative_path below switch between the absolute and the relative file paths:
abstract class AWS_S3 {

  // Continued from above...

  function get_file_relative_path($file) {

    return substr($file, strlen(WP_CONTENT_DIR));
  }

  function get_file($file_relative_path) {

    return WP_CONTENT_DIR.$file_relative_path;
  }
}
When uploading an object to S3, we can establish who is granted access to the object and the type of access, done through the access control list (ACL) permissions. The most common options are to keep the file private (ACL => “private”) and to make it accessible for reading on the internet (ACL => “public-read”). Because we will need to request the file directly from S3 to show it to the user, we need ACL => “public-read”:
abstract class AWS_S3 {

  // Continued from above...

  protected function get_acl() {

    return 'public-read';
  }
}
Finally, we implement the methods to upload an object to, and download an object from, the S3 bucket:
abstract class AWS_S3 {

  // Continued from above...

  function upload($file) {

    $s3Client = $this->get_s3_client();

    // Upload a file object to S3
    $s3Client->putObject([
      'ACL' => $this->get_acl(),
      'Bucket' => $this->get_bucket(),
      'Key' => $this->get_file_relative_path($file),
      'SourceFile' => $file,
    ]);
  }

  function download($file) {

    $s3Client = $this->get_s3_client();

    // Download a file object from S3
    $s3Client->getObject([
      'Bucket' => $this->get_bucket(),
      'Key' => $this->get_file_relative_path($file),
      'SaveAs' => $file,
    ]);
  }
}
Then, in the implementing child class we define the name of the bucket:
class AvatarCropper_AWS_S3 extends AWS_S3 {

  protected function get_bucket() {

    return 'avatars-smashing';
  }
}
Finally, we simply instantiate the class to upload the avatars to, or download from, S3. In addition, when transitioning from steps 1 to 2 and 2 to 3, we need to communicate the value of $file. We can do this by submitting a field “file_relative_path” with the value of the relative path of $file through a POST operation (we don’t pass the absolute path for security reasons: no need to include the “/var/www/current” information for outsiders to see):
// Step 1: after the file was uploaded to the server, upload it to S3. Here, $file is known
$avatarcropper = new AvatarCropper_AWS_S3();
$avatarcropper->upload($file);

// Get the file path, and send it to the next step in the POST
$file_relative_path = $avatarcropper->get_file_relative_path($file);
// ...

// --------------------------------------------------

// Step 2: get the $file from the request and download it, manipulate it, and upload it again
$avatarcropper = new AvatarCropper_AWS_S3();
$file_relative_path = $_POST['file_relative_path'];
$file = $avatarcropper->get_file($file_relative_path);
$avatarcropper->download($file);

// Do manipulation of the file
// ...

// Upload the file again to S3
$avatarcropper->upload($file);

// --------------------------------------------------

// Step 3: get the $file from the request and download it, and then save it
$avatarcropper = new AvatarCropper_AWS_S3();
$file_relative_path = $_REQUEST['file_relative_path'];
$file = $avatarcropper->get_file($file_relative_path);
$avatarcropper->download($file);

// Save it, whatever that means
// ...
Displaying The File Directly From S3
If we want to display the intermediate state of the file after manipulation on step 2 (e.g. the user avatar after cropped), then we must reference the file directly from S3; the URL couldn’t point to the file on the server since, once again, we don’t know which server will handle that request.
Below, we add function get_file_url($file) which obtains the URL for that file in S3. If using this function, please make sure that the ACL of the uploaded files is “public-read”, or otherwise it won’t be accessible to the user.
abstract class AWS_S3 {

  // Continue from above...

  protected function get_bucket_url() {

    $region = $this->get_region();

    // North Virginia region is simply "s3", the others require the region explicitly
    $prefix = $region == 'us-east-1' ? 's3' : 's3-'.$region;

    // Use the same scheme as the current request
    $scheme = is_ssl() ? 'https' : 'http';

    // Using the bucket name in path scheme
    return $scheme.'://'.$prefix.'.amazonaws.com/'.$this->get_bucket();
  }

  function get_file_url($file) {

    return $this->get_bucket_url().$this->get_file_relative_path($file);
  }
}
Then, we can simply we get the URL of the file on S3 and print the image:
printf(
  "<img src='%s'>",
  $avatarcropper->get_file_url($file)
);
Listing Files
If in our application we want to allow the user to view all previously uploaded avatars, we can do so. For that, we introduce function get_file_urls which lists the URL for all the files stored under a certain path (in S3 terms, it’s called a prefix):
abstract class AWS_S3 {

  // Continue from above...

  function get_file_urls($prefix) {

    $s3Client = $this->get_s3_client();

    $result = $s3Client->listObjects(array(
      'Bucket' => $this->get_bucket(),
      'Prefix' => $prefix
    ));

    $file_urls = array();
    if(isset($result['Contents']) && count($result['Contents']) > 0 ) {

      foreach ($result['Contents'] as $obj) {

        // Check that Key is a full file path and not just a "directory"
        if ($obj['Key'] != $prefix) {

          $file_urls[] = $this->get_bucket_url().$obj['Key'];
        }
      }
    }

    return $file_urls;
  }
}
Then, if we are storing each avatar under path “/users/${user_id}/“, by passing this prefix we will obtain the list of all files:
$user_id = get_current_user_id();
$prefix = "/users/${user_id}/";
foreach ($avatarcropper->get_file_urls($prefix) as $file_url) {
  printf(
    "<img src='%s'>",
    $file_url
  );
}
Conclusion
In this article, we explored how to employ a cloud object storage solution to act as a common repository to store files for an application deployed on multiple servers. For the solution, we focused on AWS S3, and proceeded to show the steps needed to be integrated into the application: creating the bucket, setting-up the user permissions, and downloading and installing the SDK. Finally, we explained how to avoid security pitfalls in the application, and saw code examples demonstrating how to perform the most basic operations on S3: uploading, downloading and listing files, which barely required a few lines of code each. The simplicity of the solution shows that integrating cloud services into the application is not difficult, and it can also be accomplished by developers who are not much experienced with the cloud.
![]()
(rb, ra, yk, il)
From our sponsors: Sharing Data Among Multiple Servers Through AWS S3


