Archived
Saving Grandma’s Recipes With Xamarin.Forms
Saving Grandma’s Recipes With Xamarin.Forms
Saving Grandma’s Recipes With Xamarin.Forms
Matthew Soucoup
2018-10-11T14:10:38+02:00
2018-10-11T12:19:46+00:00
My grandma makes the best, most fluffiest, go weak-in-your-knees buns that anybody has ever tasted. The problem is, there’s a ton of secret ingredients (and I’m not just talking love) that go into those buns, and those ingredients and directions are all stored in my grandma’s head.
We all have family recipes like that, and instead of possibly forgetting them, in this article we’re going to create a mobile app for iOS and Android using Xamarin.Forms that will save them for myself and future generations of my family!
Delicious warm buns (Large preview)
So if you’re interested in writing mobile applications, but don’t have the time to write the same app over and over again for each platform, this article is for you! Don’t worry if you don’t know C# from a Strawberry Pretzel Salad; I’ve been writing Xamarin apps for over 8 years, and this article is a tour through Xamarin.Forms that intends to give you enough information to start learning on your own.
What Is This Xamarin Stuff?
More than just a fun word to say, Xamarin allows developers to create native iOS and Android applications using the exact same SDKs and UI controls available as in Swift and XCode for iOS or Java and Android Studio for Android.
Front-end is messy and complicated these days. That’s why we publish articles, printed books and webinars with useful techniques to improve your work. Even better: Smashing Membership with a growing selection of front-end & UX goodies. So you get your work done, better and faster.
Explore Smashing Membership ↬

Which platform should I develop for? (Large preview)
The difference is that the apps are developed with C# using the .NET Framework and Visual Studio or Visual Studio for Mac. The apps that result, however, are exactly the same. They look, feel, and behave just like native apps written in Objective-C, Swift, or Java.
Xamarin shines when it comes to code sharing. A developer can create and tailor their UI for each platform using native controls and SDKs, but then write a library of shared app logic that’s shared across platforms.

Aha! I’ll pick Xamarin! (Large preview)
It’s this code sharing where tremendous time savings can be realized.
And like the delicious buns my grandma bakes, once given the taste of sharing code — it’s hard not to crave more — and that’s where Xamarin.Forms comes in.
Xamarin.Forms
Xamarin.Forms takes the concept of traditional Xamarin development and adds a layer of abstraction to it.
Instead of developing the user interface for iOS and Android separately, Xamarin.Forms introduces a UI toolkit that enables you to write native mobile apps from a single code base.
Think of it this way: You have an app that needs a button. Each platform has the concept of a button. Why should you have to write the user interface a bunch of different times when you know all the user of your app needs to do is tap a button?
That’s one of the problems Xamarin.Forms solves.
It provides a toolkit of the most commonly used controls and user interaction events for them, so we only have to write the user interfaces for our apps once. It’s worth noting though that you’re not limited to the controls Xamarin.Forms provides either — you still can use controls found in only a single platform within a Xamarin.Forms app. Also, we can share the application logic between platforms as before.
The code sharing stats for apps developed with Xamarin.Forms can be off the charts. A conference organizing app has 93% of its code shared on iOS and 91% on Android. The app is open sourced. Take a peek at the code.
Xamarin.Forms provides more than UI controls. It also contains a MVVM framework, a pub/sub messaging service, an animation API, and a dependency service, plus others.
But today, we’re going to focus on the UI capabilities for building our recipe manager app.
The App We’ll Build
The recipe manager app will have a straightforward user interface. We will be working in the kitchen, so it needs to be easy to use!
It will consist of 3 screens. The first will show a list of all the recipes currently loaded in the app.
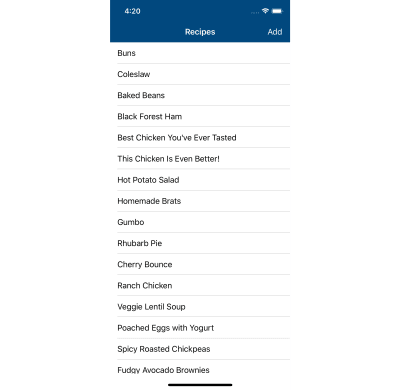
(Large preview)
Then, by tapping on one of those recipes, you’ll be able to see its details on a second screen:
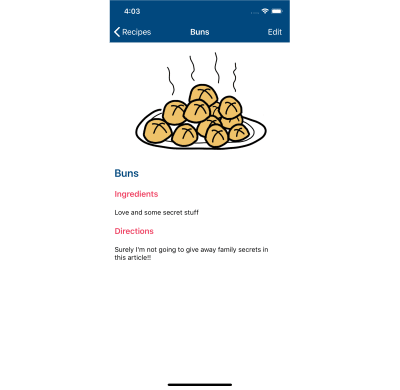
The recipe detail screen on iOS (Large preview)
From there you can tap an edit button to make changes to the recipe on the third screen:

The recipe edit screen on iOS (Large preview)
You can also get to this screen by tapping the add button from the recipe list screen.
The Development Environment
Xamarin apps are built with C# and .NET, using Visual Studio on Windows or Visual Studio for Mac on the Mac, but you need to have the iOS or Android SDKs and tooling installed, too. Getting everything installed, in the correct order could be a bit of an issue, however, the Visual Studio installers will take care of note only getting the IDE installed, but also the platform tooling.
Although a Mac is always required to build iOS apps, with Xamarin you can still develop and debug those apps from Visual Studio on Windows! So if Windows is your jam, there’s no need to change your environments altogether.
Now let’s see how Xamarin.Forms can help us save some family recipes from one code base!
Recipe List Page: Laying Out the UI
Let’s start with talking about how we’re going to layout the UI for our recipe saving app!
Overall each screen in Xamarin.Forms is comprised of 3 elements. A Page. At least one element called a Layout. And at least one Control.
The Page
The Page is the thing that hosts everything displayed on the screen at one time. The Page is also central in navigation within an app.

The page (Large preview)
We tell Xamarin.Forms which Page to display via a Navigation Service. That service then will take care of displaying whatever page in a way that’s appropriate and native for the operating system.
In other words, the code to navigate between screens has been abstracted too!
Finally, although not the only way to do it, I code the UI of my Page‘s in XAML. (The other way would be to use C#.) XAML is a markup language that describes how a page looks. And for now, suffice it to say, it’s kinda sorta similar to HTML.
The Layout
All the controls on a page are arranged by something called a Layout.

The layouts (Large preview)
One or more layouts can be added to a page.

Layouts on the page (Large preview)
There are several different types of Layouts in Forms. Some of the most common ones include Stack, Absolute, Relative, Grid, Scroll, and Flex layouts.
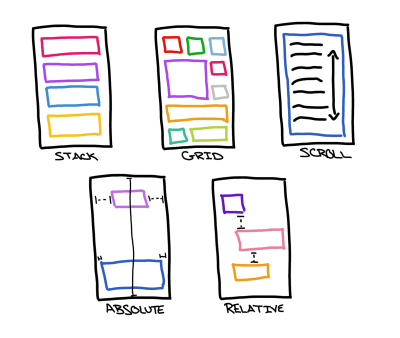
Common Xamarin.Forms layouts (Large preview)
The Controls
Then finally there are the controls. These are the widgets of your app that the user interacts with.

Some of the controls (Large preview)
Forms come with many controls that will be used no matter what type of app you’re building. Things like labels, buttons, entry boxes, images, and of course, list views.
When adding a control to a screen, you add it to a layout. It’s the layout that takes care of figuring where exactly on the screen the control should appear.

Everything fits together! (Large preview)
So to generate the following screens on iOS and Android respectively:

Recipe lists on iOS (left) and Android (right) (Large preview)
I used this XAML:
<?xml version="1.0" encoding="UTF-8"?>
<ContentPage xmlns="http://xamarin.com/schemas/2014/forms"
             xmlns:x="http://schemas.microsoft.com/winfx/2009/xaml"
             x:Class="SmashingRecipe.RecipeListPage"
             Title="Recipes">
    <ContentPage.Content>
        <StackLayout>
            <ListView x:Name="recipesList">
                <ListView.ItemTemplate>
                    <DataTemplate>
                        <TextCell Text="{Binding Name}"/>
                    </DataTemplate>
                </ListView.ItemTemplate>
            </ListView>
        </StackLayout>
    </ContentPage.Content>
    <ContentPage.ToolbarItems>
        <ToolbarItem Text="Add" />
    </ContentPage.ToolbarItems>
</ContentPage>
There’s a couple of important things going on here.
The first is the . This is telling Forms to arrange all the controls that follow in a stack.
There happens to only be a single control in the layout, and that’s a , and we’re going to give it a name so we can reference it later.
Then there’s a little bit of boilerplate ceremony to the ListView before we get to what we’re after: the . This is telling Forms to display simple text in each cell of the list.
We tell the the text we want it to display through a technique called Data Binding. The syntax looks like Text="{Binding Name}". Where Name is a property of a Recipe class that models… well, Recipes.
So how do the recipes get added to the list?
Along with every XAML file, there is a “code-behind” file. This code-behind allows us to do things like handle user interaction events, or perform setup, or do other app logic.
There’s a function that can be overridden in every Page called OnAppearing — which as I’m sure you guessed — gets called when the Page appears.
protected override void OnAppearing()
{
    base.OnAppearing();

    recipesList.ItemsSource = null;
    recipesList.ItemsSource = App.AllRecipes;
}
Notice the recipesList.ItemsSource = AllRecipes;
This is telling the ListView — “Hey! All of your data is found in the enumerable App.AllRecipes (an application-wide variable) and you can use any of its child object’s properties to bind off of!”.
A list of recipes is all well and fine — but you can’t bake anything without first seeing the recipe’s details — and we’re going to take care of that next.
Event Handling
Without responding to user touches our app is nothing more than a list of delicious sounding recipes. They sound good, but without knowing how to cook them, it’s not of much use!
Let’s make each cell in the ListView respond to taps so we can see how to make the recipe!
In the RecipeListPage code-behind file, we can add event handlers to controls to listen and react to user interaction events.
Handling tap events on the list view then:
recipesList.ItemSelected += async (sender, eventArgs) =>
{
    if (eventArgs.SelectedItem != null)
    {
        var detailPage = new RecipeDetailPage(eventArgs.SelectedItem as Recipe);

        await Navigation.PushAsync(detailPage);

        recipesList.SelectedItem = null;
    }
};
There’s some neat stuff going on there.
Whenever somebody selects a row, ItemSelected is fired on the ListView.
Of the arguments that get passed into the handler, the eventArgs object has a SelectedItem property that happens to be whatever is bound to the ListView from before.
In our case, that’s the Recipe class. (So we don’t have to search for the object in the master source – it gets passed to us.)
Recipe Detail Page
Of course, there’s a page that shows us the secret ingredients and directions of how to make each recipe, but how does that page get displayed?

Let’s get cooking! (Large preview)
Notice the await Navigation.PushAsync(detailPage); line from above. The Navigation object is a platform-independent object that handles page transitions in a native fashion for each platform.
Now let’s take a peek at the recipe details page:
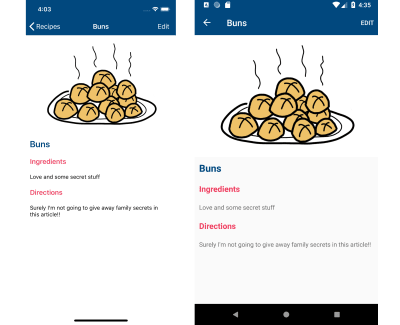
Recipe detail screens on iOS (left) and Android (right) (Large preview)
This page is built with XAML as well. However, the Layout used (FlexLayout) is quite cool as it’s inspired by the CSS Flexbox.
<ContentPage.Content>
    <ScrollView>
        <FlexLayout
            AlignItems="Start"
            AlignContent="Start"
            Wrap="Wrap">

            <Image Source="buns.png" FlexLayout.Basis="100%" />

            <Label Text="{Binding Name}" HorizontalTextAlignment="Center" TextColor="#01487E"
                   FontAttributes="Bold" FontSize="Large" Margin="10, 10" />

            <BoxView FlexLayout.Basis="100%" HeightRequest="0" />

            <Label Text="Ingredients" FontAttributes="Bold" FontSize="Medium" TextColor="#EE3F60"
                   Margin="10,10" HorizontalOptions="FillAndExpand" />
            <BoxView FlexLayout.Basis="100%" HeightRequest="0" />
            <Label Text="{Binding Ingredients}" Margin="10,10" FontSize="Small" />

            <BoxView FlexLayout.Basis="100%" HeightRequest="0" />

            <Label Text="Directions" FontAttributes="Bold" FontSize="Medium" TextColor="#EE3F60"
                   Margin="10,10" HorizontalOptions="FillAndExpand" />
            <BoxView FlexLayout.Basis="100%" HeightRequest="0" />
            <Label Text="{Binding Directions}" Margin="10,10" FontSize="Small" />

        </FlexLayout>
    </ScrollView>
</ContentPage.Content>
The FlexLayout will arrange its controls in either rows or columns. The big benefit comes though with the fact that it can automatically detect how much room there is left on the screen to place a control, and if there’s not enough, then it can automatically create a new row or column to accommodate it!
This helps greatly when dealing with various screen sizes, which there are plenty of in mobile development.
Well, with the FlexLayout helping us keep the details screen looking good, we still need to edit those recipes, right?
You probably noticed this:
<ToolbarItem Text="Edit" Clicked="Edit_Clicked" />That line is responsible for putting a button in the app’s toolbar. The Clicked="Edit_Clicked" tells the button that when it’s clicked, look in the code behind for a function of that name, and then execute its code.
Which in this case, would be instantiating the Recipe Edit Page, and pushing that onto our navigation stack using the Navigation object mentioned previously.
Recipe Edit Page
A page with a list of recipes: check! A page with all the details to make the recipes: check! All that’s now left is to create the page that we use to enter or change a recipe while we watch grandma work her magic!
First, check out the screens:
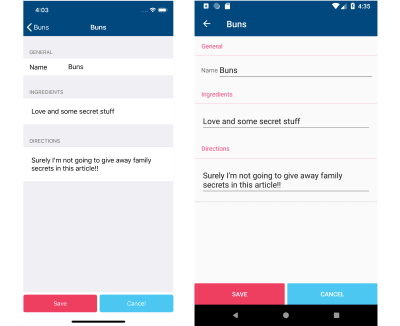
Recipe edit screens on iOS (left) and Android (right) (Large preview)
And now the code:
<ContentPage.Content>
    <Grid>
        <Grid.RowDefinitions>
            <RowDefinition Height="*" />
            <RowDefinition Height="Auto" />
        </Grid.RowDefinitions>
        <Grid.ColumnDefinitions>
            <ColumnDefinition Width="*" />
            <ColumnDefinition Width="*" />
        </Grid.ColumnDefinitions>

        <TableView Grid.Row="0" Grid.Column="0" Grid.ColumnSpan="2"
                   Intent="Form" HasUnevenRows="true">
            <TableSection Title="General">
                <EntryCell x:Name="recipeNameCell" Label="Name" />
            </TableSection>

            <TableSection Title="Ingredients">
                <ViewCell>
                    <StackLayout Padding="15">
                        <Editor x:Name="ingredientsCell" />
                    </StackLayout>
                </ViewCell>
            </TableSection>

            <TableSection Title="Directions">
                <ViewCell>
                    <StackLayout Padding="15">
                        <Editor x:Name="directionsCell" />
                    </StackLayout>
                </ViewCell>
            </TableSection>
        </TableView>

        <Button Text="Save" Grid.Row="1" Grid.Column="0" BackgroundColor="#EE3F60" TextColor="White" x:Name="saveButton" />
        <Button Text="Cancel" Grid.Row="1" Grid.Column="1" BackgroundColor="#4CC7F2" TextColor="White" x:Name="cancelButton" />
    </Grid>
</ContentPage.Content>
There’s a little more code here, and that’s because I’m using the Grid layout to specify how everything should lay out in a 2-Dimensional pattern.
And also notice no data binding here. Because I wanted to give an example of how one would populate the controls purely from the code behind file:
void InitializePage()
{
    Title = TheRecipe.Name ?? "New Recipe";

    recipeNameCell.Text = TheRecipe.Name;
    ingredientsCell.Text = TheRecipe.Ingredients;
    directionsCell.Text = TheRecipe.Directions;

    saveButton.Clicked += async (sender, args) =>
    {
        SaveRecipe();
        await CloseWindow();
    };

    cancelButton.Clicked += async (sender, args) =>
    {
        await CloseWindow();
    };
}
See that TheRecipe property? It’s page level, holds all the data for a particular recipe, and gets set in the constructor of the page.
Secondly, the Clicked event handlers for the saveButton and cancelButton are totally .NET-ified (and yes, I do make my own words up quite often.)
I say they’re .NET-ified because the syntax to handle that event is not native to Java nor Objective-C. When the app runs on Android or iOS, the behavior will be exactly like an Android Click or an iOS TouchUpInside.
And as you can see, each of those click event handlers are invoking appropriate functions that either save the recipe and dismiss the page, or only dismiss the page.
There it is — we have the UI down to save the recipes from now until the end of time!
CSS Wha?!? Or Making The App Pretty
Saving the best for last: Xamarin.Forms 3.0 gives us — among other things — the ability to style controls using CSS!
The Xamarin.Forms CSS isn’t 100% what you may be used to from web development. But it’s close enough that anyone familiar with CSS will feel right at home. Just like me at grandma’s!
So let’s take the Recipe Details page and refactor it, so it uses Cascading Style Sheets to set the visual elements instead of setting everything directly inline in the XAML.
First step is to create the CSS doc! In this case it will look like the following:
.flexContent {
    align-items: flex-start;
    align-content: flex-start;
    flex-wrap: wrap;
}

image {
    flex-basis: 100%;
}

.spacer {
    flex-basis: 100%;
    height: 0;
}

.foodHeader {
    font-size: large;
    font-weight: bold;
    color: #01487E;
    margin: 10 10;
}

.dataLabel {
    font-size: medium;
    font-weight: bold;
    color: #EE3F60;
    margin: 10 10;
}

.data {
    font-size: small;
    margin: 10 10;
}
For the most part, it looks like CSS. There are classes in there. There is a single selector for a class type, Image. And then a bunch of property setters.
Some of those property setters, such as flex-wrap or flex-basis are specific to Xamarin.Forms. Going forward, the team will prefix those with xf- to follow standard practices.
Next up will be to apply it to XAML controls.
<ContentPage.Resources>
    <StyleSheet Source="../Styles/RecipeDetailStyle.css" />
</ContentPage.Resources>

<ContentPage.Content>
    <ScrollView>
        <FlexLayout StyleClass="flexContent">

            <Image Source="buns.png" />

            <Label Text="{Binding Name}" StyleClass="foodHeader" />

            <BoxView StyleClass="spacer" />

            <Label Text="Ingredients" StyleClass="dataLabel" HorizontalOptions="FillAndExpand" />
            <BoxView StyleClass="spacer" />
            <Label Text="{Binding Ingredients}" StyleClass="data" />

            <BoxView StyleClass="spacer" />

            <Label Text="Directions" StyleClass="dataLabel" HorizontalOptions="FillAndExpand" />
            <BoxView StyleClass="spacer" />
            <Label Text="{Binding Directions}" StyleClass="data" />

        </FlexLayout>
    </ScrollView>
</ContentPage.Content>
Here’s what it looked like before.
In Xamarin.Forms, to reference the CSS document, add a . Then you can reference the classes in each control via the StyleClass property.
It definitely cleans up the XAML, and it makes the intention of the control clearer too. For example, now it’s pretty obvious what those are up to!
And the Image gets itself styled all because it’s an Image and the way we defined the selector in the CSS.
To be sure, CSS in Xamarin.Forms isn’t as fully implemented as its web cousin, but it’s still pretty cool. You have selectors, classes, can set properties and, of course, that whole cascading thing going on!
Summary
Three screens, two platforms, one article, and endless recipes saved! And you know what else? You can build apps with Xamarin.Forms for more than Android and iOS. You can build UWP, macOS, and even Samsung Tizen platforms!

Delicious! (Large preview)
Xamarin.Forms is a UI toolkit that allows you to create apps by writing the user interface once and having the UI rendered natively across the major platforms.
It does this by providing an SDK that’s an abstraction to the most commonly used controls across the platforms. In addition to the UI goodness, Xamarin.Forms also provides a full-featured MVVM framework, a pub/sub messaging service, an animation API, and a dependency service.
Xamarin.Forms also gives you all the same code benefits that traditional Xamarin development does. Any application logic is shared across all the platforms. And you get to develop all your apps with a single IDE using a single language — that’s pretty cool!
Where to next? Download the source code for this Xamarin.Forms app to give it a spin yourself. Then to learn more about Xamarin.Forms, including the ability to create an app all within your browser, check out this online tutorial!
![]()
(dm, ra, yk, il)
From our sponsors: Saving Grandma’s Recipes With Xamarin.Forms


