Archived
Getting Started With Nuxt

Getting Started With Nuxt
Timi Omoyeni 2020-04-27T10:30:00+00:00
2020-04-27T12:35:09+00:00
Web developers build a lot of Single Page Applications using JavaScript frameworks (Angular, React, Vue). SPAs dynamically populate the contents of their pages on load which means by the time google crawls their site, the important content is yet to be injected into the site. Part of this problem can be solved by pre-rendering your application’s content. This is where server-side applications come in, and for Vuejs developers, we can build server-side applications using Nuxt.js.
We’re going to assume that you have not used it before, as such it will start from the ground-up — introducing you to Nuxt.js, its file structure and how routing works. While also touching how you can get it to work with Vuex.
At the end of this tutorial, you should be able to go on to build basic web applications in Nuxt.js, and if you have been wondering how to get started with Nuxt.js, this will do justice to that.
This article is targeted at those that are fairly familiar with Vue.js and it’s a concept, For those without knowledge of Vue.js, consider starting from the official Vuejs documentation and The Net Ninja’s Vuejs playlist.
What Is Nuxt.js?
According to their official page:
“Nuxt is a progressive framework based on Vue.js to create modern web applications. It is based on Vue.js official libraries (vue, vue-router and vuex) and powerful development tools (webpack, Babel and PostCSS). Nuxt’s goal is to make web development powerful and performant with great developer experience in mind.”
It allows you to create three types of applications, depending on the purpose it’s intended for:
-
Static Generated pages (Pre-rendering)
Static generated applications do not require API requests to fetch the contents of the pages, i.e. the contents are already included in the HTML file. An example of a static site is a portfolio website or a landing page for a product. -
Single Page Application
Most JavaScript frameworks (React, Angular, Emberjs, Vue, etc) are single page application whose contents are dynamically populated with faster transitions. Most SPAs make use of the HTML5 history API or the location Hash for routing. -
Server Side Rendered Applications (SSR)
Server-Side Rendering is a technique used to fetch and display client-side data on the server to send a fully rendered page to the client. This is a good approach to get good SEO for your application.
Creating Your First Nuxt.js Application
You can create a Nuxt.js application in two ways:
- Using the scaffolding tool
create-nuxt-app. - From scratch.
In case you just want to see the finished app that we would be building, here’s a link to the GitHub repo.
In this tutorial, we would be focused on using create-nuxt-app so let’s get started. If you have npx installed, open your terminal and run this command:
$ npx create-nuxt-app nuxt-tutorial-appor
$ yarn create nuxt-app nuxt-tutorial-appFor the purpose of this tutorial, nuxt-tutorial-app is the name of the application but feel free to name yours differently.
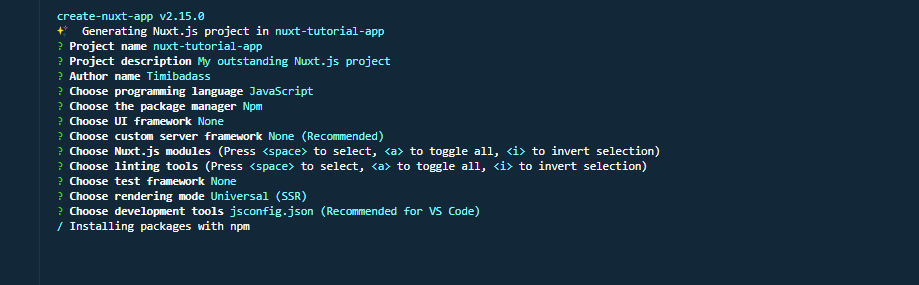
This would be followed by a list of options that help in configuring your application with what you might need for development.
Here’s what my configuration looks like:
For the purpose of this tutorial, we do not need axios, linting and Prettier configurations.
Once that is done, we’ll run the following command in our terminal:
$ cd nuxt-tutorial-app
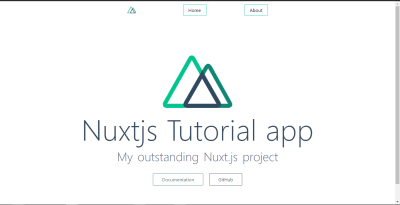
$ npm run devYour app should now be running on http://localhost:3000 and this is what you should see:

At this point, your app is ready for development.
Understanding Nuxt Folder Structure
Scaffolding the application as we did creates different files and folders which we can start working with. For someone who hasn’t work with Nuxt before, this might throw you off balance. So we’ll be looking at the folders, getting to understand their importance.
- Assets
This folder is for un-compiled files such as images, font files, SASS, LESS or JavaScript files. Let us add create astylesfolder and amain.cssfile and copy and paste the following in it.
a {
  text-decoration: none;
  color: inherit;
  cursor: pointer;
}
.header {
  width: 100%;
  max-width: 500px;
  margin-left: auto;
  margin-right: auto;
  height: 60px;
  top: 0;
  position: sticky;
  background-color: #fff;
  display: flex;
  justify-content: space-between;
  align-items: center;
}
.logo {
  width: 40%;
  max-width: 200px;
  height: 40px;
}
.logo .NuxtLogo {
  max-width: 30px;
  margin-left: 10px;
  max-height: 40px;
}
.nav {
  width: 60%;
  height: 40px;
  display: flex;
  justify-content: space-between;
  padding-right: 10px;
  max-width: 300px;
}
.nav__link {
  width: 80px;
  display: flex;
  align-items: center;
  border-radius: 4px;
  justify-content: center;
  height: 100%;
  border: 1px solid #00c58e;
  cursor: pointer;
}
.nav__link:active {
  background-color: #00c58e;
  border: 1px solid #00c58e;
  color: #fff;
  box-shadow: 5px 3px 5px 2px #3f41468c;
}
.home {
  padding-top: 30px;
}
.home__heading {
  text-align: center;
}
.directories {
  display: flex;
  box-sizing: border-box;
  padding: 10px;
  max-width: 1000px;
  margin: 0 auto;
  flex-wrap: wrap;
  justify-content: center;
}
@media (min-width: 768px) {
  .directories {
    justify-content: space-between;
  }
}
.directory__container {
  width: 100%;
  max-width: 220px;
  cursor: pointer;
  border-radius: 4px;
  border: 1px solid #00c58e;
  display: flex;
  height: 60px;
  margin: 10px 5px;
  margin-right: 0;
  justify-content: center;
  align-items: center;
}
.directory__name {
  text-align: center;
}
.directory {
  width: 100%;
  margin: 50px auto;
  max-width: 450px;
  border-radius: 4px;
  border: 1px solid #00c58e;
  box-sizing: border-box;
  padding: 10px 0;
}
.directory__info {
  padding-left: 10px;
  line-height: 22px;
  padding-right: 10px;
}
The styles above will be used across the application for what we’ll be building. As you can see we have styles for the navigation and other aspects which we’ll plug into the application as we progress.
- Components
This folder is one we’re familiar with from Vue.js, it contains your reusable components.
Now, let’s create our first component and name it navBar.vue, and add the following code to it. We want the navbar of the site to display the logo and link to the Home and About pages which we will create in future. This navbar will be visible across the application. It will also make use of some styles that we have added above.
<template>
  <header class="header">
    <div class="logo">
      <nuxt-link to="/">
        <Logo />
      </nuxt-link>
    </div>
    <nav class="nav">
      <div class="nav__link">
        <nuxt-link to="/">Home</nuxt-link>
      </div>
      <div class="nav__link">
        <nuxt-link to="/About">About</nuxt-link>
      </div>
    </nav>
  </header>
</template>
<script>
import Logo from "@/components/Logo";
export default {
  name: "nav-bar",
  components: {
    Logo
  }
};
</script>
<style>
</style>
The template section contains what will be visible to the user. We have a header element which contains our logo and nav links. For us to link to the pages, we make use of nuxt-link which provides navigation between component pages.
In the script section, we import the logo component using Nuxt alias @ and declared it in our component for use by adding it as a component. This makes it possible for us to render it in the template.
- Layout
Here, we’ll be storing our application layouts. This is particularly useful if your application’s design calls for two or more layouts, e.g. one for authenticated users and another for guests or admins. For the purpose of this tutorial, we’ll be sticking to the default layout.
Let us open our default.vue file and add our navBar component to the layout of our application.
<template>
  <div>
    <Nav />
    <nuxt />
  </div>
</template>
<script>
import Nav from "~/components/navBar.vue";
export default {
  components: {
    Nav
  }
};
</script>
In the template section, we’ve added our Nav component inside the layout container to always appear at the top after importing it into the file and declaring it in the script section.
The next thing after our Nav component is , which tells Nuxt where to render all its routes.
This Nav component is the one we created above. By adding it here, the Nav component will be used across the application.
-
Middleware
This folder was created to house JavaScript files that are required to run before a page(s) is rendered. If you’ve ever used the Vuejs navigation guard, this folder was created for files like that. -
Pages
This is another folder that developers with Vuejs background would not be familiar with. It works in such a way that every*.vuefile is created as a route in your application so it serves as both views and a router folder at the same time, we’ll talk more about this in the next section. -
Plugins
This is where you store files that you want to run before mounting the root Vue.js application. It is not a required folder so it can be deleted. -
nuxt.config.js
This file is used to configure your application, it is usually pre-populated based on the config when creating your app. An ideal nuxt.config.js file should look like this by default:
export default {
  mode: 'universal',
  /*
  ** Headers of the page
  */
  head: {
    title: process.env.npm_package_name || '',
    meta: [
      { charset: 'utf-8' },
      { name: 'viewport', content: 'width=device-width, initial-scale=1' },
      { hid: 'description', name: 'description', content: process.env.npm_package_description || '' }
    ],
    link: [
      { rel: 'icon', type: 'image/x-icon', href: '/favicon.ico' }
    ]
  },
  /*
  ** Customize the progress-bar color
  */
  loading: { color: '#fff' },
  /*
  ** Global CSS
  */
  css: [
  ],
  /*
  ** Plugins to load before mounting the App
  */
  plugins: [
  ],
  /*
  ** Nuxt.js dev-modules
  */
  buildModules: [
  ],
  /*
  ** Nuxt.js modules
  */
  modules: [
  ],
  /*
  ** Build configuration
  */
  build: {
    /*
    ** You can extend webpack config here
    */
    extend (config, ctx) {
    }
  }
}
Each time a change is made to this file, your application will automatically restart to reflect the changes. Let’s go over what the properties used in the file mean.
- Mode
The type of application; eitheruniversalorspa. By selecting universal, you’re telling Nuxt that you want your app to be able to run on both the server-side and the client-side. - Head
All the default meta tags properties and favicon link found inside theheadtag in your app is found here. This is because Nuxt.js doesn’t have a defaultindex.htmlfile, unlike Vue.js. - loading
All Nuxt applications come with a default loader component and thecolorcan be customized here. - css
You’re expected to enter the link to all your global CSS files so your application can take it into account when mounting the application. We’re going to add the link to our css file to this and restart our application.
 /*
   ** Global CSS
   */
  css: ["~/assets/styles/main.css"]
- plugins
This is where you connect all the plugins in your plugins folder to the application. It takes in an object with properties such assrcthat accepts the file path to the plugin and amodethat configures how your application treats such plugin; either as a server-side plugin or a client-side plugin. For example:
{ src: '~/plugins/universal-plugin.js' }, // for server and client plugins
{ src: '~/plugins/client-side.js', mode: 'client' }, // for client only plugins
{ src: '~/plugins/server-side.js', mode: 'server' }, // for server side only plugins
This is important to avoid error either on the server-side or client-side especially if your plugin requires something like localStorage that is not available on the server-side.
For more info about the nuxt.config.js file, check out the official doc.
Nuxt Pages And Routing System
The pages folder in your Nuxt application is used to configure your application’s routes, i.e. your route name is dependent on the name of each file in this folder, e.g. if you have an about.vue file inside your pages file, it means you now have an /about route in your app, but that’s not all. What happens if you want a dynamic route for your application? Or a nested route? How do you go about it? let’s find out.
Basic Routes
Basic routes can be classified as routes that do not require extra configuration for them to work. For example, a direct route /work or a /contact route. So if your pages folder looks like this:
pages/
--| me/
 -----| index.vue
 -----| about.vue
--| work.vue
--| contact.vue
--| index.vue
Nuxt would automatically generate a router config that looks like this:
router: {
  routes: [
    {
      name: 'index',
      path: '/',
      component: 'pages/index.vue'
    },
    {
      name: 'work',
      path: '/work',
      component: 'pages/work'
    },
    {
      name: 'contact',
      path: '/contact',
      component: 'pages/contact'
    },
    {
      name: 'me',
      path: '/me',
      component: 'pages/me/index.vue'
    },
    {
      name: 'me-about',
      path: '/me/about',
      component: 'pages/me/about.vue'
    }
  ]
}
These paths can then be used to access the components tied to them. You can see that the path does not contain pages. And Nuxt handles the components named index.vue as it should without an additional config for that.
Nested Routes
To create a nested route, create a folder called dashboard inside the pages folder. This folder should contain all the files you want to nest in it. For example, user.vue and settings.vue. Then at the root of pages folder, create a file called dashboard.vue.
pages/
 --| me/
 -----| index.vue
 -----| about.vue
 --| dashboard/
 -----| user.vue
 -----| settings.vue
 --| dashboard.vue
 --| work.vue
 --| contact.vue
 --| index.vue
This would automatically generate a router with routes that look like this:
router: {
  routes: [
    {
      name: 'index',
      path: '/',
      component: 'pages/index.vue'
    },
    {
      name: 'work',
      path: '/work',
      component: 'pages/work'
    },
    {
      name: 'contact',
      path: '/contact',
      component: 'pages/contact'
    },

    {
      name: 'me',
      path: '/me',
      component: 'pages/me/index.vue'
    },
    {
      name: 'me-about',
      path: '/me/about',
      component: 'pages/me/about.vue'
    },
    {
      name: 'dashboard',
      path: '/dashboard',
      component: 'pages/dashboard.vue',
      children: [
        {
          name: 'dashboard-user',
          path: '/dashboard/user',
          component: 'pages/dashboard/user.vue'
        },
        {
          name: 'dashboard-settings',
          path: '/dashboard/settings',
          component: 'pages/dashboard/settings.vue'
        }
      ]
    }
  ]
}
Notice that the route name always follows a regular pattern:
name of the folder + '-' + name of the file
With this, you can be sure that each route will have a unique name.
Dynamic Routes
Dynamic routes are routes that are defined by a variable, this variable can either be a name, number or an id gotten from client data on the app. This comes in handy when working with an API, where the id will likely be the id of the item coming from the database.
In Nuxt, dynamic routes are defined by appending an _ to a file name or folder name in the pages folder. For instance, if you want a dynamic route whose variable name is id, all you need is to name your file _id.vue and Nuxt automatically creates a dynamic route for you. For example:
pages/
--| me/
-----| index.vue
-----| about.vue
-----| _routeName
-------| index.vue
-------| info.vue
--| dashboard/
-----| user.vue
-----| settings.vue
--| dashboard.vue
--| work.vue
--| _id.vue
--| contact.vue
--| index.vue
This would automatically create a router file with the following routes,
   {
      name: 'work',
      path: '/work',
      component: 'pages/work'
    },
    {
      name: 'contact',
      path: '/contact',
      component: 'pages/contact'
    },
    {
      name: 'id',
      path: '/:id',
      component: 'pages/_id.vue'
    }
    {
      name: 'me',
      path: '/me',
      component: 'pages/me/index.vue'
    },
    {
      name: 'me-about',
      path: '/me/about',
      component: 'pages/me/about.vue'
    },
    {
      name: 'me-routeName',
      path: '/me/:routeName',
      component: 'pages/me/_routeName/index.vue'
    },
    {
      name: 'me-routeName-info',
      path: '/me/:routeName/info',
      component: 'pages/me/route.vue'
    },
    {
      name: 'dashboard',
      path: '/dashboard',
      component: 'pages/dashboard.vue',
      children: [
        {
          name: 'dashboard-user',
          path: '/dashboard/user',
          component: 'pages/dashboard/user.vue'
        },
        {
          name: 'dashboard-settings',
          path: '/dashboard/settings',
          component: 'pages/dashboard/settings.vue'
        }
      ]
    }
  ]
}
Although some of the Vue.js router tags work in Nuxt and can be used interchangeably, it is recommended that we use Nuxt router components. Here are some of the differences between the Nuxt Router tags and Vue.js Router tags.
| VueJs | NuxtJS |
|---|---|
| router-link | nuxt-link |
| router-view (for nested routes) | nuxt-child |
| router-view(default) | nuxt |
Difference between vue.js router and nuxt.js router
At this point, Here’s what your app should look like this, with the navigation shown at the top.
Now that we understand how Nuxt pages and Routes work, let’s add our first page and route about.vue. This page would list some directories in the application with a link to a new page that shows more information about such directory.
Let us add the following code to it:
<template>
  <section class="home">
    <h1 class="home__heading">About Nuxtjs Directory Structure</h1>
    <div class="directories">
      <div class="directory__container" v-for="directory in directories" :key="directory.id">
        <p class="directory__name">
          <nuxt-link
            :to="{ name: 'id', params: { id: directory.id, dir: directory } }"
          >{{ directory.name }}</nuxt-link>
        </p>
      </div>
    </div>
  </section>
</template>
<script>
export default {
  name: "about-nuxt",
  data() {
    return {
      directories: [
        {
          id: 0,
          name: "The Assets Directory",
          info:
            "By default, Nuxt uses vue-loader, file-loader and url-loader webpack loaders for strong assets serving. You can also use the static directory for static assets. This folder is for un-compiled files such as images, font files, SASS, LESS or JavaScript files"
        },
        {
          id: 1,
          name: "The Components Directory",
          info:
            "The components directory contains your Vue.js Components. You can't use asyncData in these components."
        },
        {
          id: 2,
          name: "The Layouts Directory",
          info:
            "The layouts directory includes your application layouts. Layouts are used to change the look and feel of your page (for example by including a sidebar). Layouts are a great help when you want to change the look and feel of your Nuxt.js app. Whether you want to include a sidebar or having distinct layouts for mobile and desktop"
        },
        {
          id: 3,
          name: "The Middleware Directory",
          info:
            "The middleware directory contains your Application Middleware. Middleware lets you define custom functions that can be run before rendering either a page or a group of pages (layouts)."
        },
        {
          id: 4,
          name: "The Pages Directory",
          info:
            "The pages directory contains your Application Views and Routes. The framework reads all the .vue files inside this directory and creates the application router. Every Page component is a Vue component but Nuxt.js adds special attributes and functions to make the development of your universal application as easy as possible"
        },
        {
          id: 5,
          name: "The Plugins Directory",
          info:
            "The plugins directory contains your Javascript plugins that you want to run before instantiating the root Vue.js Application. This is the place to register components globally and to inject functions or constants. Nuxt.js allows you to define JavaScript plugins to be run before instantiating the root Vue.js Application. This is especially helpful when using your own libraries or external modules."
        },
        {
          id: 6,
          name: "The Static Directory",
          info:
            "The static directory is directly mapped to the server root (/static/robots.txt is accessible under http://localhost:3000/robots.txt) and contains files that likely won't be changed (e.g. the favicon). If you don't want to use Webpack assets from the assets directory, you can create and use the static directory (in your project root folder)."
        },
        {
          id: 7,
          name: "The Store Directory",
          info:
            "The store directory contains your Vuex Store files. The Vuex Store comes with Nuxt.js out of the box but is disabled by default. Creating an index.js file in this directory enables the store. Using a store to manage the state is important for every big application. That's why Nuxt.js implements Vuex in its core."
        }
      ]
    };
  }
};
</script>
<style>
</style>
Starting from the script section, we created an array which we store in the directories variable. Each array contains an object with id, name, and info. This is the data we’ll show to the user when this page is opened. We want to show it to the user such that the names are clickable.
We do that in the template section, using v-for to loop through the array. This makes it possible to get each item in the array, which we can access using directory. In the loop, we use nuxt-link to handle the linking of each time. Using nuxt-link, we pass the details (id, name and info) of each directory item via nuxt router. We do this because we want to be able to display this on the show page when the user clicks on an item.
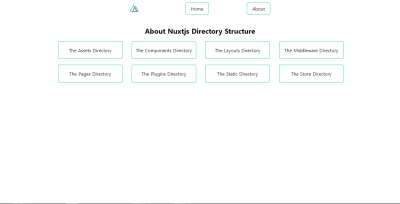
If you navigate to the /about route using your browser, you should see something like this:
Now, let’s create a new file and name it _id.vue. This would automatically create a dynamic route that takes the id param from the link display a little information about any directory clicked on from the About page.
Let us add this to our file:
<template>
  <section class="directory">
    <h1 class="directory__name">{{ directory.name }}</h1>
    <p class="directory__info">{{ directory.info }}</p>
  </section>
</template>
<script>
export default {
  name: "directory-info",
  data() {
    return {
      directory: this.$route.params.dir
    };
  }
};
</script>
<style>
</style>
What we have done is to create a page that fetches data from the route param dir using the this.$route.params. This gets us the name and info of the clicked directory, which we then display to the user.
So if you click on any directory link (e.g. store directory), you should see this.
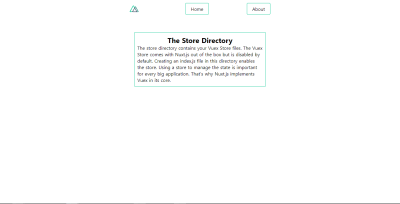
But there’s a problem, if you refresh this page, your directory info gets lost and you get an error. This would be fixed using our Vuex Store so let’s dive into it.
Using Vuex Store In Nuxt
Vuex can be accessed in Nuxt using two modes:
- Classic mode (deprecated).
- Modules mode.
Modules mode
Nuxt automatically creates a Store folder upon the creation of your app. In Modules mode, Nuxt would treat every file inside this folder as a module but index.js is required for Vuex store to be activated in your app. So let’s create an index.js file in our store folder and set it up for use. Let us add the following to our file.
index.js
export const state = () => ({

})

export const getters = {

}

export const mutations = {

}

export const actions = {

}
All we have done is to set up the store for our file with all we might need; the state for storing data, getters for performing extra manipulation to our state, mutations for modifying our state and actions for committing mutations.
Nuxt also allows users to separate each core concept into different files which means we can have store.js, getters.js, mutation.js and action.js and this is good as it makes for easy maintainability. Now, we fix the problem of directory disappearing on refresh, we’ll use the store, but first, we need to install and set up Vuex persist for our store.
Install Vuex persist from npm using either command below, depending on your preference.
$ npm install --save vuex-persistor
$ yarn add vuex-persistAfter installing, we’re going to create a vuex-persist.js file in our plugins folder and add the following:
import VuexPersistence from 'vuex-persist'

export default ({
  store
}) => {
  window.onNuxtReady(() => {
    new VuexPersistence({
      storage: window.localStorage
    }).plugin(store);
  });
}
Here, we import our plugin from node-modules and configure it to save your store in localStorage. This plugin allows you to choose other storage options such as sessionStorage too so feel free to explore their documentation for more info.
Remember to add it to your nuxt.config.js file.
/*
   ** Plugins to load before mounting the App
   */
  plugins: [{
    src: '~/plugins/vuex-persist',
    mode: 'client'
  }],
Here, we added the file path to our plugin and told Nuxt to only run this plugin on the client side of this application.
Now, we can set our store up to accept and store directory info. Update your store to handle directory info like this:
export const state = () => ({
  directory: ''
})
export const getters = {
}
export const mutations = {
  saveInfo(state, payload) {
    state.directory = payload.directory
  }
}
export const actions = {
}
What we’ve done is to add a directory state to our store and a mutation function saveInfo that modifies the value of the directory state we added to our store in anticipation of the data we’d be passing it soon.
Next, in your about.vue file, update it to look like this.
<template>
  <section class="home">
    <h1 class="home__heading">About Nuxtjs Directory Structure</h1>
    <div class="directories">
      <div
        class="directory__container"
        v-for="directory in directories"
        :key="directory.id"
        @click.prevent="storeDirectoryInfo(directory)"
      >
        <p class="directory__name">
          <nuxt-link
            :to="{ name: 'id', params: { id: directory.id, dir: directory } }"
          >{{ directory.name }}</nuxt-link>
        </p>
      </div>
    </div>
  </section>
</template>
<script>
export default {
  name: "about-nuxt",
  data() {
    return {
      directories: [
        //remains the same
      ]
    };
  },
  methods: {
    storeDirectoryInfo(dir) {
      this.$store.commit("saveInfo", {
        directory: dir
      });
    }
  }
};
</script>
<style>
</style>
Now, we’ve added a click event to every directory container that passes the directory info as an argument to the storeDirectoryInfo. In this function, we commit the directory object to our store.
Finally, we would go back to our _id.vue file and replace the directory variable with our data from the store like this:
<template>
  <section class="directory" v-if="directory">
    <h1 class="directory__name">{{ directory.name }}</h1>
    <p class="directory__info">{{ directory.info }}</p>
  </section>
</template>
<script>
import { mapState } from "vuex";
export default {
  name: "directory-info",
  computed: {
    ...mapState(["directory"])
  }
};
</script>
<style></style>
Here, we refactor our code to use directory object directly from our store by first importing mapState from Vuex.
import { mapState } from 'vuex';Instead of first checking if this.$route.params.dir is undefined before accessing the data from our store, we decide to use our store by reading the data that’s in the store.
<script>
import { mapState } from "vuex";
export default {
  name: "directory-info",
  computed: {
    ...mapState(["directory"])
  }
};
</script>
Then we update our template to make sure it doesn’t render while directory is undefined.
<template>
  <section class="directory" v-if="directory">
    <h1 class="directory__name">{{ directory.name }}</h1>
    <p class="directory__info">{{ directory.info }}</p>
  </section>
</template>
On doing this, no matter how many times we refresh our app, our directory object is safe in our store and can be easily accessed using the …mapState(['stateVariable']) method.
Deploying To Heroku
Now that our nuxt-tutorial-app app is complete, what’s next? Deploying our shiny new app to production.
We’ll be deploying our Nuxt.js app to Heroku using Github for easy deployment so if you’ve not set up a repository for your app, now would be a time to do so. The next thing would be to open Heroku and create a new app, choose a name and connect it to GitHub and the repo created above. Next, go to your settings, you should see something like this.
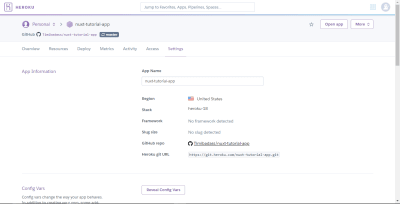
Now, add the following config variables.
NPM_CONFIG_PRODUCTION=false
HOST=0.0.0.0
NODE_ENV=production
The next thing we have to do is to create a Procfile in the root folder of our app (same level as nuxt.config.js) and enter this command:
web: nuxt startThis will run the nuxt start command and tell Heroku to direct external HTTP traffic to it.
After adding the Procfile to your app, commit and push your changes to your repo. If you have automatic deploys enabled for your app, your app should be live and accessible from its URL. If you can see your app live, congratulations! 🎆 you have successfully built and deployed your first Nuxt.js application.
Conclusion
Now that we know how to create a basic Nuxt application and deploy to Heroku, what’s next? Here are some resources that cover things like using Axios in Nuxt and implementing authentication in your app.
- Using the axios module.
- Implementing Authentication in Nuxt.
- Nuxt.js official documentation.
nuxt-tutorial-appGithub repo.
(ks, ra, yk, il)
From our sponsors: Getting Started With Nuxt


