Archived
Differences Between Static Generated Sites And Server-Side Rendered Apps
Differences Between Static Generated Sites And Server-Side Rendered Apps
Timi Omoyeni 2020-07-02T12:00:00+00:00
2020-07-02T12:34:00+00:00
JavaScript currently has three types of applications that you can build with: Single Page Applications (SPAs), pre-rendering/static generated sites and server-side rendered applications. SPAs come with many challenges, one of which is Search Engine Optimization (SEO). Possible solutions are to make use of Static Site Generators or Server-Side Rendering (SSR).
In this article, I’m going to explain them alongside listing their pros and cons so you have a balanced view. We’re going to look at what static generated/pre-rendering is as well as frameworks such as Gatsby and VuePress that help in creating statically generated sites. We’re also going to look at what server-side rendered (SSR) applications are as well as frameworks like Nextjs and Nuxtjs that can help you create SSR applications. Finally, we’re going to cover the differences between these two methods and which of them you should use when building your next application.
Note: You can find all the code snippets in this article on GitHub.
What Is A Static Site Generator?
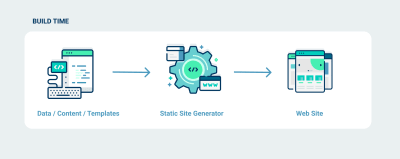
A Static Site Generator (SSG) is a software application that creates HTML pages from templates or components and a given content source. You give it some text files and content, and the generator will give you back a complete website, and this completed website is referred to as a static generated site. What this means is that your site pages are generated at build time and your site content does not change unless you add new contents or components and “rebuild” or you have to rebuild your site if you want it to be updated with new content.
This approach is good for building applications that the content does not change too often — sites that the content does not have to change depending on the user, and sites that do not have a lot of user-generated content. An example of such a site is a blog or a personal website. Let’s look at some advantages of using static generated sites.
PROS
- Fast website: Since all of your site’s pages and content have been generated at build time, you do not have to worry about API calls to the server for content and this makes your site very fast.
- Easy to deploy: After your static site has been generated, you would be left with static files, and hence, it can be easily deployed to platforms like Netlify.
- Security: Static generated site are solely composed of static files, the risk of being vulnerable to cyber attacks is minimal. This is because static generated sites have no database, attackers cannot inject malicious code or exploit your database.
- You can use version control software (e.g git) to manage and track changes to your content. This can come in handy when you want to roll back changes you made to the content on your site.
CONS
- Content can become stale if it changes too quickly.
- To update its content, you have to rebuild the site.
- Build time would increase depending on the size of the application.
Examples of static site generators are GatsbyJS and VuePress. Let us take a look at how to create static sites using these two generators.
Gatsby
According to their official website,
“Gatsby is a free and open-source framework based on React that helps developers build blazing-fast websites and apps.”
This means developers familiar with React would find it easy to get started with Gatsby.
To use this generator, you first have to install it using NPM:
npm install -g gatsby-cli
This will install Gatsby globally on your machine, you only have to run this command once on your machine. After this installation is complete, you can create your first static site generator using the following command.
gatsby new demo-gatsby
This command will create a new Gatsby project that I have named demo-gatsby. When this is done, you can start up your app server by running the following command:
cd demo-gatsby
gatsby develop
Your Gatsby application should be running on localhost:8000.

The folder structure for this app looks like this;
--| gatsby-browser.js
--| LICENSE
--| README.md
--| gatsby-config.js
--| node_modules/
--| src/
----| components
----| pages
----| images
--| gatsby-node.js
--| package.json
--| yarn.lock
--| gatsby-ssr.js
--| public/
----| icons
----| page-data
----| static
For this tutorial, we’re only going to look at the src/pages folder. This folder contains files that would be generated into routes on your site.
To test this, let us add a new file (newPage.js) to this folder:
import React from "react"
import { Link } from "gatsby"
import Layout from "../components/layout"
import SEO from "../components/seo"
const NewPage = () => (
  <Layout>
    <SEO title="My New Page" />
    <h1>Hello Gatsby</h1>
    <p>This is my first Gatsby Page</p>
    <button>
      <Link to='/'>Home</Link>
    </button>
  </Layout>
)
export default NewPage
Here, we import React from the react package so when your code is transpiled to pure JavaScript, references to React will appear there. We also import a Link component from gatsby and this is one of React’s route tag that is used in place of the native anchor tag ( <a class="colorbox" rel="nofollow" href='#'>Link). It accepts a to prop that takes a route as a value.
We import a Layout component that was added to your app by default. This component handles the layout of pages nested inside it. We also import the SEO component into this new file. This component accepts a title prop and configures this value as part of your page’s metadata. Finally, we export the function NewPage that returns a JSX containing your new page’s content.
And in your index.js file, add a link to this new page we just created:
import React from "react"
import { Link } from "gatsby"
import Layout from "../components/layout"
import Image from "../components/image"
import SEO from "../components/seo"
const IndexPage = () => (
  <Layout>
    <SEO title="Home" />
    <h1>Hi people</h1>
    <p>Welcome to your new Gatsby site.</p>
    <p>Now go build something great.</p>
    <div style={{ maxWidth: `300px`, marginBottom: `1.45rem` }}>
      <Image />
    </div>
    <Link to="/page-2/">Go to page 2</Link>
    {/* new link */}
    <button>
      <Link to="/newPage/">Go to New Page</Link>
    </button>
  </Layout>
)
export default IndexPage
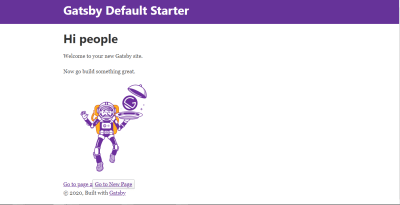
Here, we import the same components that were used in newPage.js file and they perform the same function in this file. We also import an Image component from our components folder. This component is added by default to your Gatsby application and it helps in lazy loading images and serving reduced file size. Finally, we export a function IndexPage that returns JSX containing our new link and some default content.
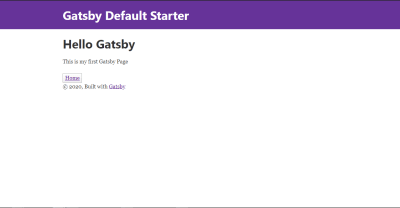
Now, if we open our browser, we should see our new link at the bottom of the page.
And if you click on Go To New Page, it should take you to your newly added page.
VuePress
VuePress is a static site generator that is powered by Vue, Vue Router and Webpack. It requires little to no configuration for you to get started with it. While there are a number of tools that are static site generators, VuePress stands out from amongst the pack for a single reason: its primary directive is to make it easier for developers to create and maintain great documentation for their projects.
To use VuePress, you first have to install it:
//globally
yarn global add vuepress # OR npm install -g vuepress

//in an existing project
yarn add -D vuepress # OR npm install -D vuepress
Once the installation process is done, you can run the following command in your terminal:
# create the project folder
mkdir demo-vuepress && cd demo-vuepress

# create a markdown file
echo '# Hello VuePress' > README.md

# start writing
vuepress dev
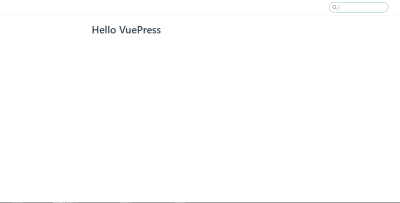
Here, we create a folder for our VuePress application, add a README.md file with # Hello VuePress as the only content inside this file, and finally, start up our server.
When this is done, our application should be running on localhost:8080 and we should see this in our browser:
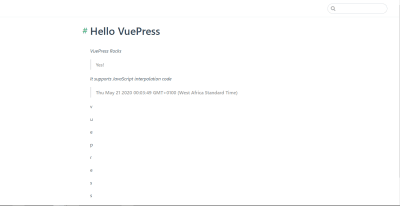
VuePress supports VueJS syntax and markup inside this file. Update your README.md file with the following:
# Hello VuePress
_VuePress Rocks_
> **Yes!**
_It supports JavaScript interpolation code_
> **{{new Date()}}**
<p v-for="i of ['v','u', 'e', 'p', 'r', 'e', 's', 's']">{{i}}</p>
If you go back to your browser, your page should look like this:
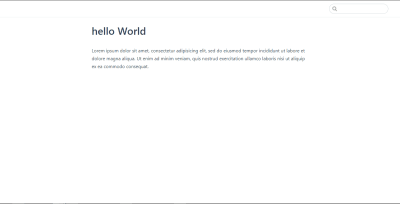
To add a new page to your VuePress site, you add a new markdown file to the root directory and name it whatever you want the route to be. In this case, I’ve gone ahead to name it Page-2.md and added the following to the file:
# hello World
Lorem ipsum dolor sit amet, consectetur adipisicing elit, sed do eiusmod
tempor incididunt ut labore et dolore magna aliqua. Ut enim ad minim veniam,
quis nostrud exercitation ullamco laboris nisi ut aliquip ex ea commodo
consequat.
And now, if you navigate to /page-2 in your browser, we should see this:
What Is Server-Side Rendering? (SSR)
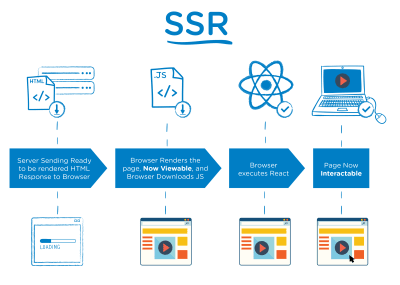
Server-Side Rendering (SSR), is the process of displaying web-pages on the server and passing it to the browser/client-side instead of rendering it in the browser. Server-side sends a fully rendered page to the client; the client’s JavaScript bundle takes over and allows the SPA framework to operate.
This means if you have an application that is server-side rendered, your content is fetched on the server side and passed to your browser to display to your user. With client-side rendering it is different, you would have to navigate to that page first before it fetches data from your server meaning your user would have to wait for some seconds before they’re served with the content on that page. Applications that have SSR enabled are called Server-side rendered applications.
This approach is good for building complex applications that require user interaction, rely on a database, or where the content changes very often. This is because content on these sites changes very often and the users need to see the updated content as soon as they’re updated. It is also good for applications that have tailored content depending on who is viewing it and applications where you need to store user-specific data like email and user preference while also catering for SEO. An example of this is a large e-commerce platform or a social media site. Let us look at some of the advantages of server-side rendering your applications.
Pros
- Content is up to date because it fetches content on the go;
- Your site loads fast because it fetches its content on the server-side before rendering it to the user;
- Since in SSR JavaScript is rendered server-side, your users’ devices have little relevance to the load time of your page and this leads to better performance.
CONS
- More API calls to the server since they’re made per request;
- Cannot deploy to a static CDN.
Further examples of frameworks that offer SSR are Next.js and Nuxt.js.
Next.js
Next.js is a React.js framework that helps in building static sites, server-side rendered applications, and so on. Since it was built on React, knowledge of React is required to use this framework.
To create a Next.js app, you need to run the following:
npm init next-app
# or
yarn create next-app
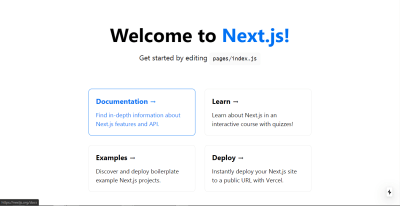
You would be prompted to choose a name your application, I have named my application demo-next. The next option would be to select a template and I’ve selected the Default starter app after which it begins to set up your app. When this is done, we can now start our application
cd demo-next
yarn dev
# or npm run dev
Your application should be running on localhost:3000 and you should see this in your browser;
The page that is being rendered can be found in pages/index.js so if you open this file and modify the JSX inside the Home function, it would reflect in your browser. Replace the JSX with this:
import Head from 'next/head'
export default function Home() {
  return (
    <div className="container">
      <Head>
        <title>Hello Next.js</title>
        <link rel="icon" href="/favicon.ico" />
      </Head>
      <main>
        <h1 className="title">
          Welcome to <a href="https://nextjs.org">Next.js!</a>
        </h1>
        <p className='description'>Nextjs Rocks!</p>
      </main>
      <style jsx>{`
        main {
          padding: 5rem 0;
          flex: 1;
          display: flex;
          flex-direction: column;
          justify-content: center;
          align-items: center;
        }
        .title a {
          color: #0070f3;
          text-decoration: none;
        }
        .title a:hover,
        .title a:focus,
        .title a:active {
          text-decoration: underline;
        }
        .title {
          margin: 0;
          line-height: 1.15;
          font-size: 4rem;
        }
        .title,
        .description {
          text-align: center;
        }
        .description {
          line-height: 1.5;
          font-size: 1.5rem;
        }
      `}</style>
      <style jsx global>{`
        html,
        body {
          padding: 0;
          margin: 0;
          font-family: -apple-system, BlinkMacSystemFont, Segoe UI, Roboto,
            Oxygen, Ubuntu, Cantarell, Fira Sans, Droid Sans, Helvetica Neue,
            sans-serif;
        }
        * {
          box-sizing: border-box;
        }
      `}</style>
    </div>
  )
}
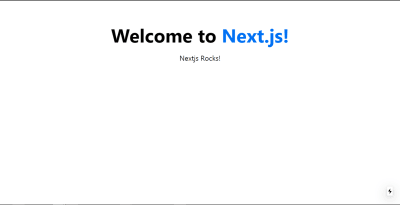
In this file, we make use of Next.js Head component to set our page’s metadata title and favicon for this page. We also export a Home function that returns a JSX containing our page’s content. This JSX contains our Head component together with our main page’s content. It also contains two style tags, one for styling this page and the other for the global styling of the app.
Now, you should see that the content on your app has changed to this:
Now if we want to add a new page to our app, we have to add a new file inside the /pages folder. Routes are automatically created based on the /pages folder structure, this means that if you have a folder structure that looks like this:
--| pages
----| index.js ==> '/'
----| about.js ==> '/about'
----| projects
------| next.js ==> '/projects/next'
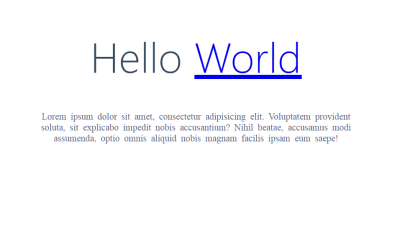
So in your pages folder, add a new file and name it hello.js then add the following to it:
import Head from 'next/head'
export default function Hello() {
  return (
    <div>
       <Head>
        <title>Hello World</title>
        <link rel="icon" href="/favicon.ico" />
      </Head>
      <main className='container'>
        <h1 className='title'>
         Hello <a href="https://en.wikipedia.org/wiki/Hello_World_(film)">World</a>
        </h1>
        <p className='subtitle'>Lorem ipsum dolor sit amet, consectetur adipisicing elit. Voluptatem provident soluta, sit explicabo impedit nobis accusantium? Nihil beatae, accusamus modi assumenda, optio omnis aliquid nobis magnam facilis ipsam eum saepe!</p>
      </main>
      <style jsx> {`

      .container {
        margin: 0 auto;
        min-height: 100vh;
        max-width: 800px;
        text-align: center;
      }
      .title {
        font-family: "Quicksand", "Source Sans Pro", -apple-system, BlinkMacSystemFont,
          "Segoe UI", Roboto, "Helvetica Neue", Arial, sans-serif;
        display: block;
        font-weight: 300;
        font-size: 100px;
        color: #35495e;
        letter-spacing: 1px;
      }
      .subtitle {
        font-weight: 300;
        font-size: 22px;
        color: #526488;
        word-spacing: 5px;
        padding-bottom: 15px;
      }
      `} </style>
    </div>
  )
}
This page is identical to the landing page we already have, we only changed the content and added new styling to the JSX. Now if we visit localhost:3000/hello, we should see our new page:
Finally, we need to add a link to this new page on our index.js page, and to do this, we make use of Next’s Link component. To do that, we have to import it first.
# index.js
import Link from 'next/link'

#Add this to your JSX
<Link href='/hello'>
<Link href='/hello'>
  <a>Next</a>
</Link>
This link component is how we add links to pages created in Next in our application.
Now if we go back to our homepage and click on this link, it would take us to our /hello page.
Nuxt.js
According to their official documentation:
“Nuxt is a progressive framework based on Vue.js to create modern web applications. It is based on Vue.js official libraries (vue, vue-router and vuex) and powerful development tools (webpack, Babel and PostCSS). Nuxt’s goal is to make web development powerful and performant with a great developer experience in mind.”
It is based on Vue.js so that means Vue.js developers would find it easy getting started with it and knowledge of Vue.js is required to use this framework.
To create a Nuxt.js app, you need to run the following command in your terminal:
yarn create nuxt-app <project-name>
# or npx
npx create-nuxt-app <project-name>
This would prompt you to select a name along with some other options. I named mine demo-nuxt and selected default options for the other options. When this is done, you can open your app folder and open pages/index.vue. Every file in this folder file is turned into a route and so our landing page is controlled by index.vue file. So if you update it with the following:
<template>
  <div class="container">
    <div>
      <logo />
      <h1 class="title">
        Hello Nuxt
      </h1>
      <h2 class="subtitle">
        Nuxt.js ROcks!
      </h2>
      <div class="links">
        <a
          href="https://nuxtjs.org/"
          target="_blank"
          class="button--green"
        >
          Documentation
        </a>
        <a
          href="https://github.com/nuxt/nuxt.js"
          target="_blank"
          class="button--grey"
        >
          GitHub
        </a>
      </div>
    </div>
  </div>
</template>
<script>
import Logo from '~/components/Logo.vue'
export default {
  components: {
    Logo
  }
}
</script>
<style>
.container {
  margin: 0 auto;
  min-height: 100vh;
  display: flex;
  justify-content: center;
  align-items: center;
  text-align: center;
}
.title {
  font-family: 'Quicksand', 'Source Sans Pro', -apple-system, BlinkMacSystemFont,
    'Segoe UI', Roboto, 'Helvetica Neue', Arial, sans-serif;
  display: block;
  font-weight: 300;
  font-size: 100px;
  color: #35495e;
  letter-spacing: 1px;
}
.subtitle {
  font-weight: 300;
  font-size: 42px;
  color: #526488;
  word-spacing: 5px;
  padding-bottom: 15px;
}
.links {
  padding-top: 15px;
}
</style>
And run your application:
cd demo-nuxt
# start your applicatio
yarn dev # or npm run dev
Your application should be running on localhost:3000 and you should see this:

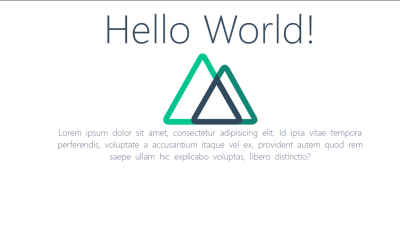
We can see that this page displays the content we added in to index.vue. The router structure works the same way Next.js router works; it renders every file inside /pages folder into a page. So let us add a new page (hello.vue) to our application.
<template>
  <div>
    <h1>Hello World!</h1>
    <p>Lorem ipsum dolor sit amet, consectetur adipisicing elit. Id ipsa vitae tempora perferendis, voluptate a accusantium itaque vel ex, provident autem quod rem saepe ullam hic explicabo voluptas, libero distinctio?</p>
  </div>
</template>
<script>
export default {};
</script>
<style>
</style>
So if you open localhost:3000/hello, you should see your new page in your browser.
Taking A Closer Look At The Differences
Now that we have looked at both static-site generators and server-side rendering and how to get started with them by using some popular tools, let us look at the differences between them.
| Static Sites Generators | Server-Side Rendering |
|---|---|
| Can easily be deployed to a static CDN | Cannot be deployed to a static CDN |
| Content and pages are generated at build time | Content and pages are generated per request |
| Content can become stale quickly | Content is always up to date |
| Fewer API calls since it only makes it at build time | Makes API calls each time a new page is visited |
Conclusion
We can see why it is so easy to think both static generated sites and server-side rendered applications are the same. Now that we know the differences between them are, I would advise that we try to learn more on how to build both static generated sites and server-side rendered applications in order to fully understand the differences between them.
Further Resources
Here are some useful links that are bound to help you get started in no time:
- “Getting Started With Gatsby,” Gatsby official website
- “Getting Started With VuePress,” VuePress official website
- “VuePress: Documentation Made Easy,” Ben Hong, Smashing Magazine
- “Getting Started With Next.js,” Next.js by Vercel official website
- “Why Do People Use A Static-Site Generator?,” Quora
- “Static Site Generator,” Gatsby official website
- “An Introduction To VuePress,” Joshua Bemenderfer, DigitalOcean
- “What Is Server-Side Rendering?,” Edpresso, Educative.io
- “What Is A Static Site Generator? And 3 Ways To Find The Best One ,” Phil Hawksworth, The Netlify Blog
- “The Benefits Of Server Side Rendering Over Client Side Rendering,” Alex Grigoryan, Medium
(ks, ra, il)
From our sponsors: Differences Between Static Generated Sites And Server-Side Rendered Apps


