Archived
Building React Apps With Storybook


Storybook is a UI explorer that eases the task of testing components during development. In this article, you will learn what storybook is about and how to use it to build and test React components by building a simple application. We’ll start with a basic example that shows how to work with storybook, then we’ll go ahead to create a storybook for a Table component which will hold students’ data.
Storybook is widely used in building live playgrounds and documenting component libraries, as you have the power to change props values, check loading states amongst other defined functionalities.
You should have basic knowledge of React and the use of NPM before proceeding with this article, as we’ll be building a handful of React components.
Storybook Stories
A story is an exported function that renders a given visual state of a component based on the defined test cases. These stories are saved under the extension .stories.js. Here is an example story:
import React from 'react';
import Sample from './x';

export default {
    title: 'Sample story',
    component: Sample
}

export function Story(){
    return (
        <Sample data="sample data" />
    )
}
The good part about storybook is that it’s not different from how you typically write React components, as you can see from the example above. The difference here is that alongside the Story component, we are also exporting an object which holds the values of our story title and the component the story is meant for.
Starting Out
Let’s start with building the basic example mentioned above. This example will get us familiar with how to create stories and how the interface of the stories look like.
You’ll start by creating the React application and installing Storybook in it.
From your terminal, run the command below:
# Scaffold a new application.
npx create-react-app table-component

# Navigate into the newly created folder.
cd table-component

# Initialise storybook.
npx -p @storybook/cli sb init
After that, check that the installation was successful by running the following commands:
In one terminal:
yarn startand in the other:
yarn storybookYou will be greeted by two different screens: the React application and the storybook explorer.
With storybook installed in our applications, you’ll go on to remove the default stories located in src/stories folder.
Building A Hello world story
In this section, you’ll write your first story, not the one for the table component yet. This story is to explain the concepts of how a story works. Interestingly, you do not need to have React running to work with a story.
Since React stories are isolated React functions, you have to define a component for the story first. In the src folder, create a components folder and a file Hello.js inside it, with the content below:
import React from 'react';

export default function Hello({name}) {
  return (
    <p>Hello {name}!, this is a simple hello world component</p>
  )
}
This is a component that accepts a name prop, it renders the value of name alongside some texts. Next, you write the story for the component in src/stories folder in a file named Hello.stories.js:
First, you import React and the Hello component:
import React from 'react';
import Hello from '../components/Hello.js';
Next, you create a default export which is an object containing the story title and component:
export default {
  title: 'Hello Story',
  component: Hello
}
Next, you create your first story:
export function HelloJoe() {
  return (
    <Hello name="Jo Doe" />
  )
}
In the code block above, the function HelloJoe(), is the name of the story, the body of the function houses the data to be rendered in the storybook. In this story, we are rendering the Hello component with the name “Jo Doe”.
This is similar to how you would typically render the Hello component if you wanted to make use of it in another component. You can see that we’re passing a value for the name prop which needs to be rendered in the Hello component.
Your storybook explorer should look like this:
The Hello Joe story is listed under the story title and already rendered. Each story has to be exported to be listed in the storybook.
If you create more stories with the title as Hello Story, they will be listed under the title and clicking on each story renders differently. Let’s create another story:
export function TestUser() {
    return (
        <Hello name="Test User" />
    )
}
Your storybook explorer should contain two stories:

Some components render data conditionally based on the props value passed to them. You will create a component that renders data conditionally and test the conditional rendering in storybook:
In the Hello component file, create a new component:
function IsLoading({condition}) {
    if (condition) {
        return (
            <p> Currently Loading </p>
        )
    return (
        <p> Here's your content </p>
    )
}
To test the behaviour of your new component, you will have to create a new story for it. In the previous story file, Hello.stories.jsx, create a new story:
import Hello, { IsLoading } from '../components/Hello';

export function NotLoading() {
    return (
        <IsLoading loading={false}/>
    )
}

export function Loading() {
    return (
        <IsLoading loading={true} />
    )
}
The first story render differs from the second story render as expected. Your storybook explorer should look like this:


You have learnt the basics of creating stories and using them. In the next section, you will build, style and test the main component for this article.
Building A Table Component
In this section, you will build a table component, after which you will write a story to test it.
The table component example will serve as a medium for displaying students data. The table component will have two headings; names and courses.

First, create a new file Table.js to house the component in the src/component folder. Define the table component inside the newly created file:
import React from 'react';

function Table({data}) {
    return ()
}
The Table component takes a prop value data. This prop value is an array of objects containing the data of students in a particular class to be rendered. Let’s write the table body:
In the return parentheses, write the following piece of code:
<table>
    <thead>
        <tr>
            <th>Name</th>
            <th>Registered Course</th>
        </tr>
    </thead>
    <tbody>
    {data}
    </tbody>
</table>
The code above creates a table with two headings, Name and Registered Course. In the table body, the students’ data is rendered. Since objects aren’t valid children in react, you will have to create a helper component to render individual data.
Just after the Table component, define the helper component. Let’s call it RenderTableData:
function RenderTableData({data}){
    return (
        <>
            {data.map(student => (
                <tr>
                    <td>{student.name}</td>
                    <td>{student.course}</td>
                </tr>
            ))}
        </>
    )
}
In the RenderTableData component above, the data prop which will be an array of objects will be mapped out and rendered individually as a table data. With the helper component written, update the Table component body from:
{data}to
{data
?
    <RenderTableData data={data} />
:
    <tr>
        <td>No student data available</td>
        <td>No student data available</td>
    </tr>
}
The new block of code renders the student data with the help of the helper component if there’s any data present, otherwise, return “No student data available”.
Before moving on to write a story to test the component, let’s style the table component. Create a stylesheet file in the components folder:
body{
    font-weight: bold;
}
table {
    border-collapse: collapse;
    width: 100%;
}
table, th, td {
    border: 1px solid rgb(0, 0, 0);
    text-align: left;
}
tr:nth-child(even){
    background-color: rgb(151, 162, 211);
    color: black;
}
th {
    background-color: rgba(158, 191, 235, 0.925);
    color: white;
}
th, td {
    padding: 15px;
}
With the styling done, let’s create two stories to test the behaviour of the table component. The first story will have data passed to be rendered and the second won’t.
You can also style the story differently.
In your stories folder, create a new file Table.stories.js. Begin by importing react, the table component and defining the story:
import React from 'react';
import Table from '../components/Table';

export default {
    title: 'Table component',
    component: Table
}
With the story defined, create dummy data for the first story:
const data = [
    {name: 'Abdulazeez Abdulazeez', course: 'Water Resources and Environmental Engineering'},
    {name: 'Albert Einstein', course: 'Physics'},
    {name: 'John Doe', course: 'Estate Managment'},
    {name: 'Sigismund Freud', course: 'Neurology'},
    {name: 'Leonhard Euler', course: 'Mathematics'},
    {name: 'Ben Carson', course: 'Neurosurgery'}
]
Next, you’ll write the first story named ShowStudentsData:
export function ShowStudentsData() {
    return (
        <Table data={data} />
    )
}
Next, head to the storybook explorer tab to check the story. Your explorer should look like this:

You have tested the component with data and it renders perfectly. The next story will be to check the behaviour if there’s no data passed.
Just after the first story, write the second story, EmptyData:
export function ExportData(){
    return (
        <Table />
    )
}
The story above is expected to render “No data available”. Head to the storybook explorer to confirm that it renders the accurate message. Your storybook explorer should look like this:

In this section, you have written a table component and a story to test the behaviour. In the next section, you’ll be looking at how to edit data in real time in the storybook explorer using the knobs addon.
Addons
Addons in storybook are extra features that are implemented optionally by the user. These extra features are things that might be necessary for your stories. Storybook provides some core addons but, you can install and even build addons to fit your use case such as decorator addons.
A decorator is a way to wrap a story in extra “rendering” functionality. Many addons define decorators in order to augment your stories with extra rendering or gather details about how your story is rendered.
— Storybook docs
Adding Knobs Addon To Our Table Story
The knobs addon is a decorator addon and one of the most used in Storybook. It enables you to change the values (or props) of components without modifying the story function or the component itself.
In this section, you will be adding the knobs addon to our application. The knobs addon eases the stress of having to update the data in your stories manually by setting up a new panel in the storybook explorer where you can easily change the data passed. Without knobs, you’ll have to go back to manually modifying your data.
Doing this would be inefficient and it will defeat the purpose of storybook — especially in cases where those who have access to the stories do not have access to modify the data in the code.
The knobs addon doesn’t come installed with storybook, so you will have to install it as an independent package:
yarn add -D @storybook/addon-knobsOnce the addon has been installed, register it under the addons array in your stories configuration located in .storybook/main.js.
module.exports = {
    stories: ['../src/**/*.stories.js'],
    addons: [
        '@storybook/preset-create-react-app',
        '@storybook/addon-actions',
        '@storybook/addon-links',
        '@storybook/addon-knobs' // Add the knobs addon.
    ],
};
With the addon registered, you can now go-ahead to implement the knobs addon in your table story. The student data is of type object, as a result, you will be using the object type from the knobs addon.
Import the decorator and the object functions after the previous imports:
import { withKnobs, object } from '@storybook/addon-knobs';Just after the component field in the default export, add another field:
decorators: [withKnobs]That is, your story definition object should look like this:
export default {
    title: 'Table component',
    component: Table,
    decorators: [withKnobs]
}
The next step is to modify our Table component in the ShowStudentsData story to allow the use of the object knob:
before:
<Table data={data}/>after:
<Table data={object('data', data)}/>The first parameter in the object function is the name to be displayed in the knobs bar. It can be anything, in this case, you’ll call it data.
In your storybook explorer, the knobs bar is now visible:
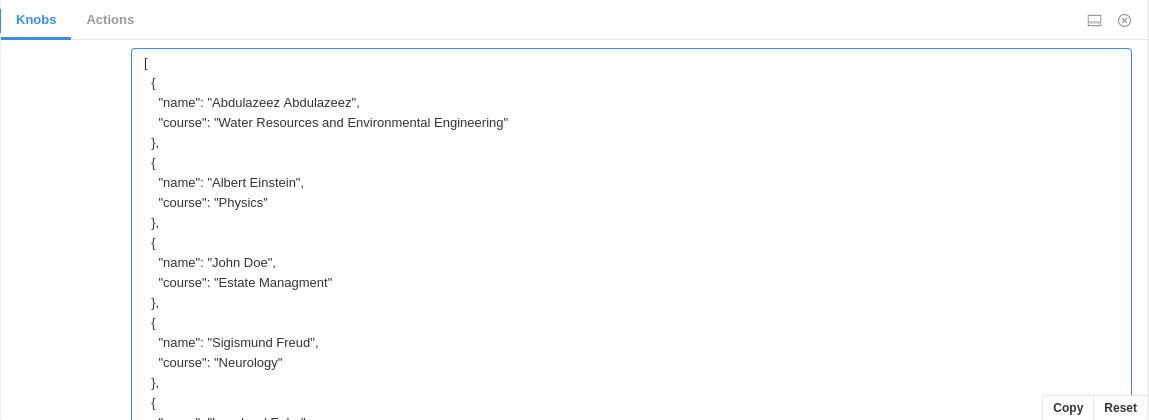
You can now add new data, edit existing ones and delete the data without changing the values in the story file directly.
Conclusion
In this article, you learned what storybook is all about and built a table component to complement the explanations. Now, you should be able to write and test components on the go using storybook.
Also, the code used in this article can be found in this GitHub repository.
External Links
- “Learn Storybook,” official website
- “Storybook,” official website
- “Introduction to Storybook for React,” Storybook v6.0
- “Supercharge Storybook,” Storybook v6.0
- “Decorators,” Storybook v6.0
From our sponsors: Building React Apps With Storybook


