Archived
Building A Node.js Express API To Convert Markdown To HTML
Building A Node.js Express API To Convert Markdown To HTML
Building A Node.js Express API To Convert Markdown To HTML
Sameer Borate
2019-04-23T12:30:16+02:00
2019-04-23T12:36:00+00:00
Markdown is a lightweight text markup language that allows the marked text to be converted to various formats. The original goal of creating Markdown was of enabling people “to write using an easy-to-read and easy-to-write plain text format and to optionally convert it to structurally valid XHTML (or HTML). Currently, with WordPress supporting Markdown, the format has become even more widely used.
The purpose of writing the article is to show you how to use Node.js and the Express framework to create an API endpoint. The context in which we will be learning this is by building an application that converts Markdown syntax to HTML. We will also be adding an authentication mechanism to the API so as to prevent misuse of our application.
A Markdown Node.js Application
Our teeny-tiny application, which we will call ‘Markdown Convertor’, will enable us to post Markdown-styled text and retrieve an HTML version. The application will be created using the Node.js Express framework, and support authentication for conversion requests.
We will build the application in small stages — initially creating a scaffold using Express and then adding various features like authentication as we go along. So let us start with the initial stage of building the application by creating a scaffold.
Stage 1: Installing Express
Assuming you’ve already installed Node.js on your system, create a directory to hold your application (let’s call it “markdown-api”), and switch to that directory:
$ mkdir markdown-api
$ cd markdown-api
Use the npm init command to create a package.json file for your application. This command prompts you for a number of things like the name and version of your application.
For now, simply hit Enter to accept the defaults for most of them. I’ve used the default entry point file as index.js, but you could try app.js or some other depending on your preferences.
Now install Express in the markdown-api directory and save it in the dependencies list:
$ npm install express --save
Create an index.js file in the current directory (markdown-api) and add the following code to test if the Express framework is properly installed:
Const express = require('express');
var app = express();

app.get('/', function(req, res){
    res.send('Hello World!');
});

app.listen(3000);
Now browse to the URL http://localhost:3000 to check whether the test file is working properly. If everything is in order, we will see a Hello World!’ greeting in the browser and we can proceed to build a base API to convert Markdown to HTML.
Stage 2: Building A Base API
The primary purpose of our API will be to convert text in a Markdown syntax to HTML. The API will have two endpoints:
/login/convert
The login endpoint will allow the application to authenticate valid requests while the convert endpoint will convert (obviously) Markdown to HTML.
Below is the base API code to call the two endpoints. The login call just returns an “Authenticated” string, while the convert call returns whatever Markdown content you submitted to the application. The home method just returns a ‘Hello World!’ string.
const express = require("express");
const bodyParser = require('body-parser');

var app = express();
app.use(bodyParser.urlencoded({ extended: true }));
app.use(bodyParser.json());

app.get('/', function(req, res){
    res.send('Hello World!');
});

app.post('/login', function(req, res) {
    res.send("Authenticated");
  },
);

app.post("/convert", function(req, res, next) {
    console.log(req.body);
    if(typeof req.body.content == 'undefined' || req.body.content == null) {
        res.json(["error", "No data found"]);
    } else {
        res.json(["markdown", req.body.content]);
    }
});

app.listen(3000, function() {
 console.log("Server running on port 3000");
});
We use the body-parser middleware to make it easy to parse incoming requests to the applications. The middleware will make all the incoming requests available to you under the req.body property. You can do without the additional middleware but adding it makes it far easier to parse various incoming request parameters.
You can install body-parser by simply using npm:
$ npm install body-parser
Now that we have our dummy stub functions in place, we will use Postman to test the same. Let’s first begin with a brief overview of Postman.
Postman Overview
Postman is an API development tool that makes it easy to build, modify and test API endpoints from within a browser or by downloading a desktop application (browser version is now deprecated). It has the ability to make various types of HTTP requests, i.e. GET, POST, PUT, PATCH. It is available for Windows, macOS, and Linux.
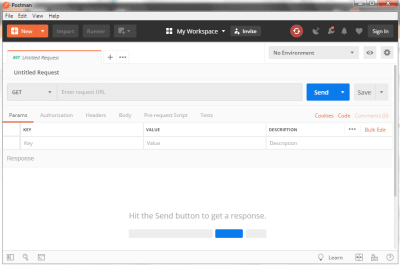
Here’s a taste of Postman’s interface:
(Large preview)
To query an API endpoint, you’ll need to do the following steps:
Postman will then send the request to the application, retrieve any responses and display it in the lower window. This is the basic mechanism on how to use the Postman tool. In our application, we will also have to add other parameters to the request, which will be described in the following sections.
Using Postman
Now that we have seen an overview of Postman, let’s move forward on using it for our application.
Start your markdown-api application from the command-line:
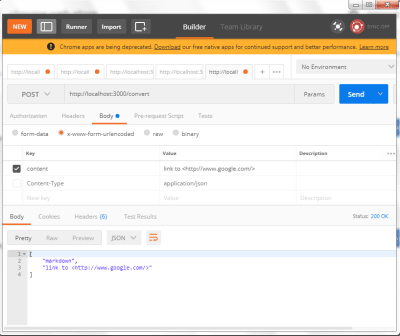
$ node index.jsTo test the base API code, we make API calls to the application from Postman. Note that we use the POST method to pass the text to convert to the application.
The application at present accepts the Markdown content to convert via the content POST parameter. This we pass as a URL encoded format. The application, currently, returns the string verbatim in a JSON format — with the first field always returning the string markdown and the second field returning the converted text. Later, when we add the Markdown processing code, it will return the converted text.
Stage 3: Adding Markdown Convertor
With the application scaffold now built, we can look into the Showdown JavaScript library which we will use to convert Markdown to HTML. Showdown is a bidirectional Markdown to HTML converter written in Javascript which allows you to convert Markdown to HTML and back.
(Large preview)
Install the package using npm:
$ npm install showdown
After adding the required showdown code to the scaffold, we get the following result:
const express        = require("express");
const bodyParser = require('body-parser');
const showdown   = require('showdown');

var app = express();
app.use(bodyParser.urlencoded({ extended: true }));
app.use(bodyParser.json());

converter = new showdown.Converter();

app.get('/', function(req, res){
    res.send('Hello World!');
});

app.post('/login', function(req, res) {
    res.send("Authenticated");
  },
);

app.post("/convert", function(req, res, next) {
    if(typeof req.body.content == 'undefined' || req.body.content == null) {
        res.json(["error", "No data found"]);
    } else {
        text = req.body.content;
        html = converter.makeHtml(text);
        res.json(["markdown", html]);
    }
});

app.listen(3000, function() {
 console.log("Server running on port 3000");
});
The main converter code is in the /convert endpoint as extracted and shown below. This will convert whatever Markdown text you post to an HTML version and return it as a JSON document.
...
} else {
        text = req.body.content;
        html = converter.makeHtml(text);
        res.json(["markdown", html]);
    }
The method that does the conversion is converter.makeHtml(text). We can set various options for the Markdown conversion using the setOption method with the following format:
converter.setOption('optionKey', 'value');
So, for example, we can set an option to automatically insert and link a specified URL without any markup.
converter.setOption('simplifiedAutoLink', 'true');
As in the Postman example, if we pass a simple string (such as Google home http://www.google.com/) to the application, it will return the following string if simplifiedAutoLink is enabled:
<p>Google home <a href="http://www.google.com/">http://www.google.com/</a></p>
Without the option, we will have to add markup information to achieve the same results:
Google home <http://www.google.com/>
There are many options to modify how the Markdown is processed. A complete list can be found on the Passport.js website.
So now we have a working Markdown-to-HTML converter with a single endpoint. Let us move further and add authentication to have application.
Stage 4: Adding API Authentication Using Passport
Exposing your application API to the outside world without proper authentication will encourage users to query your API endpoint with no restrictions. This will invite unscrupulous elements to misuse your API and also will burden your server with unmoderated requests. To mitigate this, we have to add a proper authentication mechanism.
We will be using the Passport package to add authentication to our application. Just like the body-parser middleware we encountered earlier, Passport is an authentication middleware for Node.js. The reason we will be using Passport is that it has a variety of authentication mechanisms to work with (username and password, Facebook, Twitter, and so on) which gives the user the flexibility on choosing a particular mechanism. A Passport middleware can be easily dropped into any Express application without changing much code.
Install the package using npm.
$ npm install passport
We will also be using the local strategy, which will be explained later, for authentication. So install it, too.
$ npm install passport-local
You will also need to add the JWT(JSON Web Token) encode and decode module for Node.js which is used by Passport:
$ npm install jwt-simple
Strategies In Passport
Passport uses the concept of strategies to authenticate requests. Strategies are various methods that let you authenticate requests and can range from the simple case as verifying username and password credentials, authentication using OAuth (Facebook or Twitter), or using OpenID. Before authenticating requests, the strategy used by an application must be configured.
In our application, we will use a simple username and password authentication scheme, as it is simple to understand and code. Currently, Passport supports more than 300 strategies which can be found here.
Although the design of Passport may seem complicated, the implementation in code is very simple. Here is an example that shows how our /convert endpoint is decorated for authentication. As you will see, adding authentication to a method is simple enough.
app.post("/convert",
         passport.authenticate('local',{ session: false, failWithError: true }),
         function(req, res, next) {
        // If this function gets called, authentication was successful.
        // Also check if no content is sent
        if(typeof req.body.content == 'undefined' || req.body.content == null) {
            res.json(["error", "No data found"]);
        } else {
            text = req.body.content;
            html = converter.makeHtml(text);
            res.json(["markdown", html]);
        }},
        // Return a 'Unauthorized' message back if authentication failed.
        function(err, req, res, next) {
            return res.status(401).send({ success: false, message: err })
        });
Now, along with the Markdown string to be converted, we also have to send a username and password. This will be checked with our application username and password and verified. As we are using a local strategy for authentication, the credentials are stored in the code itself.
Although this may sound like a security nightmare, for demo applications this is good enough. This also makes it easier to understand the authentication process in our example. Incidentally, a common security method used is to store credentials in environment variables. Still, many people may not agree with this method, but I find this relatively secure.
The complete example with authentication is shown below.
const express = require("express");
const showdown  = require('showdown');
const bodyParser = require('body-parser');
const passport = require('passport');
const jwt = require('jwt-simple');
const LocalStrategy = require('passport-local').Strategy;


var app = express();
app.use(bodyParser.urlencoded({ extended: true }));
app.use(bodyParser.json());

converter = new showdown.Converter();

const ADMIN = 'admin';
const ADMIN_PASSWORD = 'smagazine';
const SECRET = 'secret#4456';

passport.use(new LocalStrategy(function(username, password, done) {
  if (username === ADMIN && password === ADMIN_PASSWORD) {
    done(null, jwt.encode({ username }, SECRET));
    return;
  }
  done(null, false);
}));

app.get('/', function(req, res){
    res.send('Hello World!');
});


app.post('/login', passport.authenticate('local',{ session: false }),
                function(req, res) {
                // If this function gets called, authentication was successful.
                // Send a 'Authenticated' string back.
                res.send("Authenticated");
  });


app.post("/convert",
         passport.authenticate('local',{ session: false, failWithError: true }),
         function(req, res, next) {
        // If this function gets called, authentication was successful.
        // Also check if no content is sent
        if(typeof req.body.content == 'undefined' || req.body.content == null) {
            res.json(["error", "No data found"]);
        } else {
            text = req.body.content;
            html = converter.makeHtml(text);
            res.json(["markdown", html]);
        }},
        // Return a 'Unauthorized' message back if authentication failed.
        function(err, req, res, next) {
            return res.status(401).send({ success: false, message: err })
        });


app.listen(3000, function() {
 console.log("Server running on port 3000");
});
A Postman session that shows conversion with authentication added is shown below.
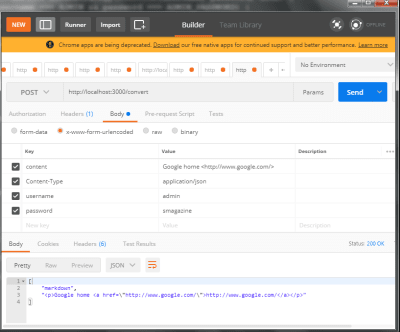
Final application testing with Postman (Large preview)
Here we can see that we have got a proper HTML converted string from a Markdown syntax. Although we have only requested to convert a single line of Markdown, the API can convert a larger amount of text.
This concludes our brief foray into building an API endpoint using Node.js and Express. API building is a complex topic and there are finer nuances that you should be aware of while building one, which sadly we have no time for here but will perhaps cover in future articles.
Accessing Our API From Another Application
Now that we have built an API, we can create a small Node.js script that will show you how the API can be accessed. For our example, we will need to install the request npm package that provides a simple way to make HTTP requests. (You will Most probably already have this installed.)
$ npm install request --save
The example code to send a request to our API and get the response is given below. As you can see, the request package simplifies the matter considerably. The markdown to be converted is in the textToConvert variable.
Before running the following script, make sure that the API application we created earlier is already running. Run the following script in another command window.
Note: We are using the (back-tick) sign to span multiple JavaScript lines for the textToConvert variable. This is not a single-quote.
var Request = require("request");

// Start of markdown
var textToConvert = `Heading
=======
## Sub-heading

Paragraphs are separated
by a blank line.

Two spaces at the end of a line
produces a line break.

Text attributes _italic_,
**bold**, 'monospace'.
A [link](http://example.com).
Horizontal rule:`;

// End of markdown

Request.post({
    "headers": { "content-type": "application/json" },
    "url": "http://localhost:3000/convert",
    "body": JSON.stringify({
        "content": textToConvert,
        "username": "admin",
        "password": "smagazine"
    })
}, function(error, response, body){
    // If we got any connection error, bail out.
    if(error) {
        return console.log(error);
    }
    // Else display the converted text
    console.dir(JSON.parse(body));
});
When we make a POST request to our API, we provide the Markdown text to be converted along with the credentials. If we provide the wrong credentials, we will be greeted with an error message.
{
  success: false,
  message: {
    name: 'AuthenticationError',
    message: 'Unauthorized',
    status: 401
  }
}
For a correctly authorized request, the above sample Markdown will be converted to the following:
[ 'markdown',
  `<h1 id="heading">Heading</h1>
  <h2 id="subheading">Sub-heading</h2>
  <p>Paragraphs are separated by a blank line.</p>
  <p>Two spaces at the end of a line<br />
  produces a line break.</p>
  <p>Text attributes <em>italic</em>,
  <strong>bold</strong>, 'monospace'.
  A <a href="http://example.com">link</a>.
  Horizontal rule:</p>` ]
Although we have hardcoded the Markdown here, the text can come from various other sources — file, web forms, and so on. The request process remains the same.
Note that as we are sending the request as an application/json content type; we need to encode the body using json, hence the JSON.stringify function call. As you can see, it takes a very small example to test or API application.
Conclusion
In this article, we embarked on a tutorial with the goal of learning on how to use Node,js and the Express framework to build an API endpoint. Rather than building some dummy application with no purpose, we decided to create an API that converts Markdown syntax to HTML, which anchors or learning in a useful context. Along the way, we added authentication to our API endpoint, and we also saw ways to test our application endpoint using Postman.
(rb, ra, il)
From our sponsors: Building A Node.js Express API To Convert Markdown To HTML


