Archived
An Introduction To React With Ionic
An Introduction To React With Ionic
Jerry Navi 2020-05-04T10:30:00+00:00
2020-05-05T12:36:36+00:00
The Ionic Framework is an open-source UI toolkit for building fast, high-quality applications using web technologies with integrations for popular frameworks like Angular and React. Ionic enables cross-platform development using either Cordova or Capacitor, with the latter featuring support for desktop application development using Electron.
In this article, we will explore Ionic with the React integration by building an app that displays comics using the Marvel Comics API and allows users to create a collection of their favorites. We’ll also learn how to integrate native capabilities into our app with Capacitor and generate builds for a native platform.
If you have not worked with Ionic in the past, or you’re curious to find out how Ionic works with React, this tutorial is for you.
Prerequisites
Before you can start building apps with the Ionic Framework, you will need the following:
- Node.js (at least v10) installed on your computer
- working knowledge of React
- familiarity with the Hooks API
- some experience with TypeScript
- a native IDE, Android Studio for Android, or XCode for iOS
- a Marvel developer account with an API key. You can get one here
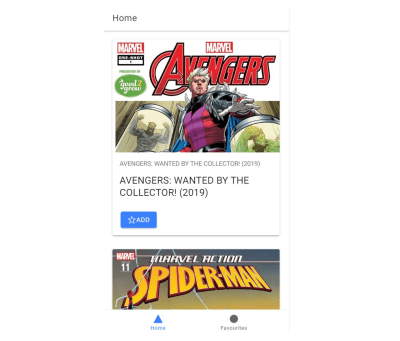
Here’s a picture of what we’ll be building:
Installing Ionic CLI
Ionic apps are created and developed primarily through the Ionic command line interface (CLI). The CLI offers a wide range of dev tools and help options as you develop your hybrid app. To proceed with this guide, you will need to make sure the CLI is installed and accessible from your terminal.
Open a new terminal window and run the following command:
npm install -g @ionic/cli
This will install the latest version of the Ionic CLI and make it accessible from anywhere on your computer. If you want to confirm that the install was successful, you can run the following command:
ionic --version
This command will output the installed Ionic version on your computer and it should be similar to this:
6.4.1
You can now bootstrap Ionic apps for the officially supported framework integrations — Angular and React — using any of the prebuilt templates available.
Starting An Ionic React Application
Creating an Ionic React application is easy using the CLI. It provides a command named start that generates files for a new project based on the JavaScript framework you select. You can also choose to start off with a prebuilt UI template instead of the default blank “Hello world” app.
To get started, run the following command:
ionic start marvel-client tabs --type=react --capacitor
This command will create a new Ionic React app using the tabs template. It also adds a Capacitor integration to your app. Capacitor is a cross-platform app runtime that makes running web apps natively on iOS, Android, and desktop easy.
Navigate your terminal to the newly created directory and run start the server.
cd marvel-client
ionic serve
Now point your browser to http://localhost:8100 to see your app running.
Note: If you have used create-react-app (CRA) before, your current project’s directory structure should feel very familiar. That’s because, in order to keep the development experience familiar, Ionic React projects are created using a setup similar to that found in a CRA app. React Router is also used to power app navigation under the hood.
Creating A React Component
You are going to create a reusable React component in this step. This component will receive data and display information about a comic. This step also aims to help demonstrate that Ionic React is still just React.
Delete the files for the ExploreContainer component from src/components and remove its imports from the .tsx files in the src/pages directory.
import React from 'react'; import { IonContent, IonHeader, IonPage, IonTitle, IonToolbar } from '@ionic/react';import ExploreContainer from '../components/ExploreContainer';import './Tab1.css'; const Tab1: React.FC = () => { return ( <IonPage> ... <IonContent><IonHeader collapse="condense"> <IonToolbar> <IonTitle size="large">Tab 1</IonTitle> </IonToolbar> </IonHeader> <ExploreContainer name="Tab 1 page" /></IonContent> </IonPage> ); }; export default Tab1;
In your Tab1.tsx file, also remove the content within the tag.
Next, create a file named ComicCard.tsx in your src/components directory. Then, open the file in your editor and add the following contents:
import React, { FC } from 'react';
import { Comic } from '../interfaces/comic';
import { IonImg, IonCard, IonCardTitle, IonCardSubtitle, IonCardHeader } from '@ionic/react';
type Props = {
    comic: Comic;
}
const ComicCard: FC = (props): JSX.Element => {
    const { comic } = props;
    return (
        <IonCard>
            <div
                style={{
                    height: '250px',
                    overflow: 'hidden',
                }}
            >
                <IonImg
                    src={`${comic.thumbnail.path}.${comic.thumbnail.extension}`}
                />
            </div>
            <IonCardHeader>
                <IonCardSubtitle>
                    {comic.title}
                </IonCardSubtitle>
                <IonCardTitle>
                    <h3>
                        {comic.series.name}
                    </h3>
                </IonCardTitle>
            </IonCardHeader>
        </IonCard>
    );
}
export default ComicCard;
Your ComicCard component receives props containing details of a comic and renders the information using an IonCard component. Cards in Ionic are usually composed using other subcomponents. In this file, you are using the IonCardTitle and IonCardSubtitle components to render the comic title and series information within a IonCardHeader component.
Consuming The Marvel API
To use your newly created component you would have to fetch some data from the Marvel API. For the purpose of this guide, you are going to use the axios package to make your HTTP Requests. You can install it by running the following command:
yarn add axios
Next, add the following folder to your src directory:
# ~/Desktop/marvel-client/src
mkdir -p services
Then, cd into the services directory and create a file named api.ts:
# ~/Desktop/marvel-client/src/services
touch api.ts
Finally, open the file and add the following contents:
import axios from 'axios';
import { DataContainer } from '../interfaces/data-container';
import { Comic } from '../interfaces/comic';
const API_KEY = '813xxxxxxxxxxxxxxxxxx';
const api = axios.create({
    baseURL: 'https://gateway.marvel.com:443/v1/public',
    headers: {
        'Content-Type': 'application/json',
    },
});
api.interceptors.response.use((response) => {
    if (response.status === 200) {
        return response.data.data;
    }
});
export function getComics(): Promise<DataContainer<Comic>> {
    return api.get('/comics', {
        params: {
            apikey: API_KEY,
            limit: 10,
            hasDigitalIssue: true,
        },
    });
}
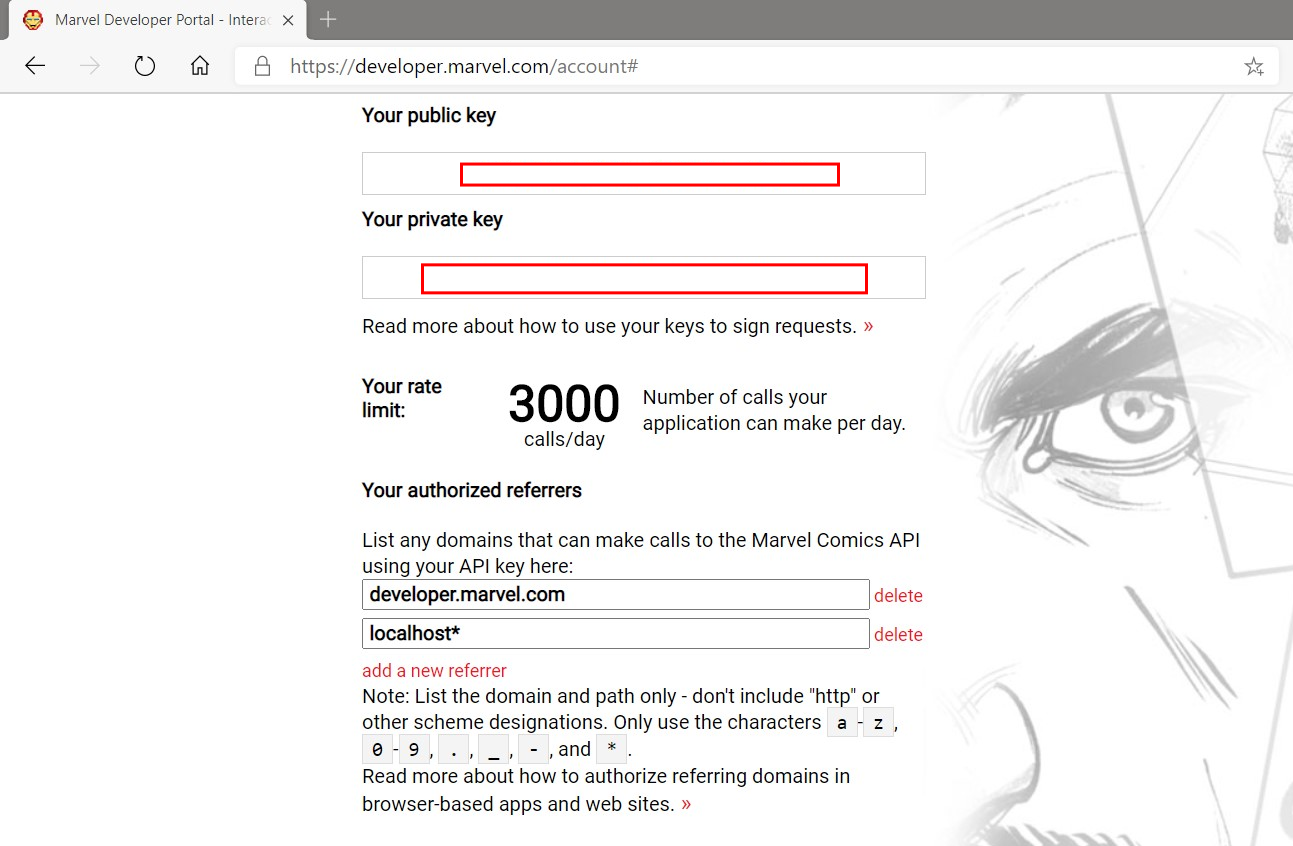
Be sure to replace the value of API_KEY with your own API key. If you don’t have one, you can request one by signing up at the Marvel developer website. You also need to set up your account to allow requests from your local development server by adding localhost* to your Marvel authorized referrers list (see the image below):

You now have an axios instance configured to use the Marvel API. The api.ts file has only one export, which hits the GET /comics endpoint and returns a collection of comics. You are limiting the results to only those that are available digitally. You will now proceed to use the API Service in your application.
Open the Tab1.tsx file and replace the contents with the following:
import React, { FC, useState, useEffect } from 'react';
import { IonContent, IonHeader, IonPage, IonTitle, IonToolbar, IonSpinner, IonGrid, IonRow, IonCol } from '@ionic/react';
import './Tab1.css';
import ComicCard from '../components/ComicCard';
import { Comic } from '../interfaces/comic';
import { getComics } from '../services/api';

const Tab1: FC = () => {
  const [comics, setComics] = useState(null as Comic[] | null);
  const [loading, setLoading] = useState(false);
  const fetchComics = () => {
    setLoading(true);
    getComics().then((response) => {
      if (response && response.results) {
        setComics(response.results);
      }
    }).finally(() => {
      setLoading(false);
    });
  };
  useEffect(() => {
    fetchComics();
  }, [])
  return (
    <IonPage>
      <IonHeader>
        <IonToolbar>
          <IonTitle>Home</IonTitle>
        </IonToolbar>
      </IonHeader>
      <IonContent>
        {(loading) && (
          <div className="ion-text-center ion-padding">
            <IonSpinner name="crescent" />
          </div>
        )}
        {(comics) && (
          <IonGrid>
            <IonRow>
              {comics.map((comic) => (
                <IonCol key={comic.id} sizeXs="12" sizeSm="6" sizeMd="4" sizeLg="3" sizeXl="2">
                  <ComicCard comic={comic} />
                </IonCol>
              ))}
            </IonRow>
          </IonGrid>
        )}
      </IonContent>
    </IonPage>
  );
};
export default Tab1;
The file above is an example of a page in Ionic. Pages are components that can be accessed with a route/URL. To ensure transitions between pages work properly, it is necessary to have the IonPage component be the root component in your page.
IonHeader is a component meant to exist at the top of a page. It’s not required for all pages, but it can contain useful components like the page title, the IonBackButton component for navigating between pages, or the IonSearchBar. IonContent is the main content area for your pages. It’s responsible for providing the scrollable content that users will interact with, plus any scroll events that could be used in your app.
Inside your component, you have a function called fetchComics() — called once inside the useEffect() hook — which makes a request to get comics from the Marvel API by calling the getComics() function you wrote earlier. It saves the results to your component’s state via the useState() hook. The IonSpinner component renders a spinning icon while your app is making a request to the API. When the request is completed, you pass the results to the ComicCard component you created earlier.
At this point your app should look like this:

In the next step, you will learn how to use Capacitor plugins in your app by enabling offline storage.
Creating a Personal Collection of Marvel Comics
Your app looks good so far, but it isn’t very useful as a mobile app. In this step you will extend your app’s functionality by allowing users to ‘star’ comics, or save them as favorites. You will also make information about the saved favorites available to view offline by using the Capacitor Storage plugin.

First, create a file named util.ts in your src directory:
# ~/Desktop/marvel-client/src
touch util.ts
Now, open the file and paste the following contents:
import { Plugins } from '@capacitor/core';
import { Comic } from './interfaces/comic';

const { Storage, Toast } = Plugins;

export const updateFavourites = async (comic: Comic): Promise => {
    const saved = await Storage.get({ key: 'savedFavourites' });
    const favourites: Comic[] | null = (saved && saved.value)
        ? JSON.parse(saved.value)
        : null;

    if (!favourites) {
        const comics = [comic];
        await Storage.set({
            key: 'savedFavourites',
            value: JSON.stringify(comics),
        });
        return Toast.show({
            text: 'Added to favourites',
        });
    }

    const copyOfFavourites = favourites.slice();
    const { id } = comic;
    const isSavedIndex = copyOfFavourites.findIndex((c) => c.id === id);

    if (isSavedIndex !== -1) {
        copyOfFavourites.splice(isSavedIndex, 1);
        await Storage.set({
            key: 'savedFavourites',
            value: JSON.stringify(copyOfFavourites),
        });
        return Toast.show({
            text: 'Removed from favourites',
        });
    } else {
        copyOfFavourites.unshift(comic);
        await Storage.set({
            key: 'savedFavourites',
            value: JSON.stringify(copyOfFavourites),
        });
        return Toast.show({
            text: 'Added to favourites',
        });
    }
};

export const getFavourites = async (): Promise<Comic[] | null> => {
    const saved = await Storage.get({
        key: 'savedFavourites',
    });
    return (saved && saved.value)
        ? JSON.parse(saved.value)
        : null;
};

export const checkFavourite = async (id: number): Promise<boolean> => {
    const saved = await Storage.get({
        key: 'savedFavourites',
    });
    const favourites: Comic[] | null = (saved && saved.value)
        ? JSON.parse(saved.value)
        : null;
    if (favourites) {
        const isSavedIndex = favourites.findIndex((c) => c.id === id);
        if (isSavedIndex !== -1) {
            return true;
        }
    }
    return false;
};
The Storage plugin provides a key-value store for simple data, while the Toast plugin provides a notification pop-up for displaying important information to a user.
The updateFavourites() function in this file takes a single argument, a Comic object, and adds it to the device storage if it doesn’t exist, or removes it from the device storage if it was already saved. getFavourites() returns the user’s saved comics, while checkFavourites() accepts a single argument, a Comic resource ID, and looks it up in the saved comics, returning true if it exists, or false otherwise.
Next, open the ComicCard.tsx file and make the following changes to allow your app’s users to save their favorite comics:
import { star, starOutline } from 'ionicons/icons'; import * as utils from '../util';type Props = { comic: Comic; } const ComicCard: FC<Props> = (props): JSX.Element => { const { comic } = props;const [isFavourite, setIsFavourite] = useState(false); const checkFavourite = (): void => { utils.checkFavourite(comic.id).then((value: boolean) => { setIsFavourite(value); }); } useEffect(() => { checkFavourite(); });return ( <IonCard> ... <IonCardHeader> ... </IonCardHeader><IonCardContent> <IonButton onClick={(): void => { utils.updateFavourites(comic).finally(() => { checkFavourite(); }); }} > <IonIcon icon={(isFavourite) ? star : starOutline} color="light" /> {(isFavourite) ? 'Remove' : 'Add' } </IonButton> </IonCardContent></IonCard> ); }
Your ComicCard component now has a IonButton component that, when clicked, calls the updateFavourites() function you wrote earlier. Remember that the function acts like a toggle, removing the comic if it was already saved, or else saving it. Don’t forget to add the imports for the new Ionic components, IonButton, IonCardContent and IonIcon, just added to this component.
Now for the final part of this step, where you will be rendering saved comics in their own page. Replace the contents of the Tab2.tsx file with the following:
import React, { useState } from 'react';
import { IonContent, IonHeader, IonPage, IonTitle, IonToolbar, IonGrid, IonRow, IonCol, useIonViewWillEnter } from '@ionic/react';
import './Tab2.css';
import { Comic } from '../interfaces/comic';
import { getFavourites } from '../util';
import ComicCard from '../components/ComicCard';

const Tab2: React.FC = () => {
  const [comics, setComics] = useState(null as Comic[] | null);

  const loadComics = (): void => {
    getFavourites().then((result) => {
      if (result) {
        setComics(result);
      }
    })
  };

  useIonViewWillEnter(() => {
    loadComics();
  });

  return (
    <IonPage>
      <IonHeader>
        <IonToolbar>
          <IonTitle>Favourites</IonTitle>
        </IonToolbar>
      </IonHeader>
      <IonContent>
        {(comics) && (
          <IonGrid>
            <IonRow>
              {comics.map((comic) => (
                <IonCol key={comic.id} sizeXs="12" sizeSm="6" sizeMd="4" sizeLg="3" sizeXl="2">
                  <ComicCard comic={comic} />
                </IonCol>
              ))}
            </IonRow>
          </IonGrid>
        )}
      </IonContent>
    </IonPage>
  );
};
export default Tab2;
This page is quite similar to the Tab1 page but, instead of making an API request to get comics, you are accessing locally saved data. You are also using the Ionic life cycle hook, useIonViewWillEnter(), instead of a useEffect() hook, to make a call to the function that reads saved comics and updates the component’s state. The useIonViewWillEnter() hook gets called just as the page being navigated to enters into view.
Your application now makes use of a few native plugins to improve its functionality. In the next step, you will learn how to generate a native project for Android and create a native app using Android Studio.
Note: You can delete the files related to *Tab3* and remove the import and related *IonTab* component in the *App.tsx* file.
Generating A Native Project
Ionic comes with support for cross-platform app runtimes such as Capacitor and Cordova. These frameworks help you to build and run apps developed using Ionic on a native device or emulator. For the purpose of this guide, you will be using Capacitor to generate native project files.
Before proceeding to adding a platform, you will need to generate a production build of your application. Run the following command in your project’s root directory to do so:
ionic build
Now let’s add Capacitor to your project and generate the assets required to build a native application. Capacitor provides a CLI which can be accessed in your project by using npx or from the ionic CLI as shown below:
Using npx
npx cap add android
This command adds the android platform to your project. Other possible platform values are ios and electron.
Using ionic
Since you initialized your project using the --capacitor flag earlier, Capacitor has already been initialized with your project’s information. You can proceed to adding a platform by running the following command:
ionic capacitor add android
This command will install the required dependencies for the android platform. It will also generate files required for a native Android project and copy over the assets you built earlier when running ionic build.
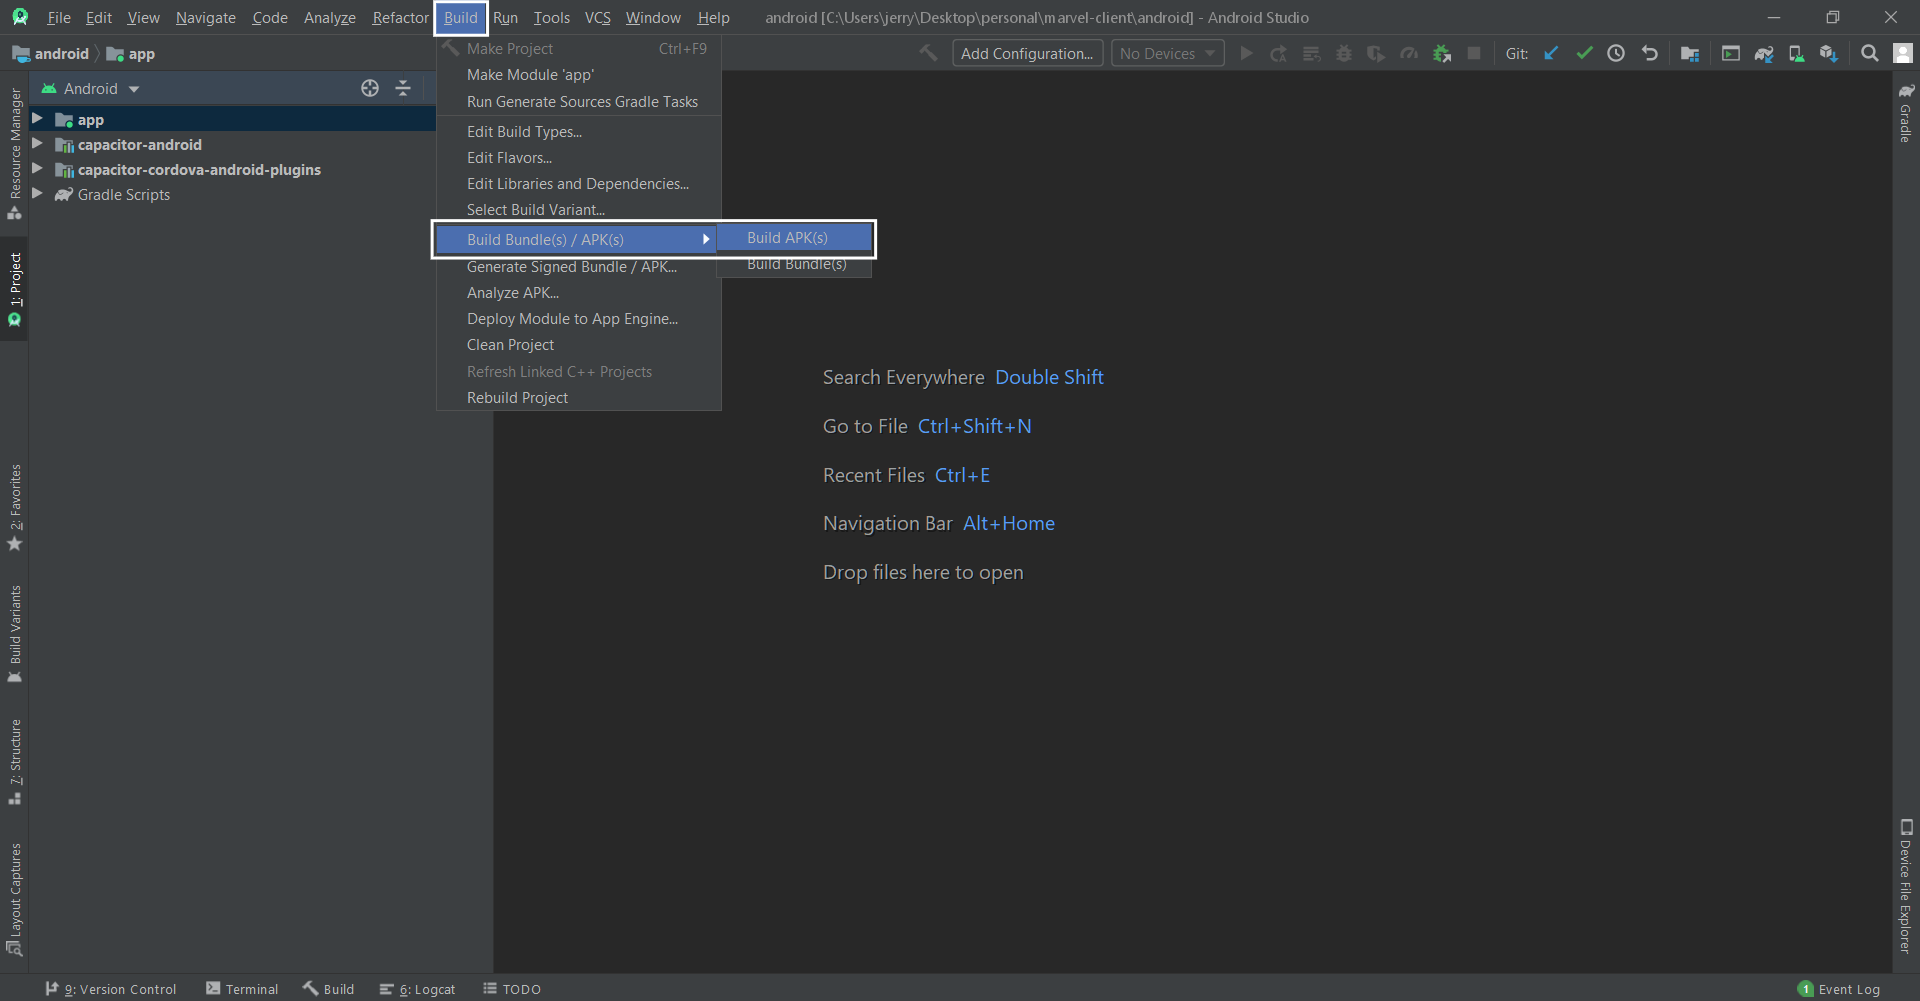
If you have installed Android Studio, you can now open your project in Android Studio by running:
ionic capacitor open android
Finally, build your project:

Conclusion
In this guide, you have learned how to develop hybrid mobile applications using Ionic Framework’s React integration. You also learned how to use Capacitor for building native apps, specifically for the Android platform. Check out the API docs as there are a lot more UI components available to be used in Ionic apps that we didn’t explore. You can find the code on GitHub.
References
(ks, ra, yk, il, og)
From our sponsors: An Introduction To React With Ionic


