Archived
Adding Dynamic And Async Functionality To JAMstack Sites

Adding Dynamic And Async Functionality To JAMstack Sites
Jason Lengstorf 2019-12-18T11:30:00+00:00
2019-12-18T12:37:00+00:00
It’s increasingly common to see websites built using the JAMstack — that is, websites that can be served as static HTML files built from JavaScript, Markup, and APIs. Companies love the JAMstack because it reduces infrastructure costs, speeds up delivery, and lowers the barriers for performance and security improvements because shipping static assets removes the need for scaling servers or keeping databases highly available (which also means there are no servers or databases that can be hacked). Developers like the JAMstack because it cuts down on the complexity of getting a website live on the internet: there are no servers to manage or deploy; we can write front-end code and it just goes live, like magic.
(“Magic” in this case is automated static deployments, which are available for free from a number of companies, including Netlify, where I work.)
But if you spend a lot of time talking to developers about the JAMstack, the question of whether or not the JAMstack can handle Serious Web Applications™ will come up. After all, JAMstack sites are static sites, right? And aren’t static sites super limited in what they can do?
This is a really common misconception, and in this article we’re going to dive into where the misconception comes from, look at the capabilities of the JAMstack, and walk through several examples of using the JAMstack to build Serious Web Applications™.
JAMstack Fundamentals
Phil Hawksworth explains what JAMStack actually means and when it makes sense to use it in your projects, as well as how it affects tooling and front-end architecture. Read article →
What Makes A JAMstack Site “Static”?
Web browsers today load HTML, CSS, and JavaScript files, just like they did back in the 90s.
A JAMstack site, at its core, is a folder full of HTML, CSS, and JavaScript files.
These are “static assets”, meaning we don’t need an intermediate step to generate them (for example, PHP projects like WordPress need a server to generate the HTML on every request).
That’s the true power of the JAMstack: it doesn’t require any specialized infrastructure to work. You can run a JAMstack site on your local computer, by putting it on your preferred content delivery network (CDN), hosting it with services like GitHub Pages — you can even drag-and-drop the folder into your favorite FTP client to upload it to shared hosting.
Static Assets Don’t Necessarily Mean Static Experiences
Because JAMstack sites are made of static files, it’s easy to assume that the experience on those sites is, y’know, static. But that’s not the case!
JavaScript is capable of doing a whole lot of dynamic stuff. After all, modern JavaScript frameworks are static files after we get through the build step — and there are hundreds of examples of incredibly dynamic website experiences powered by them.
There is a common misconception that “static” means inflexible or fixed. But all that “static” really means in the context of “static sites” is that browsers don’t need any help delivering their content — they’re able to use them natively without a server handling a processing step first.
Or, put in another way:
“Static assets” does not mean static apps; it means no server required.
“
Can The JAMstack Do That?
If someone asks about building a new app, it’s common to see suggestions for JAMstack approaches such as Gatsby, Eleventy, Nuxt, and other similar tools. It’s equally common to see objections arise: “static site generators can’t do _______”, where _______ is something dynamic.
But — as we touched on in the previous section — JAMstack sites can handle dynamic content and interactions!
Here’s an incomplete list of things that I’ve repeatedly heard people claim the JAMstack can’t handle that it definitely can:
- Load data asynchronously
- Handle processing files, such as manipulating images
- Read from and write to a database
- Handle user authentication and protect content behind a login
In the following sections, we’ll look at how to implement each of these workflows on a JAMstack site.
If you can’t wait to see the dynamic JAMstack in action, you can check out the demos first, then come back and learn how they work.
A note about the demos:
These demos are written without any frameworks. They are only HTML, CSS, and standard JavaScript. They were built with modern browsers (e.g. Chrome, Firefox, Safari, Edge) in mind and take advantage of newer features like JavaScript modules, HTML templates, and the Fetch API. No polyfills were added, so if you’re using an unsupported browser, the demos will probably fail.
Load Data From A Third-Party API Asynchronously
“What if I need to get new data after my static files are built?”
In the JAMstack, we can take advantage of numerous asynchronous request libraries, including the built-in Fetch API, to load data using JavaScript at any point.
Demo: Search A Third-Party API From A JAMstack Site
A common scenario that requires asynchronous loading is when the content we need depends on user input. For example, if we build a search page for the Rick & Morty API, we don’t know what content to display until someone has entered a search term.
To handle that, we need to:
- Create a form where people can type in their search term,
- Listen for a form submission,
- Get the search term from the form submission,
- Send an asynchronous request to the Rick & Morty API using the search term,
- Display the request results on the page.
First, we need to create a form and an empty element that will contain our search results, which looks like this:
<form>
  <label for="name">Find characters by name</label>
  <input type="text" id="name" name="name" required />
  <button type="submit">Search</button>
</form>

<ul id="search-results"></ul>
Next, we need to write a function that handles form submissions. This function will:
- Prevent the default form submission behavior
- Get the search term from the form input
- Use the Fetch API to send a request to the Rick & Morty API using the search term
- Call a helper function that displays the search results on the page
We also need to add an event listener on the form for the submit event that calls our handler function.
Here’s what that code looks like altogether:
<script type="module">
 import showResults from './show-results.js';

 const form = document.querySelector('form');

 const handleSubmit = async event => {
   event.preventDefault();

   // get the search term from the form input
   const name = form.elements['name'].value;

   // send a request to the Rick & Morty API based on the user input
   const characters = await fetch(
     `https://rickandmortyapi.com/api/character/?name=${name}`,
   )
     .then(response => response.json())
     .catch(error => console.error(error));

   // add the search results to the DOM
   showResults(characters.results);
 };

 form.addEventListener('submit', handleSubmit);
</script>
Note: to stay focused on dynamic JAMstack behaviors, we will not be discussing how utility functions like showResults are written. The code is thoroughly commented, though, so check out the source to learn how it works!
With this code in place, we can load our site in a browser and we’ll see the empty form with no results showing:
If we enter a character name (e.g. “rick”) and click “search”, we see a list of characters whose names contain “rick” displayed:
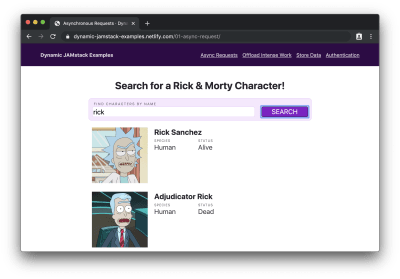
Hey! Did that static site just dynamically load data? Holy buckets!
You can try this out for yourself on the live demo, or check out the full source code for more details.
Handle Expensive Computing Tasks Off the User’s Device
In many apps, we need to do things that are pretty resource-intensive, such as processing an image. While some of these kinds of operations are possible using client-side JavaScript only, it’s not necessarily a great idea to make your users’ devices do all that work. If they’re on a low-powered device or trying to stretch out their last 5% of battery life, making their device do a bunch of work is probably going to be a frustrating experience for them.
So does that mean that JAMstack apps are out of luck? Not at all!
The “A” in JAMstack stands for APIs. This means we can send off that work to an API and avoid spinning our users’ computer fans up to the “hover” setting.
“But wait,” you might say. “If our app needs to do custom work, and that work requires an API, doesn’t that just mean we’re building a server?”
Thanks to the power of serverless functions, we don’t have to!
Serverless functions (also called “lambda functions”) are a sort of API without any server boilerplate required. We get to write a plain old JavaScript function, and all of the work of deploying, scaling, routing, and so on is offloaded to our serverless provider of choice.
“
Serverless functions are the peanut butter to our JAMstack: they unlock a whole world of high-powered, dynamic functionality without ever asking us to deal with server code or devops.
Demo: Convert An Image To Grayscale
Let’s assume we have an app that needs to:
- Download an image from a URL
- Convert that image to grayscale
- Upload the converted image to a GitHub repo
As far as I know, there’s no way to do image conversions like that entirely in the browser — and even if there was, it’s a fairly resource-intensive thing to do, so we probably don’t want to put that load on our users’ devices.
Instead, we can submit the URL to be converted to a serverless function, which will do the heavy lifting for us and send back a URL to a converted image.
For our serverless function, we’ll be using Netlify Functions. In our site’s code, we add a folder at the root level called “functions” and create a new file called “convert-image.js” inside. Then we write what’s called a handler, which is what receives and — as you may have guessed — handles requests to our serverless function.
To convert an image, it looks like this:
exports.handler = async event => {
 // only try to handle POST requests
 if (event.httpMethod !== 'POST') {
   return { statusCode: 404, body: '404 Not Found' };
 }

 try {
   // get the image URL from the POST submission
   const { imageURL } = JSON.parse(event.body);

   // use a temporary directory to avoid intermediate file cruft
   // see https://www.npmjs.com/package/tmp
   const tmpDir = tmp.dirSync();

   const convertedPath = await convertToGrayscale(imageURL, tmpDir);

   // upload the processed image to GitHub
   const response = await uploadToGitHub(convertedPath, tmpDir.name);

   return {
     statusCode: 200,
     body: JSON.stringify({
       url: response.data.content.download_url,
     }),
   };
 } catch (error) {
   return {
     statusCode: 500,
     body: JSON.stringify(error.message),
   };
 }
};
This function does the following:
- Checks to make sure the request was sent using the HTTP POST method
- Grabs the image URL from the POST body
- Creates a temporary directory for storing files that will be cleaned up once the function is done executing
- Calls a helper function that converts the image to grayscale
- Calls a helper function that uploads the converted image to GitHub
- Returns a response object with an HTTP 200 status code and the newly uploaded image’s URL
Note: We won’t go over how the helper functions for image conversion or uploading to GitHub work, but the source code is well commented so you can see how it works.
Next, we need to add a form that will be used to submit URLs for processing and a place to show the before and after:
<form
 id="image-form"
 action="/.netlify/functions/convert-image"
 method="POST"
>
 <label for="imageURL">URL of an image to convert</label>
 <input type="url" name="imageURL" required />
 <button type="submit">Convert</button>
</form>

<div id="converted"></div>
Finally, we need to add an event listener to the form so we can send off the URLs to our serverless function for processing:
<script type="module">
 import showResults from './show-results.js';

 const form = document.querySelector('form');
 form.addEventListener('submit', event => {
   event.preventDefault();

   // get the image URL from the form
   const imageURL = form.elements['imageURL'].value;

   // send the image off for processing
   const promise = fetch('/.netlify/functions/convert-image', {
     method: 'POST',
     headers: { 'Content-Type': 'application/json' },
     body: JSON.stringify({ imageURL }),
   })
     .then(result => result.json())
     .catch(error => console.error(error));

   // do the work to show the result on the page
   showResults(imageURL, promise);
 });
</script>
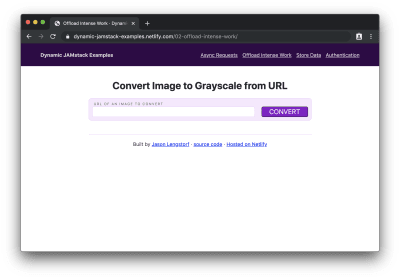
After deploying the site (along with its new “functions” folder) to Netlify and/or starting up Netlify Dev in our CLI, we can see the form in our browser:
If we add an image URL to the form and click “convert”, we’ll see “processing…” for a moment while the conversion is happening, then we’ll see the original image and its newly created grayscale counterpart:
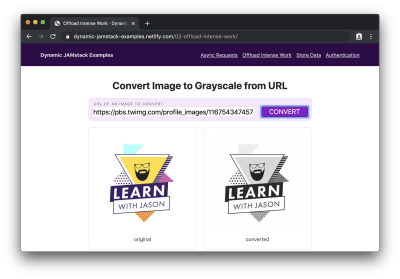
Oh dang! Our JAMstack site just handled some pretty serious business and we didn’t have to think about servers once or drain our users’ batteries!
Use A Database To Store And Retrieve Entries
In many apps, we’re inevitably going to need the ability to save user input. And that means we need a database.
You may be thinking, “So that’s it, right? The jig is up? Surely a JAMstack site — which you’ve told us is just a collection of files in a folder — can’t be connected to a database!”
Au contraire.
As we saw in the previous section, serverless functions give us the ability to do all sorts of powerful things without needing to create our own servers.
Similarly, we can use database-as-a-service (DBaaS) tools, such as Fauna and Amplify DataStore, to read and write to a database without having to set one up or host it ourselves.
DBaaS tools massively simplify the process of setting up databases for websites: creating a new database is as straightforward as defining the types of data we want to store. The tools automatically generate all of the code to manage create, read, update, and delete (CRUD) operations and make it available for us to use via API, so we don’t have to actually manage a database; we just get to use it.
Demo: Create a Petition Page
If we want to create a small app to collect digital signatures for a petition, we need to set up a database to store those signatures and allow the page to read them out for display.
For this demo we’ll use Fauna as our DBaaS provider. We won’t go deep into how Fauna works, but in the interest of demonstrating the small amount of effort required to set up a database, let’s list each step and click to get a ready-to-use database:
- Create a Fauna account at https://fauna.com
- Click “create a new database”
- Give the database a name (e.g. “dynamic-jamstack-demos”)
- Click “create”
- Click “security” in the left-hand menu on the next page
- Click “new key”
- Change the role dropdown to “Server”
- Add a name for the key (e.g. “Dynamic JAMstack Demos”)
- Store the key somewhere secure for use with the app
- Click “save”
- Click “GraphQL” in the left-hand menu
- Click “import schema”
- Upload a file called
db-schema.gqlthat contains the following code:
type Signature {
 name: String!
}

type Query {
 signatures: [Signature!]!
}
Once we upload the schema, our database is ready to use. (Seriously.)
Thirteen steps is a lot, but with those thirteen steps, we just got a database, a GraphQL API, automatic management of capacity, scaling, deployment, security, and more — all handled by database experts. For free. What a time to be alive!
To try it out, the “GraphQL” option in the left-hand menu gives us a GraphQL explorer with documentation on the available queries and mutations that allow us to perform CRUD operations.
Note: We won’t go into details about GraphQL queries and mutations in this post, but Eve Porcello wrote an excellent intro to sending GraphQL queries and mutations if you want a primer on how it works.
With the database ready to go, we can create a serverless function that stores new signatures in the database:
const qs = require('querystring');
const graphql = require('./util/graphql');

exports.handler = async event => {
 try {
   // get the signature from the POST data
   const { signature } = qs.parse(event.body);

   const ADD_SIGNATURE = `
     mutation($signature: String!) {
       createSignature(data: { name: $signature }) {
         _id
       }
     }
   `;

   // store the signature in the database
   await graphql(ADD_SIGNATURE, { signature });

   // send people back to the petition page
   return {
     statusCode: 302,
     headers: {
       Location: '/03-store-data/',
     },
     // body is unused in 3xx codes, but required in all function responses
     body: 'redirecting...',
   };
 } catch (error) {
   return {
     statusCode: 500,
     body: JSON.stringify(error.message),
   };
 }
};
This function does the following:
- Grabs the signature value from the form
POSTdata - Calls a helper function that stores the signature in the database
- Defines a GraphQL mutation to write to the database
- Sends off the mutation using a GraphQL helper function
- Redirects back to the page that submitted the data
Next, we need a serverless function to read out all of the signatures from the database so we can show how many people support our petition:
const graphql = require('./util/graphql');

exports.handler = async () => {
 const { signatures } = await graphql(`
   query {
     signatures {
       data {
         name
       }
     }
   }
 `);

 return {
   statusCode: 200,
   body: JSON.stringify(signatures.data),
 };
};
This function sends off a query and returns it.
An important note about sensitive keys and JAMstack apps:
One thing to note about this app is that we’re using serverless functions to make these calls because we need to pass a private server key to Fauna that proves we have read and write access to this database. We cannot put this key into client-side code, because that would mean anyone could find it in the source code and use it to perform CRUD operations against our database. Serverless functions are critical for keeping private keys private in JAMstack apps.
Once we have our serverless functions set up, we can add a form that submits to the function for adding a signature, an element to show existing signatures, and a little bit of JS to call the function to get signatures and put them into our display element:
<form action="/.netlify/functions/add-signature" method="POST">
 <label for="signature">Your name</label>
 <input type="text" name="signature" required />
 <button type="submit">Sign</button>
</form>

<ul class="signatures"></ul>

<script>
 fetch('/.netlify/functions/get-signatures')
   .then(res => res.json())
   .then(names => {
     const signatures = document.querySelector('.signatures');

     names.forEach(({ name }) => {
       const li = document.createElement('li');
       li.innerText = name;
       signatures.appendChild(li);
     });
   });
</script>
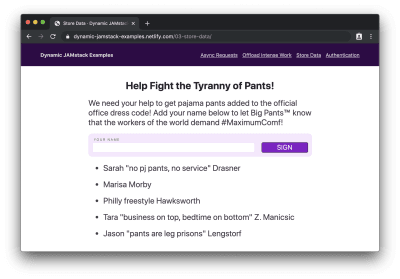
If we load this in the browser, we’ll see our petition form with signatures below it:
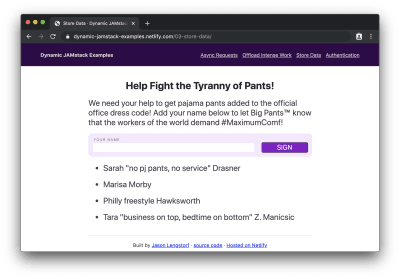
Then, if we add our signature…
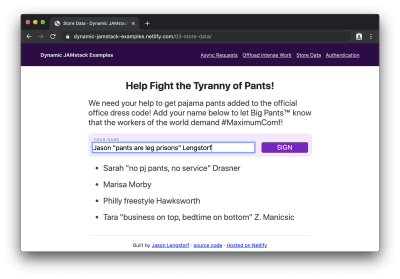
…and submit it, we’ll see our name appended to the bottom of the list:
Hot diggity dog! We just wrote a full-on database-powered JAMstack app with about 75 lines of code and 7 lines of database schema!
Protect Content With User Authentication
“Okay, you’re for sure stuck this time,” you may be thinking. “There is no way a JAMstack site can handle user authentication. How the heck would that work, even?!”
I’ll tell you how it works, my friend: with our trusty serverless functions and OAuth.
OAuth is a widely-adopted standard for allowing people to give apps limited access to their account info rather than sharing their passwords. If you’ve ever logged into a service using another service (for example, “sign in with your Google account”), you’ve used OAuth before.
Note: We won’t go deep into how OAuth works, but Aaron Parecki wrote a solid overview of OAuth that covers the details and workflow.
In JAMstack apps, we can take advantage of OAuth, and the JSON Web Tokens (JWTs) that it provides us with for identifying users, to protect content and only allow logged-in users to view it.
Demo: Require Login to View Protected Content
If we need to build a site that only shows content to logged-in users, we need a few things:
- An identity provider that manages users and the sign-in flow
- UI elements to manage logging in and logging out
- A serverless function that checks for a logged-in user using JWTs and returns protected content if one is provided
For this example, we’ll use Netlify Identity, which gives us a really pleasant developer experience for adding authentication and provides a drop-in widget for managing login and logout actions.
To enable it:
- Visit your Netlify dashboard
- Choose the site that needs auth from your sites list
- Click “identity” in the top nav
- Click the “Enable Identity” button
We can add Netlify Identity to our site by adding markup that shows logged out content and adds an element to show protected content after logging in:
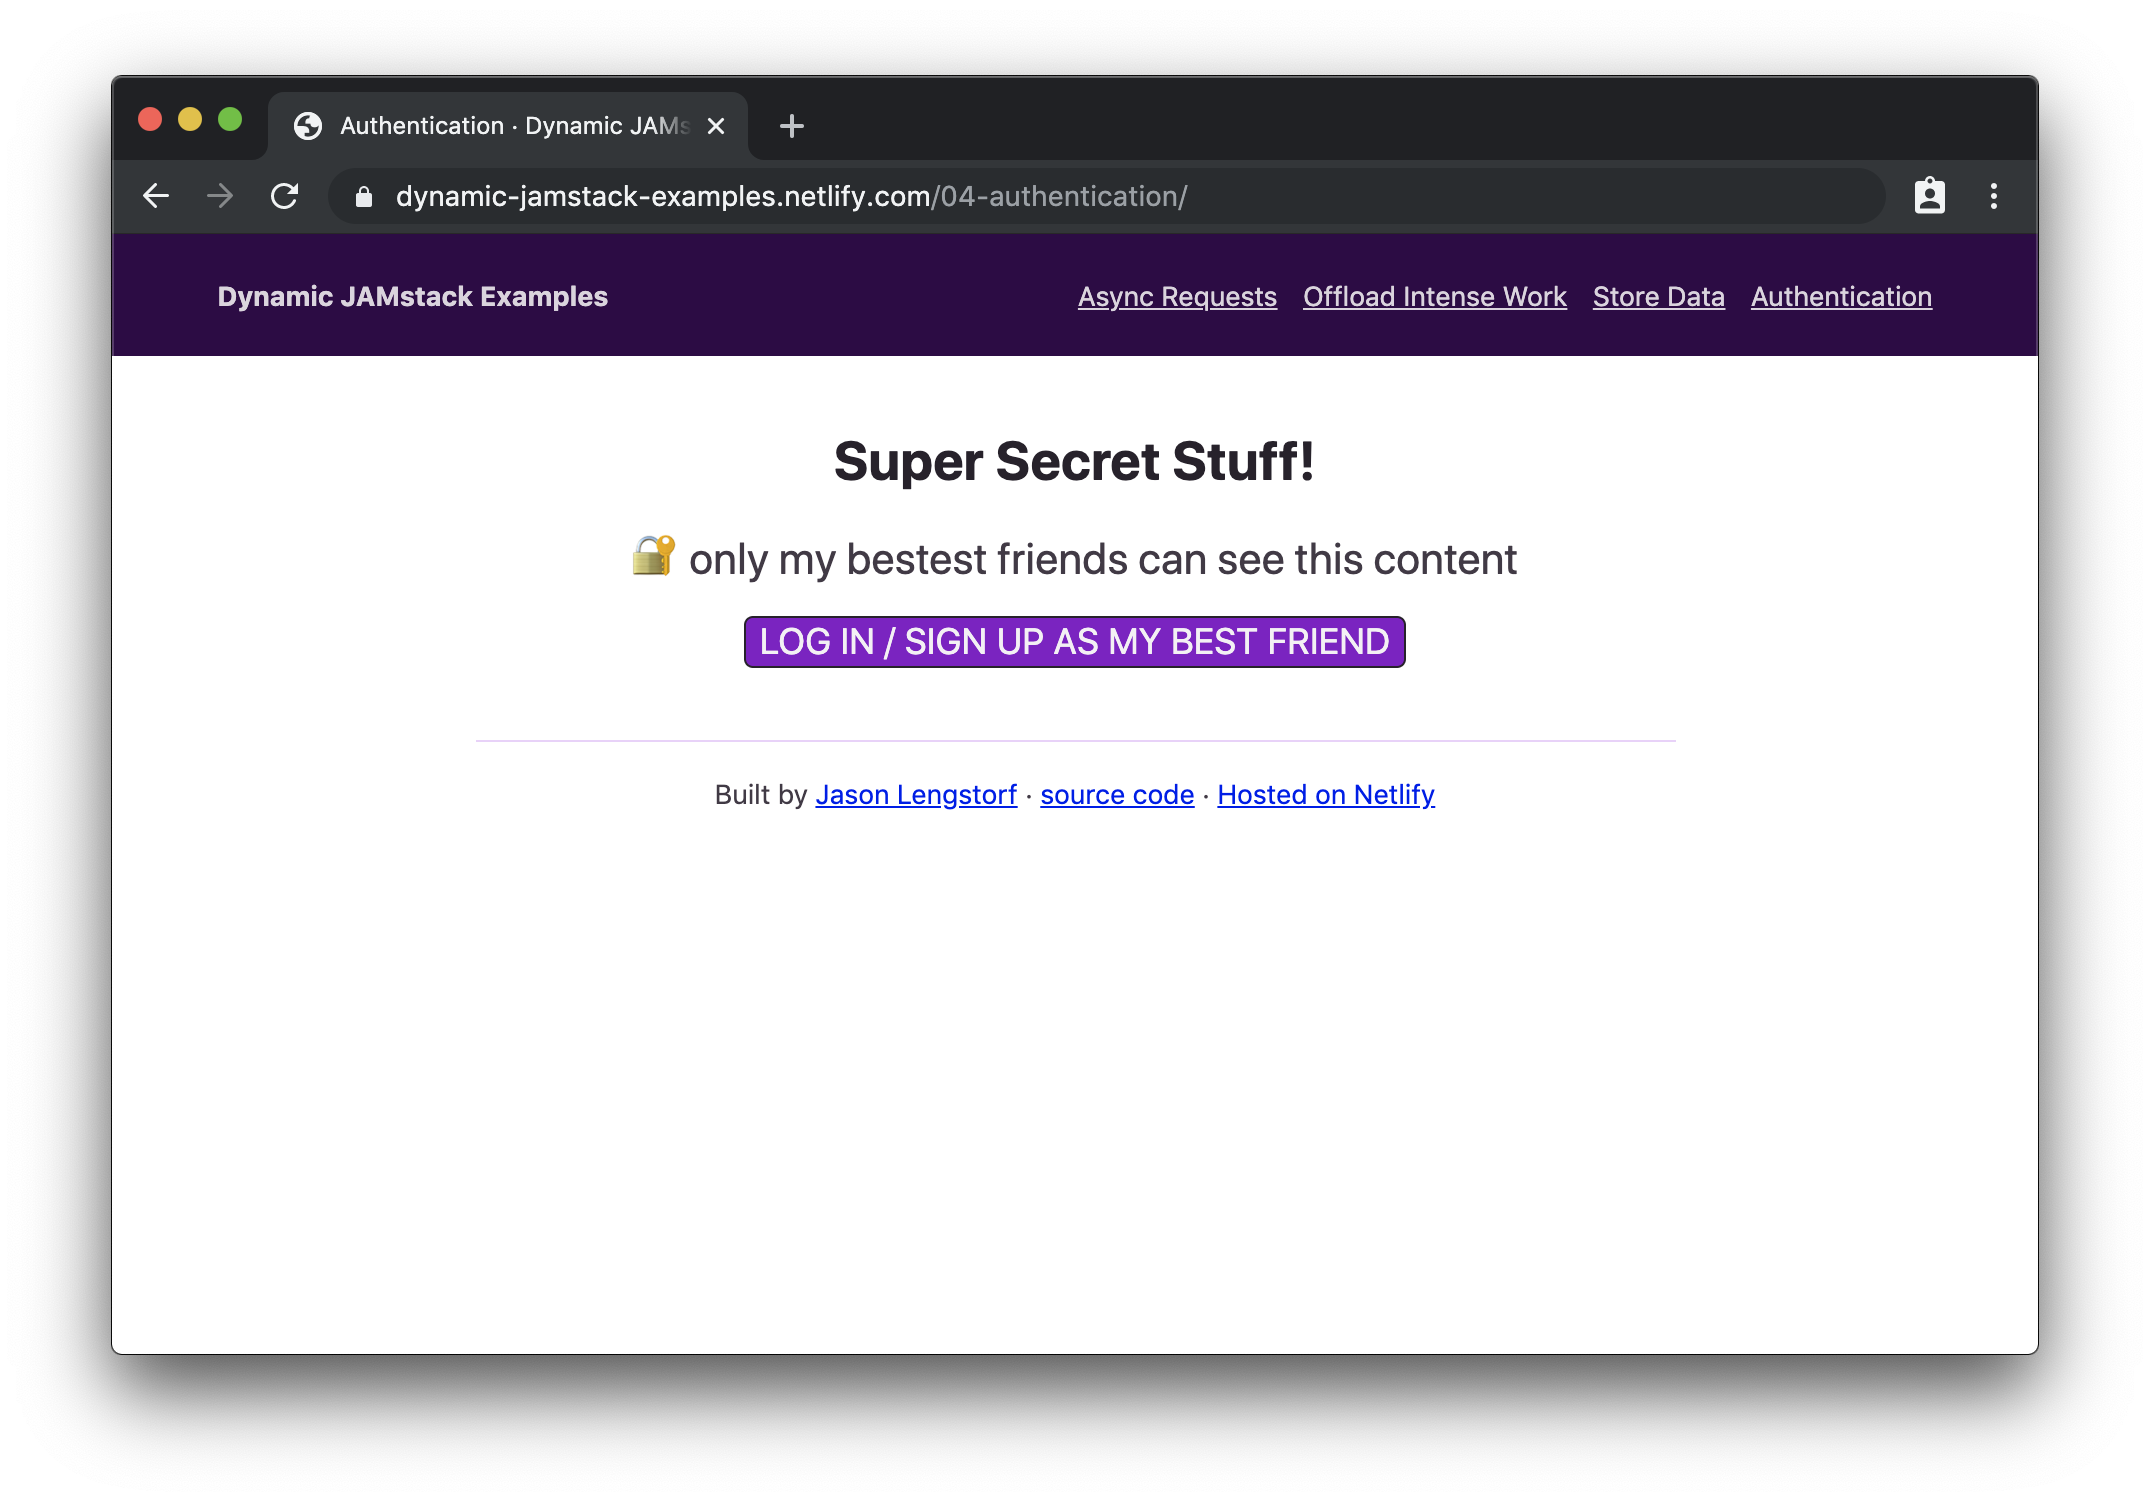
<div class="content logged-out">
  <h1>Super Secret Stuff!</h1>
  <p>🔐 only my bestest friends can see this content</p>
  <button class="login">log in / sign up to be my best friend</button>
</div>
<div class="content logged-in">
  <div class="secret-stuff"></div>
  <button class="logout">log out</button>
</div>
This markup relies on CSS to show content based on whether the user is logged in or not. However, we can’t rely on that to actually protect the content — anyone could view the source code and steal our secrets!
Instead, we created an empty div that will contain our protected content, but we’ll need to make a request to a serverless function to actually get that content. We’ll dig into how that works shortly.
Next, we need to add code to make our login button work, load the protected content, and show it on screen:
<script src="https://identity.netlify.com/v1/netlify-identity-widget.js"></script>
<script>
 const login = document.querySelector('.login');
 login.addEventListener('click', () => {
   netlifyIdentity.open();
 });

 const logout = document.querySelector('.logout');
 logout.addEventListener('click', () => {
   netlifyIdentity.logout();
 });

 netlifyIdentity.on('logout', () => {
   document.querySelector('body').classList.remove('authenticated');
 });

 netlifyIdentity.on('login', async () => {
   document.querySelector('body').classList.add('authenticated');

   const token = await netlifyIdentity.currentUser().jwt();

   const response = await fetch('/.netlify/functions/get-secret-content', {
     headers: {
       Authorization: `Bearer ${token}`,
     },
   }).then(res => res.text());

   document.querySelector('.secret-stuff').innerHTML = response;
 });
</script>
Here’s what this code does:
- Loads the Netlify Identity widget, which is a helper library that creates a login modal, handles the OAuth workflow with Netlify Identity, and gives our app access to the logged-in user’s info
- Adds an event listener to the login button that triggers the Netlify Identity login modal to open
- Adds an event listener to the logout button that calls the Netlify Identity logout method
- Adds an event handler for logging out to remove the authenticated class on logout, which hides the logged-in content and shows the logged-out content
- Adds an event handler for logging in that:
- Adds the authenticated class to show the logged-in content and hide the logged-out content
- Grabs the logged-in user’s JWT
- Calls a serverless function to load protected content, sending the JWT in the Authorization header
- Puts the secret content in the secret-stuff div so logged-in users can see it
Right now the serverless function we’re calling in that code doesn’t exist. Let’s create it with the following code:
exports.handler = async (_event, context) => {
 try {
   const { user } = context.clientContext;

   if (!user) throw new Error('Not Authorized');

   return {
     statusCode: 200,
     headers: {
       'Content-Type': 'text/html',
     },
     body: `
       You're Invited, ${user.user_metadata.full_name}!
       If you can read this it means we're best friends.

         Here are the secret details for my birthday party:

         jason.af/party

     `,
   };
 } catch (error) {
   return {
     statusCode: 401,
     body: 'Not Authorized',
   };
 }
};
This function does the following:
- Checks for a user in the serverless function’s context argument
- Throws an error if no user is found
- Returns secret content after ensuring that a logged-in user requested it
Netlify Functions will detect Netlify Identity JWTs in Authorization headers and automatically put that information into context — this means we can check for a valid JWTs without needing to write code to validate JWTs!
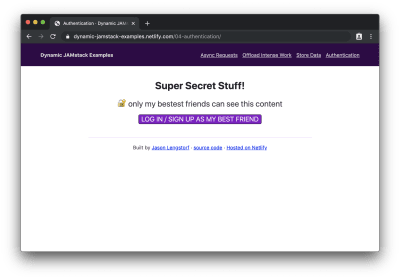
When we load this page in our browser, we’ll see the logged out page first:
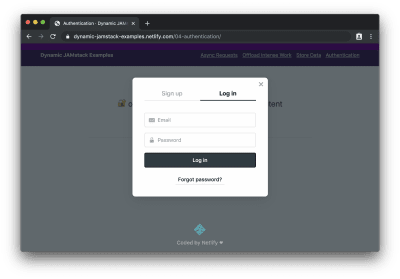
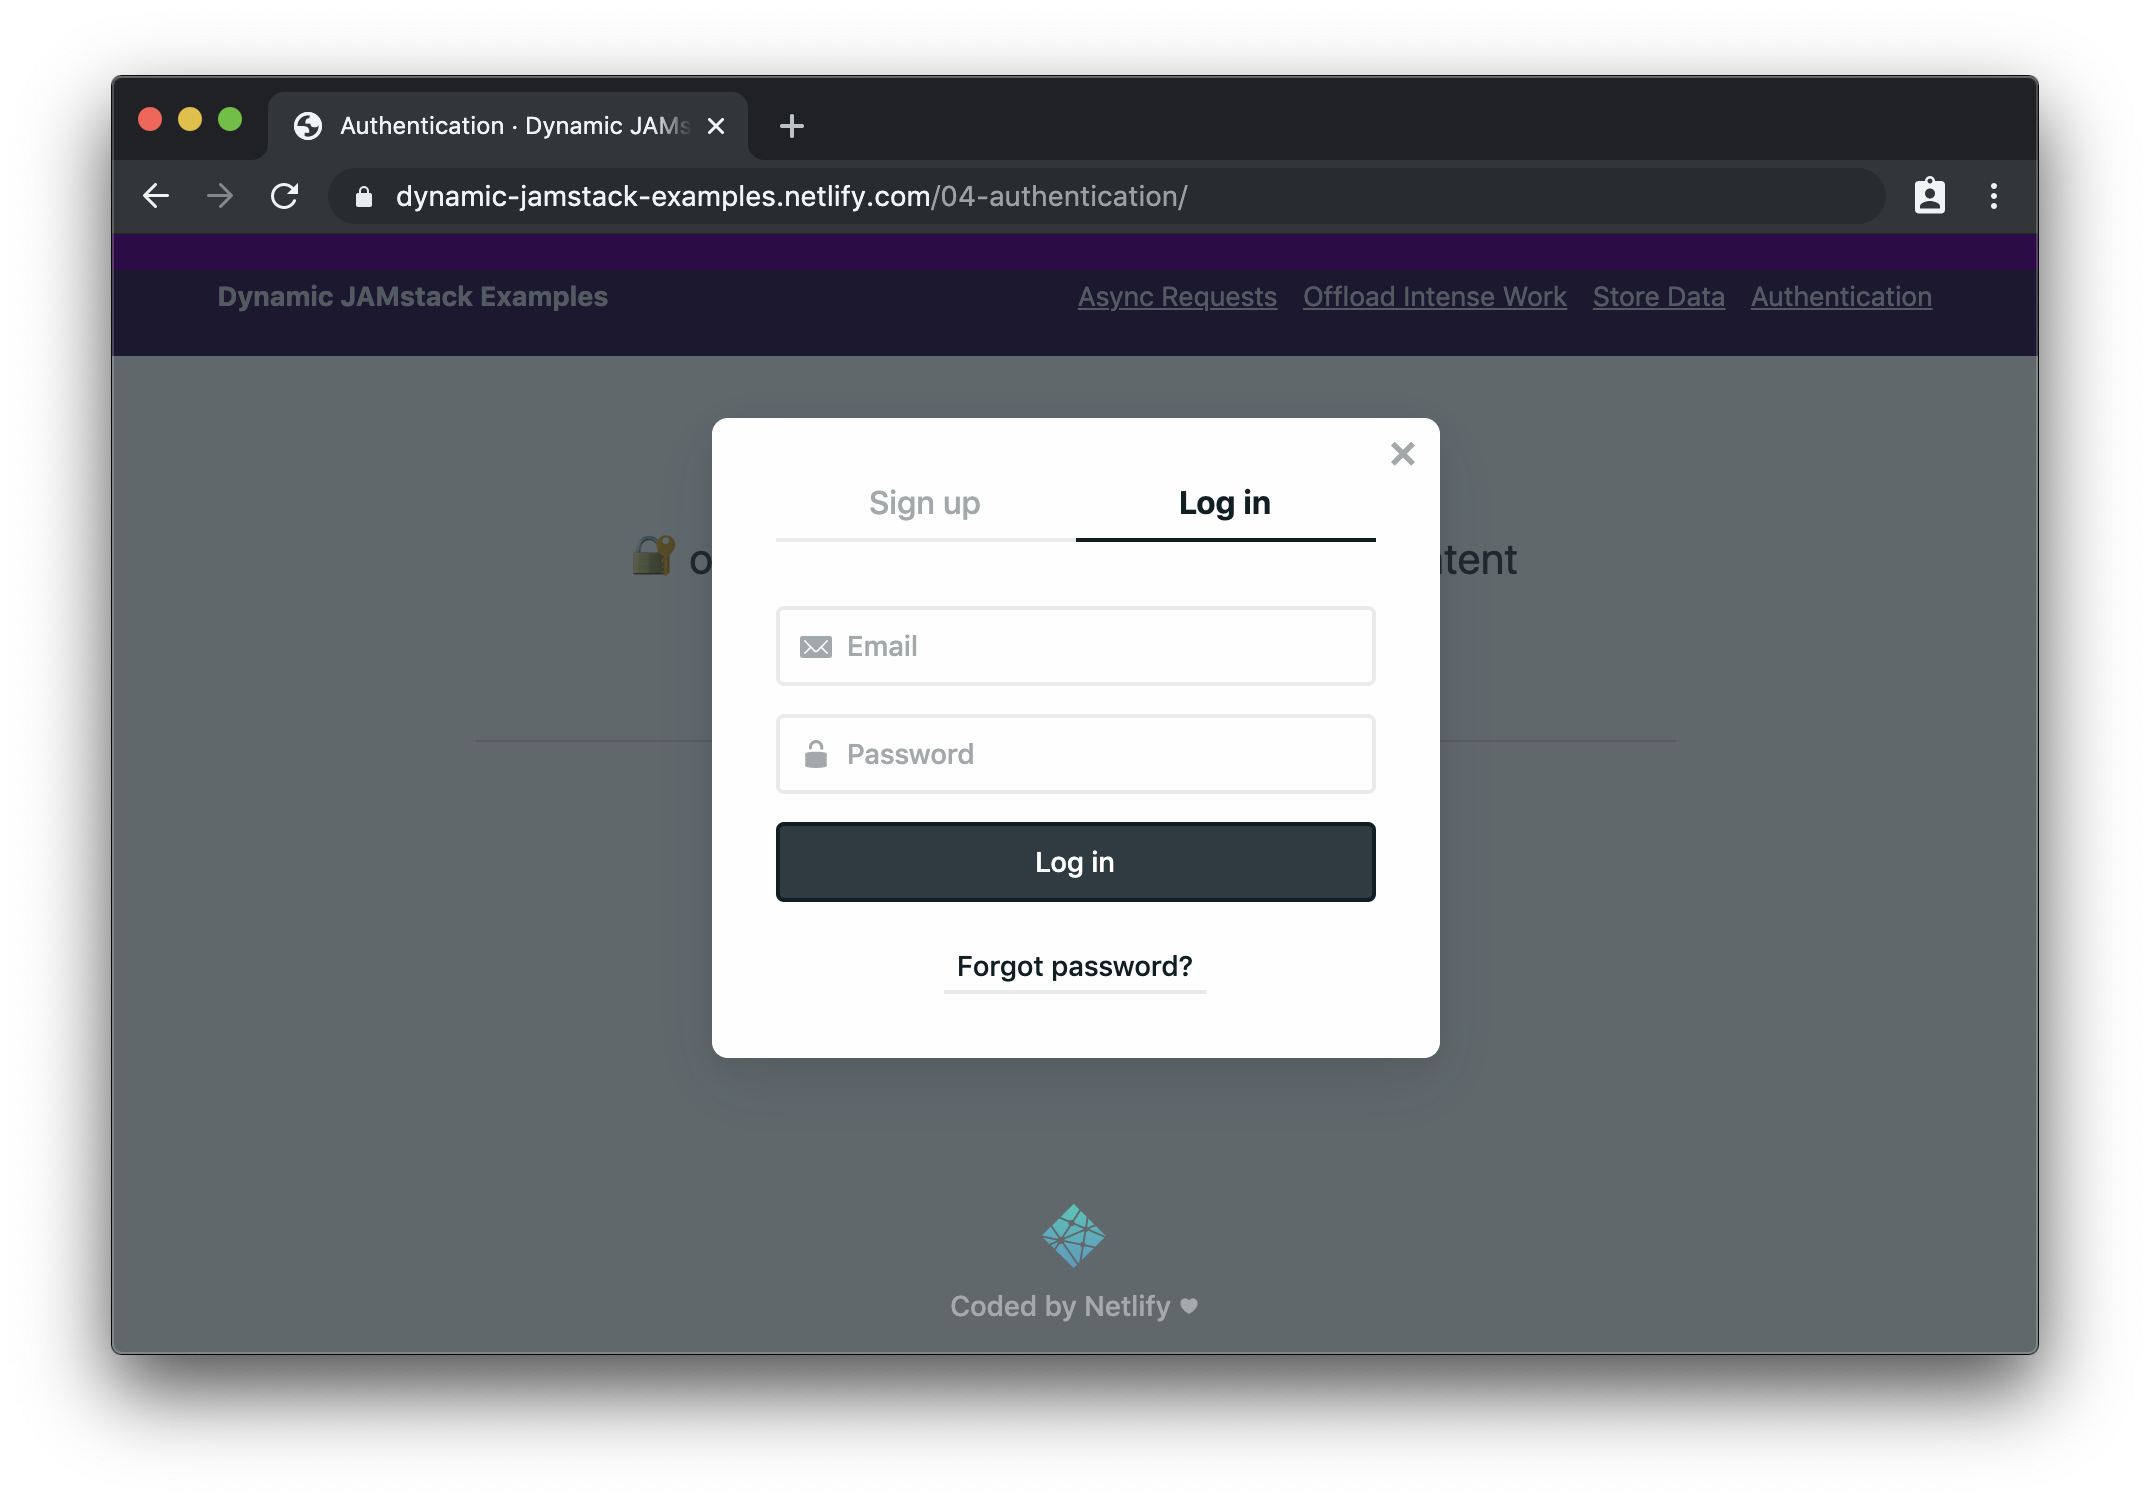
If we click the button to log in, we’ll see the Netlify Identity widget:
After logging in (or signing up), we can see the protected content:
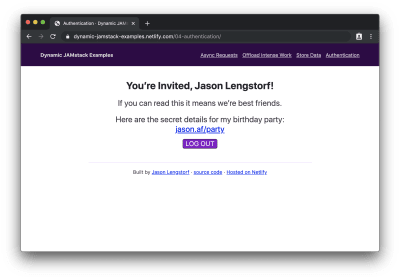
Wowee! We just added user login and protected content to a JAMstack app!
What To Do Next
The JAMstack is much more than “just static sites” — we can respond to user interactions, store data, handle user authentication, and just about anything else we want to do on a modern website. And all without the need to provision, configure, or deploy a server!
What do you want to build with the JAMstack? Is there anything you’re still not convinced the JAMstack can handle? I’d love to hear about it — hit me up on Twitter or in the comments!
(dm, il)
From our sponsors: Adding Dynamic And Async Functionality To JAMstack Sites


