Archived
How To Build A Simple Cryptocurrency Blockchain In Node.js
How To Build A Simple Cryptocurrency Blockchain In Node.js
Alfrick Opidi 2020-02-21T10:30:00+00:00
2020-02-21T12:35:14+00:00
The unprecedented rise of cryptocurrencies, and their underpinning blockchain technology, have taken the world by storm — from the humble beginnings of being an academic concept over a decade ago to current increased adoption in various industries.
The blockchain technology is receiving a lot of attention because of its ability to enhance security in trustless environments, enforce decentralization, and make processes efficient.
Traditionally, Python has been the de facto programming language for blockchain development. However, with the proliferation of this amazing technology, the development options have also increased — and Node.js has not been left behind.
In this tutorial, I’m going to talk about how to build a simple cryptocurrency blockchain in Node.js. It’s not going to be too fancy, but just sufficient to assist you to understand how a blockchain works.
I’ll call this simple cryptocurrency smashingCoin.
If you are a JavaScript developer who wants to take a leap into the burgeoning field of cryptocurrency, this article will equip you with the necessary skills to get started. Or, if you’re curious about how things work in the world of cryptocurrencies, then this tutorial may help in answering some of your questions.
Recommended reading: Understanding Subresource Integrity by Drew McLellan
Prerequisites
To follow this tutorial successfully, you’ll need to have the following:
- Node.js installed on your machine. You can download it from here;
- A code editor, such as Visual Studio Code, Sublime Text, or any other.
Let’s get started…
What Is A Blockchain?
Blockchain is the technology that powers digital currencies, such as Bitcoin and Ethereum. It is an innovative distributed public ledger technology that maintains a continuously growing list of records, referred to as blocks, which are connected securely using cryptography.
The term blockchain has earned its name because of the manner it keeps transaction data, i.e. in blocks that are connected to each other to create a chain. The size of the blockchain grows with an increase in the number of transactions undertaken.
Any valid transaction data is logged into the blockchain network, which is governed by peer-to-peer rules that the participants stipulate. For example, this data could contain the “value” of the block such as in digital currencies, a record of transactions (such as when parties exchange goods and services), or entitlement privileges such as when the chain records ownership information.
Besides the transaction data, every block may contain its own cryptographic hash (a unique identifier or digital footprint), its own nonce value (an arbitrary random number used once in cryptographic computations), the hash of the previous block, and a timestamp of recent authenticated transactions.
Since every new block should point to the previous block, if a block is incorporated into the chain without containing the right hash of the last block, it could render the entire blockchain invalid. This immutability property is key to the security of blockchains.
Furthermore, various types of consensus protocols are often applied to maintain the authenticity of the blockchain. Consensus ensures that all participants agree to the network-validated transactions.
For example, a commonly used consensus protocol is proof of work, which aims to identify a number that finds a solution to a complicated mathematical problem after completing a certain amount of computing work.
The main idea of proof work is that any participant in the blockchain network should find this number difficult to identify but easily verifiable. Consequently, it discourages spamming and tampering with the structure of the blockchain.
In the case of most cryptocurrencies, adding a new block to the blockchain requires solving a complex mathematical equation, which increases in difficulty over time as the blockchain grows. Consequently, any person who proves that they’ve done work by solving this problem is compensated with a digital currency, in a process referred to as “mining”.
How To Create A Block
Now, after introducing the blockchain technology and how it works, let’s see how we can apply the concepts in creating a block. As earlier mentioned, blocks are what interlink to each other to form a blockchain.
To create the smashingCoin currency, I’ll use JavaScript classes, which were introduced in ES6.
Ready?
Let’s get our hands dirty…
Here is the code for the CryptoBlock class:
const SHA256 = require('crypto-js/sha256');
class CryptoBlock{
    constructor(index, timestamp, data, precedingHash=" "){
     this.index = index;
     this.timestamp = timestamp;
     this.data = data;
     this.precedingHash = precedingHash;
     this.hash = this.computeHash();
    }
    computeHash(){
        return SHA256(this.index + this.precedingHash + this.timestamp + JSON.stringify(this.data)).toString();
    }
}
As you can see in the code above, I created the CryptoBlock class and added the constructor() method to it — just like it’s done in any other JavaScript class. Then, to initialize its properties, I assigned the following parameters to the constructor method:
index |
It’s a unique number that tracks the position of every block in the entire blockchain. |
timestamp |
It keeps a record of the time of occurrence of each completed transaction. |
data |
It provides data about the completed transactions, such as the sender details, recipient’s details, and quantity transacted. |
precedingHash |
It points to the hash of the preceding block in the blockchain, something important in maintaining the blockchain’s integrity. |
Furthermore, I used the computeHash method to calculate the hash of the block based on its properties, as given in the data above.
As you can see, I imported the crypto-js JavaScript library and used its crypto-js/sha256 module to calculate the hash of each block. Since the module returns a number object, I used the toString() method to convert it into a string.
To add the crypto-js library to your project, go the terminal and run the following command to install it using npm:
npm install --save crypto-js
After running the above command, the node modules directory, which contains the library and other essential files, will be added to your project’s folder.
How To Create A Blockchain
As earlier explained, the blockchain technology is based on the concept that all the blocks are chained to one another. So, let’s create a CryptoBlockchain class that will be responsible for handling the operations of the entire chain. This is where the rubber is going to meet the road.
The CryptoBlockchain class will maintain the operations of the blockchain using helper methods that accomplish different tasks, such as creating new blocks and adding them to the chain.
Here is the code for the CryptoBlockchain class:
class CryptoBlockchain{
    constructor(){
        this.blockchain = [this.startGenesisBlock()];
    }
    startGenesisBlock(){
        return new CryptoBlock(0, "01/01/2020", "Initial Block in the Chain", "0");
    }
    obtainLatestBlock(){
        return this.blockchain[this.blockchain.length - 1];
    }
    addNewBlock(newBlock){
        newBlock.precedingHash = this.obtainLatestBlock().hash;
        newBlock.hash = newBlock.computeHash();
        this.blockchain.push(newBlock);
    }
}
Let me talk about the roles of each of the helper methods that constitute the CryptoBlockchain class.
1. Constructor Method
This method instantiates the blockchain. Inside the constructor, I created the blockchain property, which refers to an array of blocks. Notice that I passed to it the startGenesisBlock() method, which creates the initial block in the chain.
2. Creating The Genesis Block
In a blockchain, the genesis block refers to the first-ever block created on the network. Whenever a block is integrated with the rest of the chain, it should reference the preceding block.
Conversely, in the case of this initial block, it does not have any preceding block to point to. Therefore, a genesis block is usually hardcoded into the blockchain. This way, subsequent blocks can be created on it. It usually has an index of 0.
I used the startGenesisBlock() method to create the genesis block. Notice that I created it using the afore-created CryptoBlock class and passed the index, timestamp, data, and precedingHash parameters.
3. Obtaining The Latest Block
Getting the latest block in the blockchain assists in ensuring the hash of the current block points to the hash of the previous block — thus maintaining the chain’s integrity.
I used the obtainLatestBlock() method to retrieve it.
4. Adding New Blocks
I used the addNewBlock() method to add a new block to the chain. To accomplish this, I set the previous hash of the new block to be equal to the hash of the last block in the chain — thus ensuring the chain is tamper-proof.
Since the properties of the new block get changed with every new calculation, it’s important to calculate its cryptographic hash again. After updating its hash, the new block is pushed into the blockchain array.
In reality, adding a new block to a blockchain is not that easy because of the several checks that have been placed. Nonetheless, for this simple cryptocurrency, it’s enough to demonstrate how a blockchain actually works.
Testing The Blockchain
Now, let’s test our simple blockchain and see if it works.
Here is the code:
let smashingCoin = new CryptoBlockchain();
smashingCoin.addNewBlock(new CryptoBlock(1, "01/06/2020", {sender: "Iris Ljesnjanin", recipient: "Cosima Mielke", quantity: 50}));
smashingCoin.addNewBlock(new CryptoBlock(2, "01/07/2020", {sender: "Vitaly Friedman", recipient: "Ricardo Gimenes", quantity: 100}) );
console.log(JSON.stringify(smashingCoin, null, 4));
As you can see in the code above, I created a new instance of the CryptoBlockchain class and named it as smashingCoin. Then, I added two blocks into the blockchain using some arbitrary values. In the data parameter, I used an object and added sender details, recipient’s details, and quantity transacted.
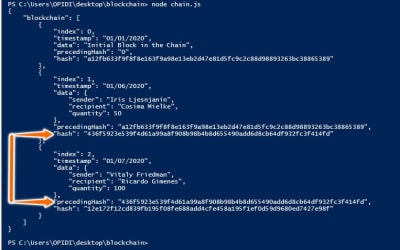
If I run the code on the terminal, here is the output I get:
That’s what the smashingCoin looks like!
It’s an object that contains the blockchain property, which is an array containing all the blocks in the chain. As you can see in the image above, each block references the hash of the previous block. For example, the second block references the hash of the first block.
After testing and seeing that our blockchain works, let’s add some more functionalities to enhance the features of the smashingCoin.
How To Verify The Blockchain’s Integrity
As earlier mentioned, a key characteristic of a blockchain is that once a block has been added to the chain, it cannot be changed without invalidating the integrity of the rest of the chain.
Therefore, to verify the integrity of the blockchain, I’ll add a checkChainValidity() method to the CryptoBlockchain class.
Hashes are critical for ensuring the validity and security of a blockchain because any change in the contents of a block will result in the production of an entirely new hash, and invalidating the blockchain.
As such, the checkChainValidity() method will make use of if statements to verify whether the hash of every block has been tampered with. Starting from the first created block, it’ll loop over the entire blockchain and check for its validity. Note that since the genesis block was hardcoded, it’ll not be checked.
Also, the method will verify whether the hashes of each two consecutive blocks are pointing to one another. If the integrity of the blockchain has not been compromised, it returns true; otherwise, in case of any anomalies, it returns false.
Here is the code:
checkChainValidity(){
        for(let i = 1; i
How To Add Proof Of Work
As earlier mentioned, proof of work is the concept applied to increase the difficulty entailed in mining or adding new blocks to the blockchain.
In the case of smashingCoin, I’ll employ a simple algorithm that deters people from generating new blocks easily or spamming the blockchain.
So, in the CryptoBlock class, I’ll add another method called proofOfWork().Essentially, this simple algorithm identifies a number, passed as a difficulty property, such that the hash of every block contains leading zeros that correspond to this difficulty level.
Ensuring the hash of every block begins with the number of zeros as set in the difficulty level requires a lot of computing power. The higher the difficulty level, the more time it takes to mine new blocks.
Furthermore, I’ll add a random nonce value to every hashed block such that, when rehashing takes place, the difficulty level restrictions can still be met.
Here is the code:
proofOfWork(difficulty){
      while(this.hash.substring(0, difficulty) !==Array(difficulty + 1).join("0")){
          this.nonce++;
          this.hash = this.computeHash();
      }
  }
And, here is the updated computeHash() method with the nonce variable included:
computeHash(){
        return SHA256(this.index + this.precedingHash + this.timestamp + JSON.stringify(this.data)+this.nonce).toString();
    }
Additionally, to implement the proof of work mechanism in the generation of new blocks, I’ll include it in the addNewBlock() method:
addNewBlock(newBlock){
      newBlock.precedingHash = this.obtainLatestBlock().hash;
      //newBlock.hash = newBlock.computeHash();
      newBlock.proofOfWork(this.difficulty);
      this.blockchain.push(newBlock);
  }
Wrapping Up
Here is the entire code for building the smashingCoin cryptocurrency using Node.js:
const SHA256 = require("crypto-js/sha256");
class CryptoBlock {
constructor(index, timestamp, data, precedingHash = " ") {
this.index = index;
this.timestamp = timestamp;
this.data = data;
this.precedingHash = precedingHash;
this.hash = this.computeHash();
this.nonce = 0;
}
computeHash() {
return SHA256(
this.index +
this.precedingHash +
this.timestamp +
JSON.stringify(this.data) +
this.nonce
).toString();
}
proofOfWork(difficulty) {
while (
this.hash.substring(0, difficulty) !== Array(difficulty + 1).join("0")
) {
this.nonce++;
this.hash = this.computeHash();
}
}
}
class CryptoBlockchain {
constructor() {
this.blockchain = [this.startGenesisBlock()];
this.difficulty = 4;
}
startGenesisBlock() {
return new CryptoBlock(0, "01/01/2020", "Initial Block in the Chain", "0");
}
obtainLatestBlock() {
return this.blockchain[this.blockchain.length - 1];
}
addNewBlock(newBlock) {
newBlock.precedingHash = this.obtainLatestBlock().hash;
//newBlock.hash = newBlock.computeHash();
newBlock.proofOfWork(this.difficulty);
this.blockchain.push(newBlock);
}
checkChainValidity() {
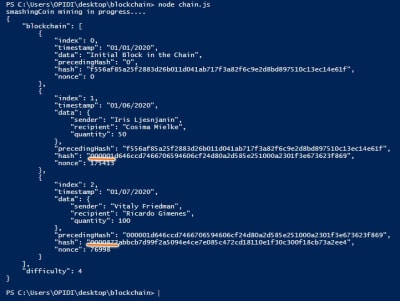
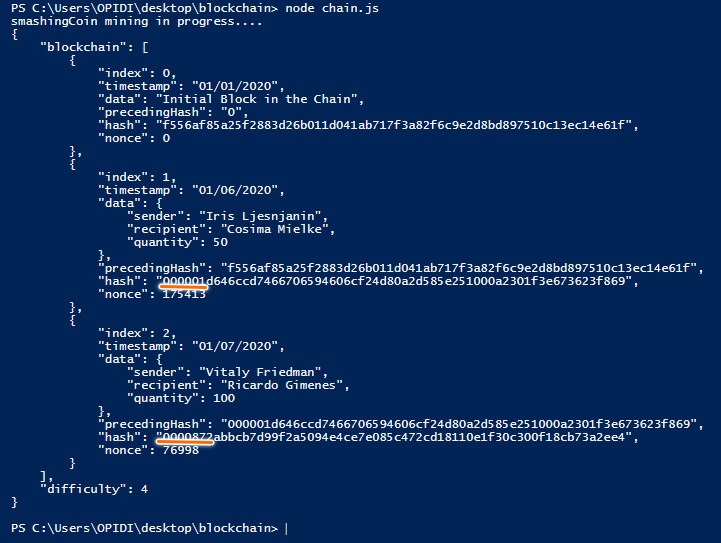
for (let i = 1; i If I run the code on the terminal, here is the output I get:
smashingCoin cryptocurrency! (Large preview)
As you can see on the image above, the hashes now start with four zeros, which correspond with the difficulty level set in the proof of work mechanism.
Conclusion
That’s it! That’s how you can build a simple cryptocurrency blockchain using Node.js.
Of course, the smashingCoin cryptocurrency is far from complete. In fact, if you release it without making more improvements, it is unlikely to meet the current market demands for a secure, reliable, and intuitive digital currency — making you the only one using it!
Nonetheless, I hope that this tutorial has equipped you with some basic skills to get your feet wet in the thrilling world of cryptos.
If you have any comments or questions, please post them below.
Further Resources
- “Blockchain 101,” CoinDesk
- “Bitcoin: A Peer-to-Peer Electronic Cash System,” Satoshi Nakamoto, Bitcoin.org
(dm, il)
From our sponsors: How To Build A Simple Cryptocurrency Blockchain In Node.js


